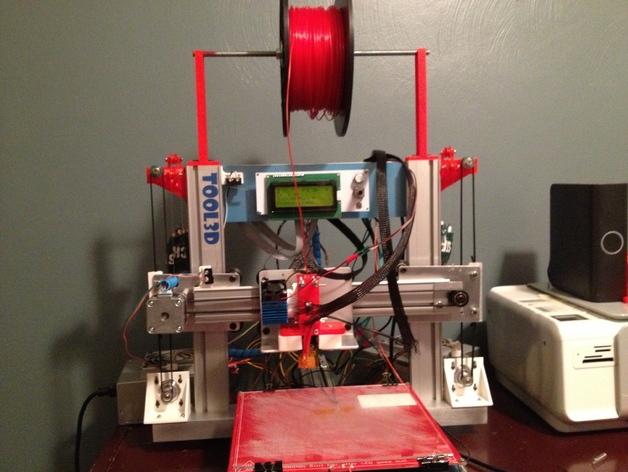
Ord Bot Z-Axis Conversion to Belt Drive
thingiverse
I had problems with my ord bot lead screws causing my motors to grind and get out of sync. I had experience with a belt drive delta bot so I wanted to make the switch to make my z-axis belt drive. It's working pretty smooth. The only real drawback is that the gantry will fall once the motors are un-powered so I still need to design flip out rest for it at the top. I've posted the stl files as well as the scad files. My motors actually atach to aluminum angle with holes meant for the original setup. The belt clamp should bolt right to a z-lift block hole. You might need to drill the other one out though from the gantry plate. Let me know if you have any questions! Advantages of belt driven Z-axis: Fast response for max z endstop homing Better suited for autoleveling (in my opinion) Zero z-wobble No need for lubrication and less noise as a result. I have posted a couple images of a 20 hr print of a large football helmet that demonstrates good looking layers at 0.2 mm layer height. **Update: Added a mashup of http://www.thingiverse.com/thing:43069 with my current motor bracket so it will work with misumi, as recommended by blah_59. Here's videos of the first tests and printing:https://www.youtube.com/watch?v=OvG_cZWBxVkhttp://www.youtube.com/watch?v=Z6Kx2tsMY4Ihttp://youtu.be/4NoBIgc69HM **Make sure to hook up z-axis motors separatley and reversed. I hooked them both up in the same direction and fried a driver due to the motors working against each other!*** Update-03/10/14: I have now implemented a counter balance pulley system using 2 lbs of lead sinkers and 30 lb test fishing line. I've posted the updated files. Credit goes to whosawhatsis http://www.thingiverse.com/thing:3970 for the printed idler pulleys. Instructions There are two versions of the motor bracket and two versions of the idler bracket. The one version of the motor bracket will work on the misumi which is found on most ord bots. The gantrys on other ord bots might stick out farther so there is a standard and extended version of the idler. What's needed: 4-6 x 4mmx8mm screws for idler brackets 4-6 x 4mm T slot nuts 6 x 4mm washers 2 x 4mm x 40 mm screws 4 x 624zz bearings (only two would be needed if you using printed pulleys 2 x 6mm GT2 belt 2 x GT2 20 tooth pulleys 4 x 1/8" or 3mm rods for locking belt loops in clamp 4 x 5mmx12mm screws 4 x 5mm nuts (could add two more to gantry plates for strength 8x3mm screws for motors mounting screws for motor brackets to frame
With this file you will be able to print Ord Bot Z-Axis Conversion to Belt Drive with your 3D printer. Click on the button and save the file on your computer to work, edit or customize your design. You can also find more 3D designs for printers on Ord Bot Z-Axis Conversion to Belt Drive.
