Original Apple logo in 3D
thingiverse
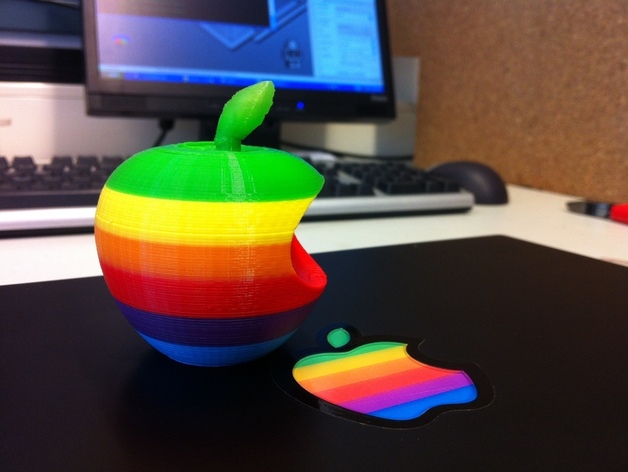
The original Apple logo, like you have never seen before! In the instructions, an ingenious way of getting the color layers right is explained, credits go to "zeq" for this. go to : embedables.wordpress.com for more information on the purpose of this thing Instructions Print in the right color combination for the complete experience! If you don't have all the colors at hand, buy them from a supplier that has them. For example , faberdashery.co.uk has a Rainbow fun pack with 10 colors. When using the provided g-code, if you want to get the width of each color in your print to be exactly equal and a 6th of the total height, and you have an Ultimaker with a 0.4mm nozzle, use the provided handy filament cutting sheet, or just the dimensions on it. This will make a nicely sized(63mm high)decorative object. However, if you want to do this with anything else than the above mentioned setup, do the following, 1) Measure the amount of filament that your machine takes in per E's in your g-code. Do some experiment like, making the machine push 1000E's, 500E's or 5000E's, and look at the mm's of filament that went in the exturder. Now you know how many mm goes in say, 1000E's 2) Generate g-code for the thing(note that you need a fill for this print, especially to support the stem.), open it and look at the Z number at the last lines and note this down. This is how high your object is going to be in mm's. 3) Do the following calculation (total height of object) / 47 x 6 = the width of each color for your object. 4) Now that you have the height for each color, you can determine at what height in your object they are going to start. Note down the starting heights of each color. 5) Next, you can look again at the Z numbers in your g-code. First, find the point where Z is the closest to the width of your first color. For example, if the width is 8.04mm, look for something like 8.02 or 8.06. Just find the closest one. 6) When you find the right Z number, look at the E number behind it. Note this down. 7) Repeat step 6 until the green color. Note down each E number behind the corresponding Z number. 8) Calculate the difference in E numbers for each color layer. 9) Finally, divide these differences in E numbers by the mm/E that you calculated in step 1. This will give you the length of filament for each color. 10) Cut the filaments in the correct size and preferably join them before printing by your favorite method of choice. If you haven't done this before, look around a bit for how people do it. Note: Actually, you don't want to cut the green, because if you do, you will have the risk of running out of filament for your print because of the small miss-calculations. Also, if using a Bowden tube, you will need more filament to push the green to the hot-end anyway. 11)Print away!
With this file you will be able to print Original Apple logo in 3D with your 3D printer. Click on the button and save the file on your computer to work, edit or customize your design. You can also find more 3D designs for printers on Original Apple logo in 3D.