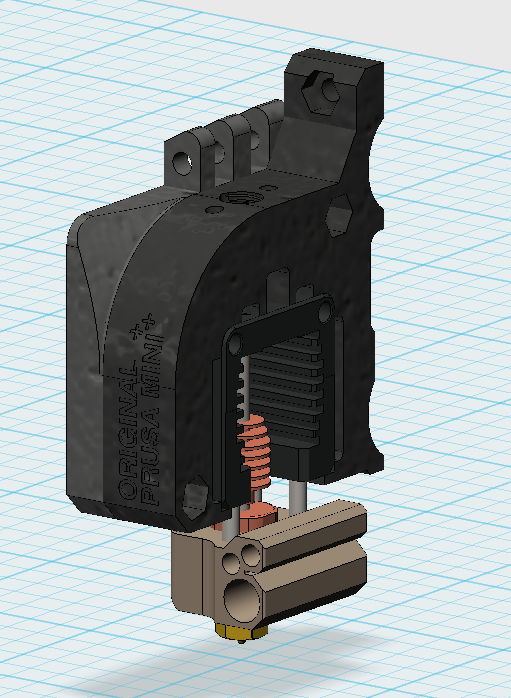
Original Prusa Mini ++ Mosquito Conversion
prusaprinters
<h3>Print instructions</h3><p>Print this with the visible side down, so you get that nice textured look whenever you stare at your prints as they happen. You shouldn't need any supports, as I designed the holes like Prusa does.</p><p>20% infill (I use gyroid because it reminds me of Animal Crossing and looks cool)</p><p>PETG or higher heat resistance material should be perfect. You might get away with PLA, but I'm not sure I'd chance it.</p><p> </p><p><strong>Update Jan 10 2022</strong></p><p>If this support included version doesn't print right, I'll remove it. I'll also very likely change the support in the power and ethernet port, since I have no idea what I was thinking supporting some of that circular hole…</p><ul><li>added a version of the control box with with built-in supports since I couldn't get Cura to do what I wanted it to</li></ul><figure class="image image_resized" style="width:75%;"><img src="https://media.prusaprinters.org/media/prints/50708/rich_content/c531a572-b374-4b9d-ab06-70a0ee59c93d/capture.png#%7B%22uuid%22%3A%223c92b7e8-3d34-47d5-903e-f0fbc365ba20%22%2C%22w%22%3A672%2C%22h%22%3A495%7D"></figure><p> </p><p><strong>Update Jan 9 2022</strong></p><p>Putting the box on the rail, I found out that even when completely tightened, the slide-in t-nuts are not putting any pressure on the extrusion at all, meaning the box can slide around as it pleases. So this is still the R8 D6 revision, but just edited that part. I'm hoping this fixes it, since the box is around 10 hours to print for me.</p><figure class="image image-style-align-center image_resized" style="width:75%;"><img src="https://media.prusaprinters.org/media/prints/50708/rich_content/14b1096a-8278-47fe-a02d-f21b46af2661/capture.png#%7B%22uuid%22%3A%226230fb91-194c-409e-b018-e760820055c2%22%2C%22w%22%3A1194%2C%22h%22%3A692%7D"></figure><ul><li>Added my restyled front Y-axis piece (with MMU insert). It's 1mm taller to help with the M5 screw pockets.</li><li>Speaking of screw pockets, they're adjusted for low profile M5's for added slickness. You can still use the originals, of course.</li></ul><p> </p><p><strong>Update Jan 6 2022</strong></p><ul><li>adjusted square nut holes on z-bottom to fit the thicker style instead of absolutely having to reuse the thin ones from the original</li><li>updated to the R8 style bottom</li><li>removed the wall between the ethernet and power port, as it seems to break every time I'd tried to print it except once</li><li>adjusted a couple port hole positions</li></ul><p>Supports as you see fit. I would recommend all the bridges honestly.</p><figure class="image image-style-align-center image_resized" style="width:75%;"><img src="https://media.prusaprinters.org/media/prints/50708/rich_content/e5dae378-1828-431b-880b-78d7cb4bc533/capture.png#%7B%22uuid%22%3A%2261d51812-2344-4284-b702-cd8a9d4f74fd%22%2C%22w%22%3A893%2C%22h%22%3A655%7D"></figure><p> </p><p><strong>Update Jan 31 2021</strong></p><ul><li>made the holes for the hex nuts smaller to promote better hold under torque</li><li>added relief cut on the M6 hole, as threading may result in splitting the model on version D1</li><li>resized the D1 on the fan spacer, since it printed a touch too small</li><li>added some extra padding and adjusted hex nut and square nut holes on the Z bottom</li><li>added some more fun design to the Z bottom</li></ul><figure class="image image-style-align-center image_resized" style="width:75%;"><img src="https://media.prusaprinters.org/media/prints/50708/rich_content/6daf30ed-eb66-4807-b731-360e958a3125/capture.png#%7B%22uuid%22%3A%22a83bf465-f20b-4dc9-a810-c50828626cb6%22%2C%22w%22%3A1242%2C%22h%22%3A733%7D"></figure><figure class="image image_resized" style="width:75%;"><img src="https://media.prusaprinters.org/media/prints/50708/rich_content/9cc98fdb-fa36-4645-8700-07e66a8879b7/capture.png#%7B%22uuid%22%3A%22be49114f-e6e9-4468-a5fd-59d2eaed209c%22%2C%22w%22%3A1031%2C%22h%22%3A477%7D"></figure><p> </p><p><strong>Update:</strong></p><ul><li>added version numbers (everything is D1 right now)</li><li>uploaded new Z bottom to counteract 5.6mm shift in nozzle position</li><li>uploaded notched fan duct for heatsink clearance</li></ul><figure class="image image_resized" style="width:75%;"><img src="https://media.prusaprinters.org/media/prints/50708/rich_content/320447d4-0906-426e-9a33-149e0bde9928/capture.png#%7B%22uuid%22%3A%2237c4d473-ef50-47d3-be77-77834a54268a%22%2C%22w%22%3A823%2C%22h%22%3A359%7D"></figure><p>The new Z bottom should print better now, as I removed the unnecessary overhangs on two parts of it. The cutout for the pad might not need supports, but you should probably do supports on the big cutout.</p><p>I loved the idea of having the original look of the Prusa Mini heatsink, but it's missing the text, and a couple other Prusa style features.</p><p>I HAVEN'T PRINTED THIS YET, BUT WHEN I DO, I'LL POST REAL PICTURES, AND ADJUST AS NEEDED.</p><p>For this remix:</p><ul><li>fixed the alignment for the allen wrench access holes</li><li>added Prusa style holes, so you can print on the show side without supports</li><li>added "ORIGINAL PRUSA MINI ++" to appeal to my aesthetics</li><li>changed the fitting to a PC4-M6 style</li></ul><p>I would use the through style for the fitting, as that will keep you from having to use two pieces of PTFE on the hotend... end. Same for the extruder end for that matter.</p><p>I'm hoping this is going to be the end-all beat-all version of this mount!</p>
With this file you will be able to print Original Prusa Mini ++ Mosquito Conversion with your 3D printer. Click on the button and save the file on your computer to work, edit or customize your design. You can also find more 3D designs for printers on Original Prusa Mini ++ Mosquito Conversion.