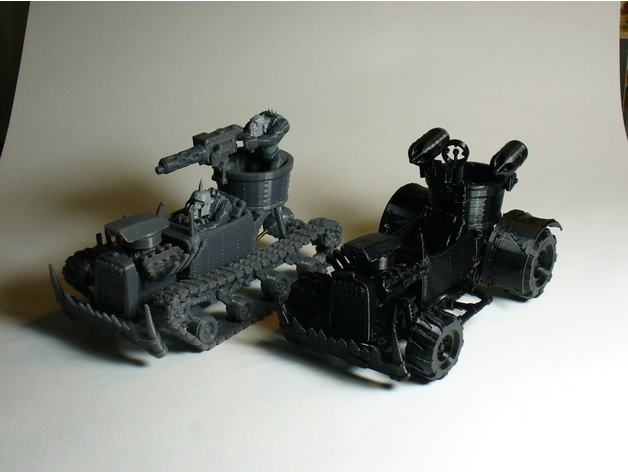
Ork Warbuggy and Wartrakk
thingiverse
The Warbuggy and Wartrakk are easily the two worst models still used in Warhammer 40K. I made these as replacements. The Engine Folder is common to both models with the exception of the exhaust systems - for a warbuggy just print the warbuggy cylinder heads and for a wartrakk print either the warbuggy cylinder heads or the plain cylinder heads and the wartrakk zoomies. The zoomies don't fit on the warbuggy. The vehicle drive shafts are not included and you'll need to supply some thin rod for them. Once you've printed a vehicle then add a weapon and possibly some extra armor plating. You will also need two GW ork Torsos and two GW ork heads to complete this. NEW! INSTRUCTIONS! The warbuggy frame in the zip file is an old version. Use the one that's not in the zip file. How to assemble the Warbuggy:https://imgur.com/a/CVT2Uzw How to assemble the Wartrakkhttps://imgur.com/a/IsleZnt How to assemble the Big Shoota:https://imgur.com/a/0ienk8x How to assemble the Scorcha:https://imgur.com/a/fy2mhF5 How to assemble the Rokkit Launcher:https://imgur.com/a/UqymqjY How to add the armor plates:https://imgur.com/RAhQXdz Print Settings Printer Brand: Printrbot Printer: Printrbot Plus Rafts: Yes Supports: Yes Notes: The intake manifold requires a larger raft to keep it stuck down when the print head inevitably catches on one of the tubes. Probably couldn't hurt to use a larger raft on the zoomies either.
With this file you will be able to print Ork Warbuggy and Wartrakk with your 3D printer. Click on the button and save the file on your computer to work, edit or customize your design. You can also find more 3D designs for printers on Ork Warbuggy and Wartrakk.