Ottawa River Model Railroad Bridge
prusaprinters
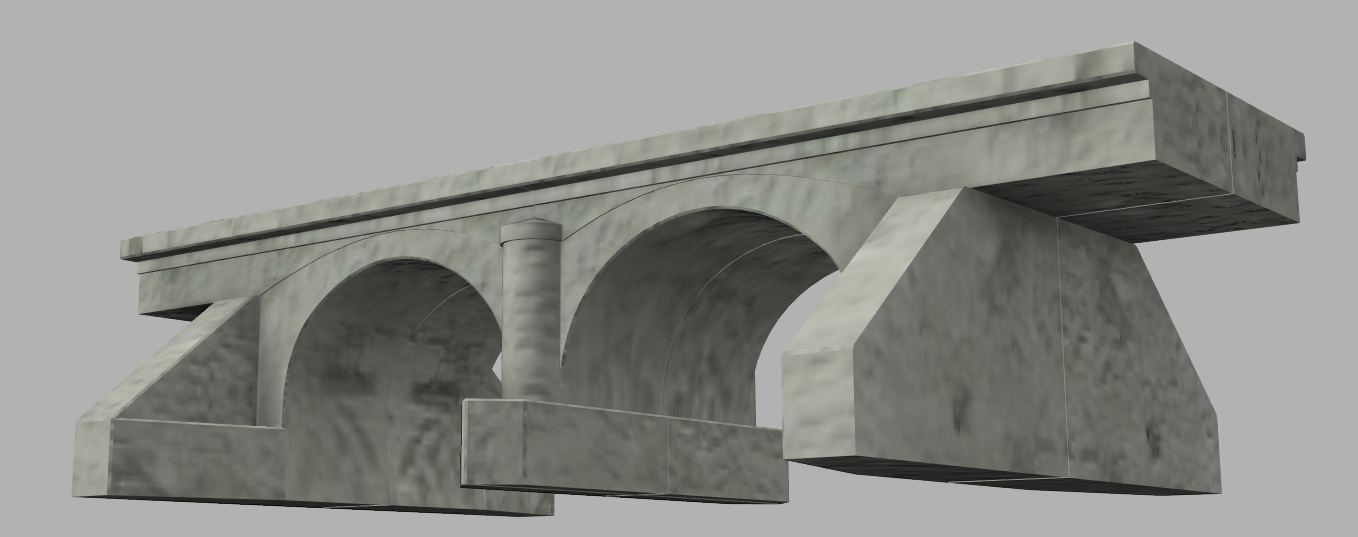
<p>Ottawa River Railroad Bridge<br><br>This is an HO scale model of the two track concrete arch bridge of traditional design that carries the Norfolk Southern tracks over the Ottawa River in Toledo, Ohio. The model was developed using information from HistoricBridges.org and Google Maps in Fusion 360. The construction date of the bridge is unknown, but could be over a 100 years old, and is still in service.<br><br>For more information and photos of the bridge, follow this link:<br><br><a href="https://historicbridges.org/bridges/browser/?bridgebrowser=ohio/toledorrarch/">https://historicbridges.org/bridges/browser/?bridgebrowser=ohio/toledorrarch/</a></p><p>More information on concrete arch bridges built during the early 1900's, follow this link:<br>https://www.roads.maryland.gov/OPPEN/IX-CABr.pdf<br><br>The bridge in HO scale is 1' 3 1/4" (400 mm) long, 4 5/8" (118.5 mm) wide, and 4" (100 mm) tall. Suggested print settings in PrusaSlicer are PLA+, 7% gyroid infill, 3 shells, 5 top and 3 bottom, variable layer height (adaptive, high quality), enable ironing, all top surfaces (7% ironing flow rate). PrusaSlicer estimates about 760 grams of filament is needed with these settings. Don't print the dowels with ironing or you will have to sand them down (although some needed a little sanding to fit anyway).<br><br>This is the first of three railroad bridge models that I made as an exercise to learn Fusion 360. The idea is to make bridges that can be printed on a Prusa i3 mk3 with reasonable quality. Layer lines are a significant detriment to model quality, and it seems that most steel prototype bridges cannot be 3d printed with reasonable detail. These models are designed to be printed with the side of the bridge as the top surfaces on the print bed. This way the visible face of the bridge has the highest quality. The layer lines are under the arch between pieces, and on the trackbed surfaces. The trackbed surface is flat and easily sanded. Also, as you can see from the photographs of the prototype, with this type of bridge the tracks are installed with ballast between the ties, so most of the trackbed is covered anyway. By modeling this style of bridge and printing in this way, the surfaces with layer lines are easily sanded smooth and are mostly hidden.<br><br>Since the model has to be split along the centerline to allow both sides to be printed facing up, and the model is too long for the print bed, the model is one quadrant. It is symmetric, so two of the original and two mirror images need to be printed. I included a hexagonal dowel and matching holes for ten alignment dowels. The mating surfaces should be sanded, and then I used epoxy on my test piece for gluing the pieces together. I put a thin layer of epoxy on both surfaces, gluing the sides together first. See attached photo for one side being glued. It needed to be held lightly with clamps. Since I didn't have a clamp long enough and wanted a flat surface to hold it straight, I made the wooden clamp on the bottom with scrap wood. When the epoxy had set but was not fully hardened I trimmed off the excess with a razor knife. The ironing of the top surfaces worked really well on the test pieces I printed, basically eliminating having to sand around the details on the side of the bridge. I used a nail file to round the center pillar. In retrospect by sanding the layer lines off the surfaces that I glued together there was no need for epoxy, any glue would have worked.<br><br>This style of bridge is easy to model in 3D CAD because of its simple geometric shapes, but that makes it less visually interesting than a steel bridge. While I think it adds interest to a layout to have multiple styles of bridges, and this style is under-represented (probably because it is not conductive to injection molding used in commercial kits) It would really benefit from a well done paint job (i.e. weathering) that highlights its features and breaks up the solid surfaces.<br><br>I have not printed the full bridge in HO scale. I just don't have space for a layout right now. The photo is of a test model I printed in N scale (scaled in Prusa Slicer by 54.375%), and took 150 grams of filament and 16 hours to print. I did several test prints of small pieces of the three bridges and found that the 7% gyroid has the same infill weight as 10% adaptive cubic, and had less print-through of the fill. These prints are silly strong, I could stand on one piece with all my weight. I also found that the default ironing flow setting of 15% was a little too much, so I changed it to 10% and it looks less smooshed, and then to 7% and it is just barely enough to smooth out the surface, but not so much to round over the edges. I used 3DFuel Re-Fuel Pro PLA, which is recycled PLA+. It printed well, and the color isn't important since I would paint it anyway. In sprayed a light coat of white paint on the test model so it would photograph better. These are my experiences, and it makes sense to do some test prints of small pieces of the model and fine tune your settings with your printer and your filament before committing to the final prints.<br> </p>
With this file you will be able to print Ottawa River Model Railroad Bridge with your 3D printer. Click on the button and save the file on your computer to work, edit or customize your design. You can also find more 3D designs for printers on Ottawa River Model Railroad Bridge.