Outfeed Roller Top for ZAG Folding Sawhorse
thingiverse
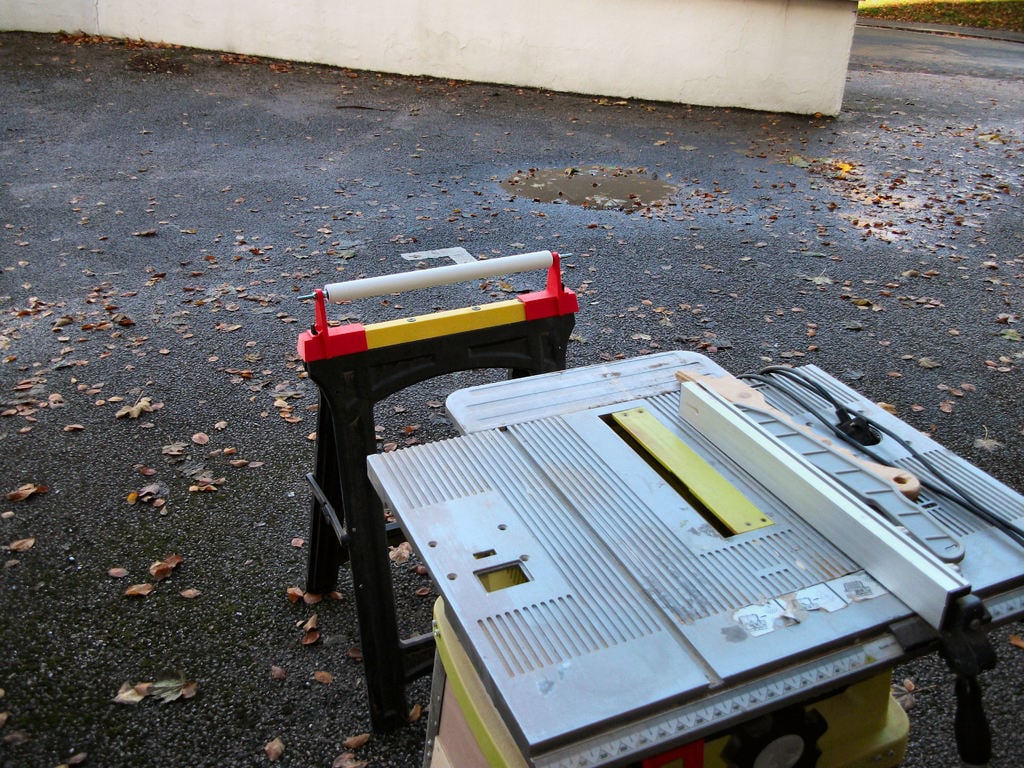
Small update: Having used this for a while now, I made the following experience-based change: I would recommend splitting the roller into two or more pieces (with the relevant quantity of extra bearings and holders, obviously!). This helps with handling the workpiece on the odd occasion where you didn't quite get the roller square to the table. _____________________________________________________ This is a simple saw table outfeed roller, designed to sit on the top of a ZAG folding sawhorse. I have a Ryobi circular saw table. It wasn't new when I bought it, and it's had quite a hard life. But as a keen woodworker it's an absolute Godsend in the workshop, and I love it to bits (especially since I've sorted the "stop" button - see my other designs). With a tool like this, safety is paramount. My grandfather lost two fingers on a saw table, and didn't realise until he waved goodnight to his boss! (For those outside the UK :The V-sign means "F... off" or "F... you" over here) So, back to the point: Anyone with a portable saw table will tell you that handling long boards, solo, is a nerve-wracking experience. As the timber passes off the back edge of the table top, gravity comes into play. The rear edge of the table becomes a fulcrum, and the workpiece behaves like a see-saw by trying to raise the part of the workpiece nearest to the front of the table - exactly at the moment your fingers are closest to the blade. I had a couple of ZAG sawhorses I bought about 15 years ago, some inch and a quarter waste pipe, some (very) cheap and nasty 608 bearings, some threaded rod, and a 3D printer. If only there were some way to put these together to make some sort of rolling support to carry the workpiece when it leaves the back of the saw table!! It turns out there is; Print two bearing-carriers to slide into the ends of the waste pipe, and insert the bearings. Then put the threaded rod through the bearing centres and secure each side with a washer and locking nut, adjusting so the pipe spins freely. Now print two saddles, one for each end of the sawhorse. The saddles are designed to fit into the hinged board holders found on the top of the saw horse, and (hopefully) won't need any other fixings. Now print two saddle-riders to hold the ends of the threaded rods. Bolt these to the saddles using captive nuts (and a bit of glue if you feel like it). Add two more locking nuts to hold these assemblies each end of the threaded rod, and... Job done! I designed the saddles to take cheese-head bolts. But when I went to assemble things, I realised I hadn't got any! So I hacksawed a slot into each bolt head. Not ideal, but it worked. So I'm calling that a win! It seems to work well (although I have only tested it on lightweight wood, so far). When not in use, it simply lifts off, and can be stored in a convenient location. There is also a far better, and entirely unforeseen, benefit: I can now say, with complete honesty, that I keep a roller in my garage!
With this file you will be able to print Outfeed Roller Top for ZAG Folding Sawhorse with your 3D printer. Click on the button and save the file on your computer to work, edit or customize your design. You can also find more 3D designs for printers on Outfeed Roller Top for ZAG Folding Sawhorse.