Outrigger: Two Wheeled Electric Skateboard
prusaprinters
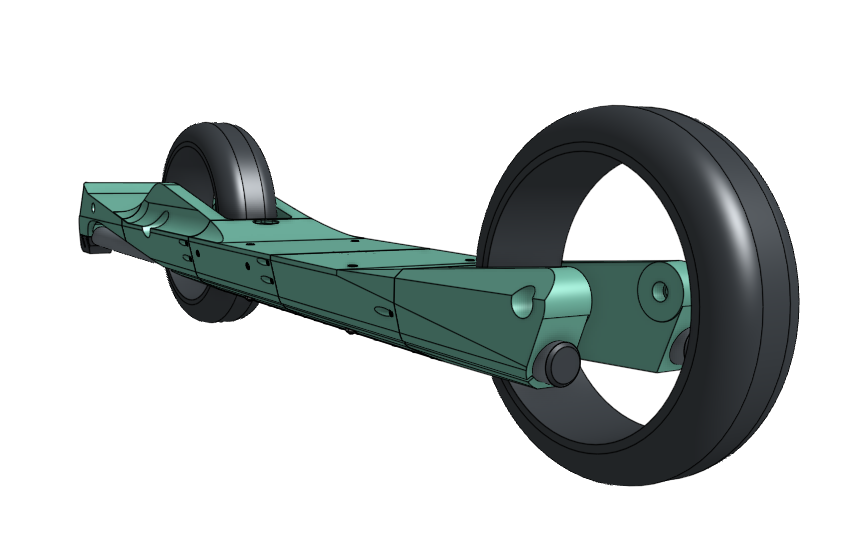
<p>Say hello to the <strong>Outrigger</strong>, a Xiaomi Mi m365 conversion! I found a broken e-scooter in a dumpster and decided to give it a second life. </p><p> </p><p>From tip to tip the board is 980mm, it has a 250w motor, and is designed to be printed entirely on a Prusa Mk3s.</p><p> </p><p>Also, accessory is defined as: “a thing which can be added to something else in order to make it more useful, versatile, or attractive." Just saying… this totally fits.</p><p><strong>Electronics</strong></p><p> </p><p>The 36v battery and 250w hub motor are both taken from the e-scooter. The <a href="https://www.amazon.com/gp/product/B07WT183JN/ref=ppx_yo_dt_b_asin_title_o06_s00?ie=UTF8&psc=1">esc</a> is for 10s batteries and can be purchased from amazon. I hope to integrate lights into the project at a later date.</p><p> </p><p><strong>Printing</strong></p><p> </p><p>In the download you will find 13 stl files, some of which need to be printed multiple times. None of the prints require support. I used a 0.4 nozzle and 0.2 layer height for every print. You will need about a spool and a half of petg to make the board.</p><p> </p><p>The main frame is made up of five parts, all of which I printed with petg, and 20% infill. The files labeled 2nd, 3rd, 5th were printed with 3 perimeters and the files labeled 1st and 4th were printed with 5 perimeters. </p><p> </p><p>The battery and esc covers were printed in petg with 20% infill and 2 perimeters.</p><p> </p><p>Nub.stl and NubMirror.stl are designed to be consumable so that when the pair wears out they can be replaced. I recommend printing with 100% infill out of an abrasion resistant material like abs or nylon to improve durability.</p><p> </p><p>BoltCover.stl and TubeCover.stl need to be printed four times each and are cosmetic so any settings are acceptable. </p><p> </p><p><strong>Assembly</strong><br> </p><p>Tools Needed:</p><ul><li>Soldering Iron</li><li>Drill</li><li>Pipe Cutter</li><li>Allen Keys</li><li>18mm Socket</li><li>Dash of Patience</li></ul><p> </p><p>Hardware needed:</p><ul><li>4x M4x35mm Bolt</li><li>4x M4 Nylock Nut</li><li>4x M4x10mm Bolt</li><li>4x M4 Shallow Threaded Insert</li><li>14x M3x8mm Socket Bolt</li><li>8x M3x5mm Martini Bolt</li><li>26x M3 Threaded Insert</li><li>62x M2x5mm Socket Bolt</li><li>62x M2x5mm Martini Bolt</li><li>70x M2 Threaded Insert</li><li>2x M3x25mm Rod</li><li>2x 3/4inx885mm Electrical Conduit</li></ul><p> </p><p>Consumables Needed:</p><ul><li>Thread Lock</li><li>Silicone Sealant</li><li>Epoxy</li><li>Super Glue</li><li>1.5 kg of PETG</li><li>Grip Tape</li></ul><p> </p><p>You will also need to keep the nuts, washers and plates from the m365 wheel assemblies to attach both wheels to the board.<br> </p><p>Inserting all of the threaded inserts should be simple as long as you match them based on size. Be careful about getting the angle right with the pocket hole inserts. </p><p> </p><p>The two holes that connect the top of 2nd and 3rd are for the M3x25mm rods. This is to add a bit of strength to the top of the board. I recommend adding a bit of epoxy to these to keep them in place.</p><p> </p><p>You may need to sand down the BoltCovers and TubeCovers and/or apply a bit of super glue before inserting.</p><p> </p><p>The two holes for M3 threaded inserts on the sides of 3rd are for carrying straps that I hope to add in the future.<br> </p><p>Good luck, happy printing and riding!</p><p> </p><p><strong>Disclaimer</strong></p><p>This is a work in progress and I am still testing and tweaking the design. The two wheeled design is also very unconventional and doubtlessly will come with a steep learning curve. Make and use at your own risk. Please wear a helmet! </p><p> </p><p> </p>
With this file you will be able to print Outrigger: Two Wheeled Electric Skateboard with your 3D printer. Click on the button and save the file on your computer to work, edit or customize your design. You can also find more 3D designs for printers on Outrigger: Two Wheeled Electric Skateboard.