Overcomplicated Variable Torque Wrench Ratchet
prusaprinters
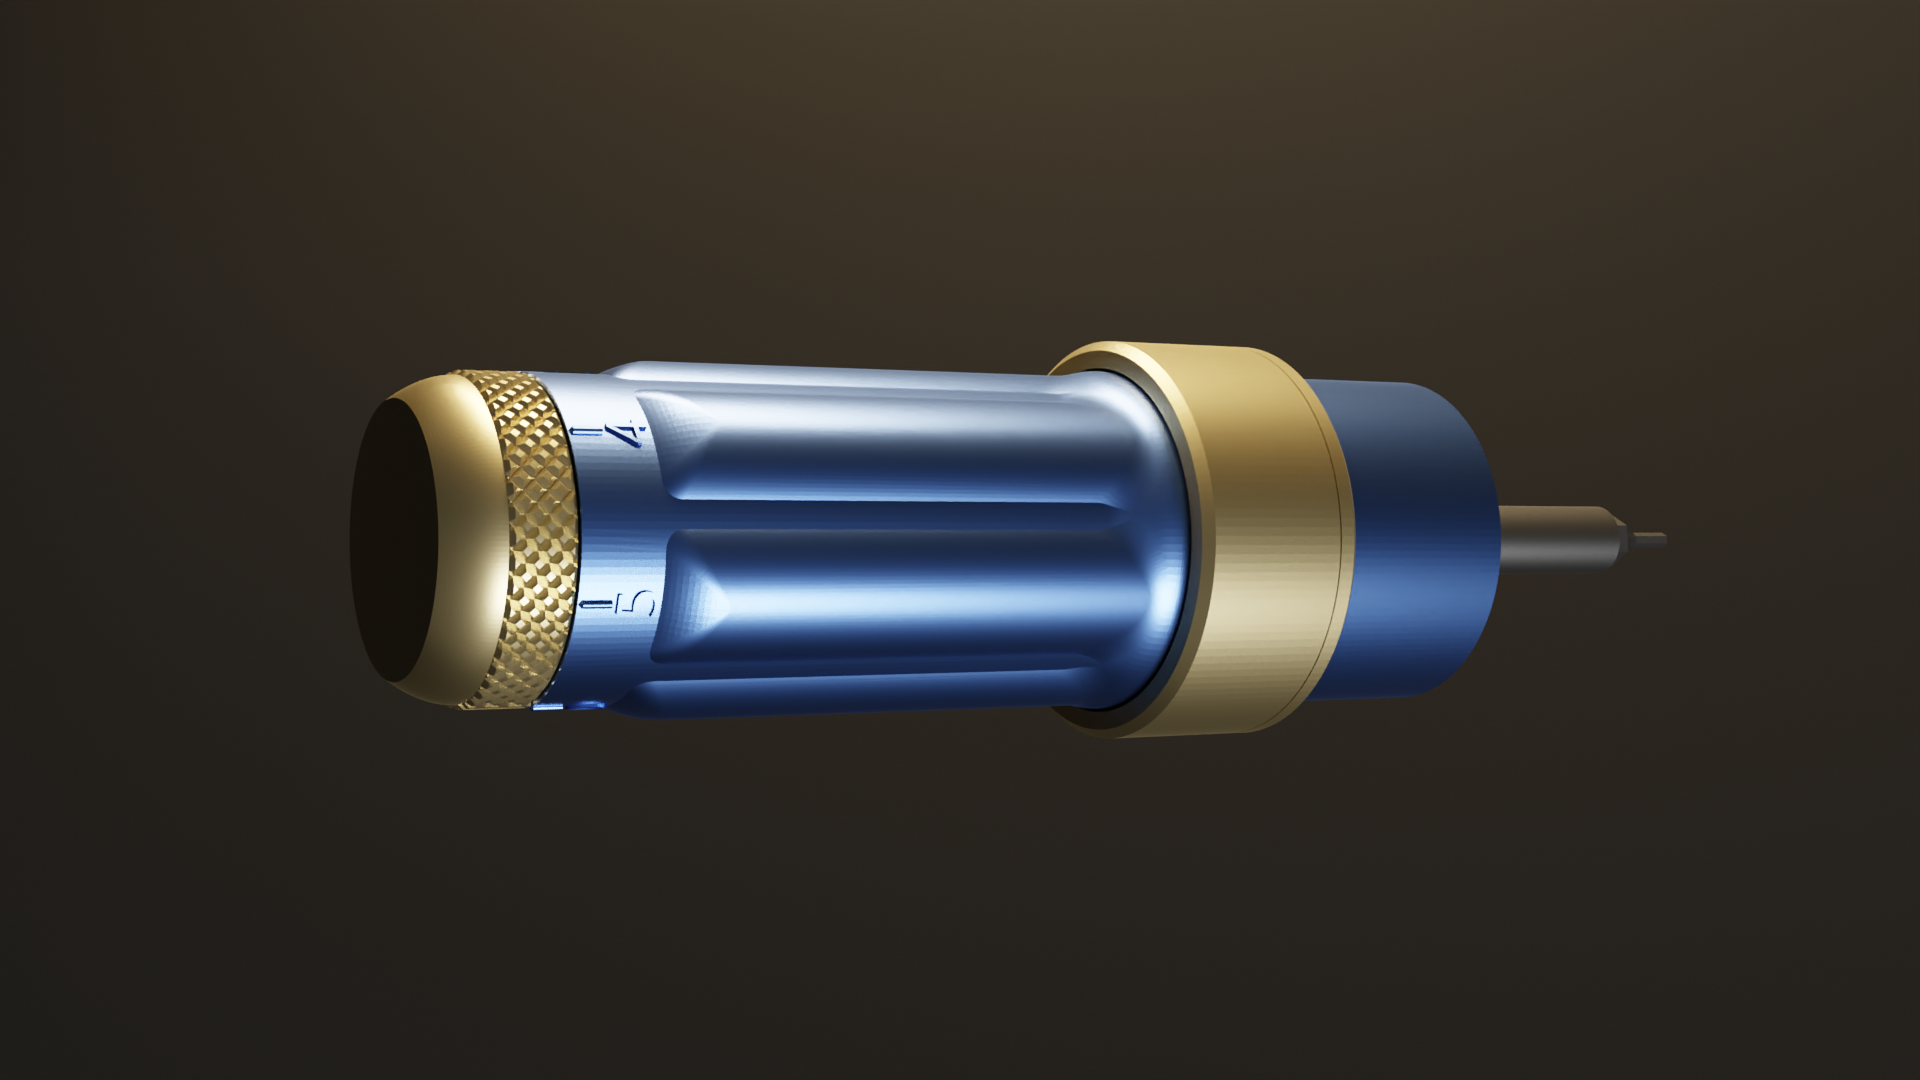
<p>REMEMBER: do not leave torque wrench in preload state. Always unscrew cap to 0 position or below when not in use. It is usual practice using torque wrenches.</p> <p>UPDATE 2020-04-19 added more constant and variable thicknes springs.</p> <p> <figure class="media"> <oembed url="https://www.youtube.com/watch?v=NHQN-asuM1A"></oembed> </figure> </p> <p>As most of my printed parts use M3 hex screws, I got tired of using hex L-key. So decided to make torque wrench for light use.<br/> With default 1.8mm thick spring it works in range of 0.39 - 1.06Nm (depending on PETG manufacturer spring stiffness will vary). You can switch springs if needed to change Nm range. Now I only included 1.8mm and 2.05mm springs. Will upload more springs. Designed variable thickness springs across its length which gives wider range like example 0.5-2.5Nm.<br/> I tested torque wrench mechanism, it can withstand 3Nm load, but since I added ratchet mechanism later and didn't had a chance to test it. So it probably is a weaker point and might break at that point. I doubt anyone needs so much torque, with 3.5Nm I squished 3D printed part and M4 screw itself.</p> <p>Wrench uses 3x 6000ZZ 10x26x8mm bearings, 2x M3 50mm buttonhead bolts and 2x M3 nuts, everything else is 3D printed.<br/> This is probably useless tool for most of the makers as it is pretty bulky, but I hope someone will make some use of it.<br/> This is second gen of wrench, first gen was 2 times shorter, without wide front but lacked ratchet function.</p> <p>Designed to avoid using supports as much as possible.</p> <p>Feel free to ask.</p> <h3>Print instructions</h3><p>Parts BOM below. It's noted which parts has to be printed with PETG.<br/> As I printed all parts from PETG. I included 3 gcode files, each of them has different parts set, Set1 parts with supports, Set2 parts with brim, Set3 parts without supports and brim. I used textured bed sheet.</p> <p>Assembly video: <a href="https://www.youtube.com/watch?v=opOk2o8NLI0">https://www.youtube.com/watch?v=opOk2o8NLI0</a></p> <p>BOM link: <a href="https://docs.google.com/spreadsheets/d/1kFQk56aX42L3CyWq5Kztgkbw85gURGIeB6PzmdoBpio/edit?usp=sharing">https://docs.google.com/spreadsheets/d/1kFQk56aX42L3CyWq5Kztgkbw85gURGIeB6PzmdoBpio/edit?usp=sharing</a></p> <p>Filament Quantity Name<br/> ¯_(ツ)<em>/¯ 1 Filament Top Pin<br/> BUY 3 6000ZZ 10x26x8<br/> ¯\</em>(ツ)<em>/¯ 1 Bit Base V2<br/> P E T G 1 Cap<br/> ¯\</em>(ツ)<em>/¯ 1 Fastener Top<br/> P E T G 1 Insert<br/> ¯\</em>(ツ)<em>/¯ 6 Pusher V3<br/> ¯\</em>(ツ)<em>/¯ 6 Teeth V2<br/> ¯\</em>(ツ)<em>/¯ 1 Spring Preloader<br/> ¯\</em>(ツ)<em>/¯ 1 Tube<br/> P E T G 6 Clip<br/> ¯\</em>(ツ)<em>/¯ 1 Clip Bottom Holder<br/> ¯\</em>(ツ)<em>/¯ 1 Clip Middle Holder<br/> ¯\</em>(ツ)<em>/¯ 1 Clip Top Holder<br/> ¯\</em>(ツ)<em>/¯ 1 Fastener Bottom<br/> ¯\</em>(ツ)<em>/¯ 1 Filament Botom Pin<br/> ¯\</em>(ツ)<em>/¯ 1 Hex Shank Holder<br/> BUY 2 M3 Nut<br/> BUY 2 M3x50mm<br/> ¯\</em>(ツ)<em>/¯ 1 Spacer<br/> ¯\</em>(ツ)<em>/¯ 1 Switch Inner<br/> ¯\</em>(ツ)<em>/¯ 1 Switch Outer<br/> ¯\</em>(ツ)<em>/¯ 1 Switch Ring<br/> ¯\</em>(ツ)_/¯ 3 Switch Ring Holder<br/> P E T G 6 Parametric Spring</p>
With this file you will be able to print Overcomplicated Variable Torque Wrench Ratchet with your 3D printer. Click on the button and save the file on your computer to work, edit or customize your design. You can also find more 3D designs for printers on Overcomplicated Variable Torque Wrench Ratchet.