Overkill series X and Y motor mounts for Tronxy X5SA Pro
prusaprinters
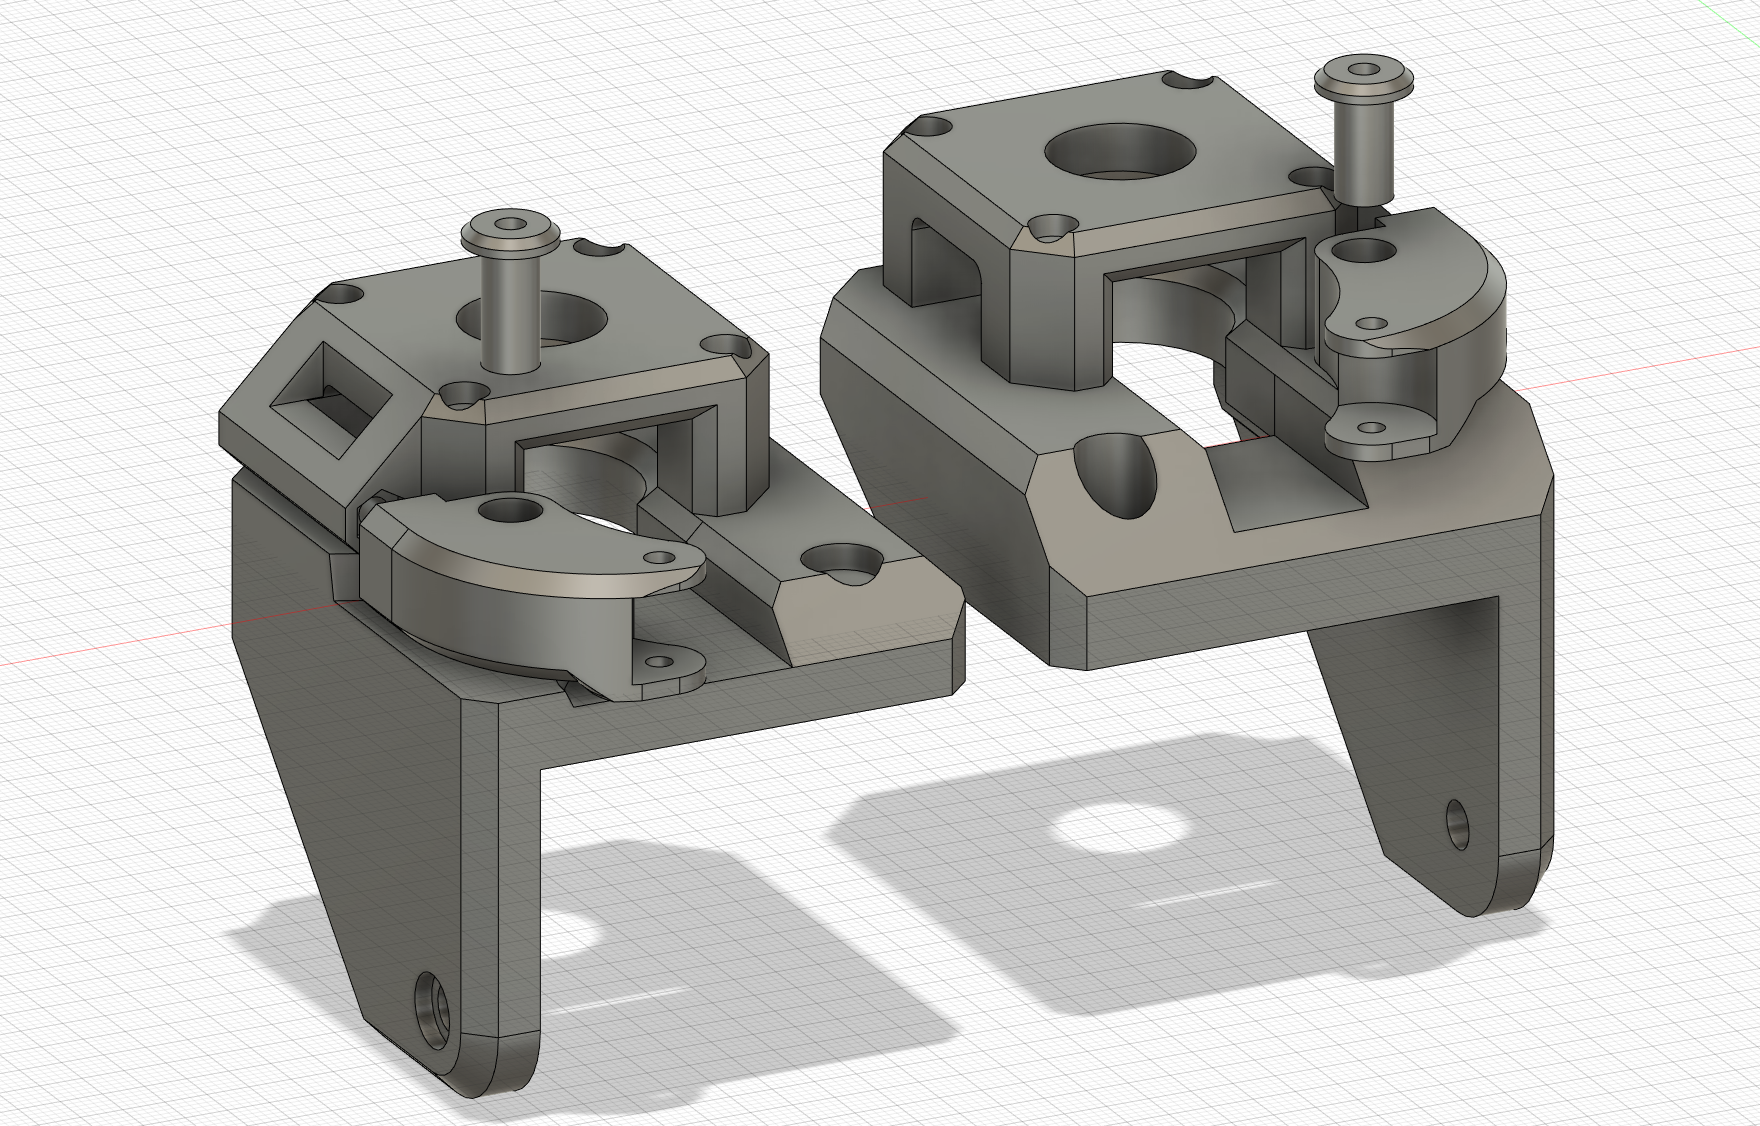
<p>Stock, acrylic brackets provided by Tronxy are weak and crappy, tending to bent under the tension of the belts. Additionally, they are forcing the Y motor pulley to be positioned unnaturally high, creating a lever effect and bending both shaft of the motor and the bracket as well if we overtense its belt even a bit. </p><p>To resolve that issue I created thick, sturdy X and Y motor mounts, with additional bearings holding tips of the shafts in place and providing additional support for them. Y motor is also positioned higher, so the pulley can be installed close to it.</p><p>Brackets include optional soft tensioners for the belts. They movement is very narrow, as they are not designed to provide main tension of the belt, only to fine-tune it. Design of the brackets also takes into account presence of the rear corner frame reinforcement plates. So if You have them, You do not need to worry about lack of space. If not, it is highly recommend to buy and install them.</p><p> </p><p>Attention: Those brackets are not adjustable themselves to adjust belts tension. You will need to adjust it just by clamping right length of the belts on the X carriage, and then eventually use provided tensioners to fine-tune it.</p><p> </p><p>To perform that mod You will need:</p><p>Brackets:</p><p>2 x 625ZZ bearing</p><p>3 x M5 15mm screw</p><p>3 x M5 10mm screw</p><p>6 x M5 V-Slot inserts</p><p>8 x M3 30mm screw</p><p> </p><p>Optional tensioners:</p><p>2 x M3 40mm screw</p><p>2 x M3 30mm</p><p>2 x M3 20mm screw</p><p>2x M3 nut</p><p>2x M3 square nut</p><p>2 x GT2 6mm 16T smooth pulleys</p><p>2 x M3 washer</p><p>2 x M3 wide washer</p><p> </p><p>Installation:</p><p>Installation is pretty straightforward. First detach the old brackets and unscrew motors from them. Pull out M3 inserts and place new M5, four on the top and additional 2 on the sides of rear bars of the machine. Insert 2 M3 square nuts in the designated for it holes on the bottom of the brackets, and then screw them to the printer using M5 screws.</p><p>Put the 625 bearings into designated for it openings for each Mount Tops. Now put the motor from the underneath and screw it to the bracket using 4 30mm screws. You may need to loose the pulley from the motor shaft first for better adjustment. You can later tighten it again from the front of the bracket. After screwing the motors You can nail the belt around the pulley and attach it again if needed.</p><p>If You want to install the tensioners, first install the smooth pulleys in the holders. They have protrusion from one side to hold the pulley, and from another You need to slip the M3 washer. Then use 15mm screw to secure them. Now put the 3d printed sleeve in the holder, and such setup install on the bracket separating it with wide M3 washer, using 30mm screws.</p><p>On the end put the M3 nuts in the recesses on both brackets tops, then screw long 40mm screws through them. They will be used to adjust fine tension on the belts.</p><p> </p><p>3D printing:</p><p>Parts were designed to minimize the amount of needed supports, although there are some which require them. It is left (X) motor bracket and tensioners arms. Rest of parts can be printer with regular bridges, although if You wanna bridges to come nicer, You may use supports there as well. Holes for M5 screws have purposely designed 0.2mm layer to help with the printing, so You do not need to worry about them. Just after print use something sharp to punch through that supportive layer.</p><p>In PrusaSlicer, use Painting Supports to paint them over overhang of X bracket and tensioner holder. Optionally also under Y bracket middle bridge and both Tops. </p><p>Printer settings:</p><p>0.20 layer, 4 or more perimeters, 20% grid infill.</p><p>Material: ABS or PET recommended. PLA may start to deform from the motors heat (although not tested).</p>
With this file you will be able to print Overkill series X and Y motor mounts for Tronxy X5SA Pro with your 3D printer. Click on the button and save the file on your computer to work, edit or customize your design. You can also find more 3D designs for printers on Overkill series X and Y motor mounts for Tronxy X5SA Pro.