Overlord Pro - E3D V6 hotend mount v1
thingiverse
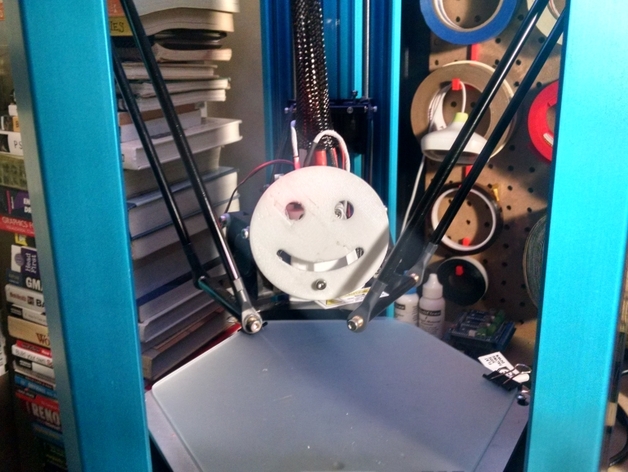
Here's my printed mounting kit for an E3D v6 hotend to an Overlord printer. Should work on the Overlord and Overlord Pro. Unfortunately, you will be required to source 2 3mm x 40mm bolts 2 3mm nylocks 4 3mm washers All other hardware you can source from the existing hotend cage assembly. Do take your time. Be sure to ask questions if you have them. Have fun tinkering. I will probably make changes over time. At the moment, I'm not entirely happy with my layer cooling solution. I'm always messing with things. For the curious, I've printed mine at 1.2mm shells, 10% infill in esun PETG and grid supports. So far so good! If you don't like my hotend fan shroud adapter, and honestly I kinda don't like it either, take a look at this one. http://www.thingiverse.com/thing:988310 I haven't figured out what variables to use, but its pretty nice! The brave of you can try to mount the 40mm fan directly to the centering mount itself. I'm not entirely sure it's a good idea anymore. Hence the fan adapter. But it's there if you're willing to risk a clog for science. :) I would not auto level with this mount. I haven't tried it. Honestly, I don't think you should try it either. I printed the mount upright. Yeah, its not designed to be easy to print. That's the noob in me shining through. V2 will definitely be easier to print. Here's a timelapse of it being made. https://www.youtube.com/watch?v=2Vx8JcYKlNY Update 9/17/15 So a friend and I are on google hangouts just chillen, and he's all like "Dude, metrique?!" And I'm all surly, "Yeah man! boltdepot.com! Tell em Danny sent you, they'll have like no idea who I am." Next sentence, I swear, "Why so hard to print man, I mean seriously? Seriously." And I'm all puffy, "Yo, if your printer is setup right, this is a piece of cake." Silence. Because, we were typing not talking. So, I made a modified version. The PCB nubs are removed and replaced with holes. The fan mounting holes are removed since they really aren't necessary. The holes to clamp the two halves together have been significantly enlarged. #6-32 machine screws should work just fine now. 1.75in long is preferred, 2in will work too, just cut off whatever is too exposed for your sensibilities. I enlarged the through holes to 4mm... #4's I think will work with the original mount, not sure though. Now you can print it upside down, and have a lot less, maybe no supports needed. Still printing this one to see how it goes. Update 11/29/2016: I used really really nice Shin Etsu based thermal paste on the heatbreak to heatsink threads initially. Worked great but eventually dried out and turned into powder. After some furious chat sessions with a friend, tried copper based anti-seize. Woah, way better. Be liberal but keep things clean. Copper anti-seize (Jet-Lube Kopr-Kote) won't dry out at the temps I'm using (265C), but it sure is messy. The hear-say thinking goes, CPU based thermal paste over the long haul will dry out because it has a service temp rating that is quite small and maxes out usually around 100-300C. These temps typically aren't published either. Copper anti-seize is typically used on car brakes and has a published service rating of 1800F/980C. They tend to rival the best thermal pastes in terms of W/m-K, but more importantly fill the gaps better of the course threaded parts to promote heat exchange. It's also $6 for 4oz of Kopr-Kote vs $8 for 3grams for AS-5. Use it on your hotend and your car projects! Instructions Print out the parts you want to use. Be sure to split the mount in your slicer into two pieces. If you print it as is, you're going to end up with a fused part. On the centered mount, test fit your E3D hotend into the groove. Depending on how it printed, the groove may be a bit... gnarly on the bottom. Take an Xacto, scraper, or pin file and clean up the surface. Now, put together your frankenstein E3D hotend. 1) remove the v6 style heater block. You won't be using it. 2) very carefully take apart your stock hotend. What you want is just the heater block, the temp sensors, and the heater cartridge. Don't remove them. They are kinda fragile in my experience. You will not be using the stock nozzle or heatsink. NOTE: Seriously, the temp sensors are fragile. You don't even want to bend the wires too much while you're taking it apart. 3) very carefully Reassemble your E3D hotend using the Overlord's heater block. 4) When reassembling the hotend, be sure to add some sort of thermal grease to the UPPER threads of the heatbreak that thread into the heatsink. If you don't have any, I have found that Copper based anti-seize works incredibly well and doesn't dry out like electronics thermal paste. Also, the nozzle should not be tightened to the heater block but to the heatbreak, so back off the nozzle if it's tight to the heater block. 5) mount the hotend into the printed mount and clamp it down with the 40mm bolts. 6) Attach the PCB components and connect up the temp sensors and heater cartridge. 7) Turn on the printer and see if you broke anything. If you get an error, sorry you weren't careful enough. I wasn't the first few times while I was testing out prints and ended up breaking 2 temp sensors. It's painful when they break... 7) screw together a fan to the hotend cooling shroud you've chosen. If you use my fan adapter, you'll need two of the plastic PCB washers. See the images. 8) Attach the fan shroud to the hotend heatsink and plug it in. It's the connector listed as Fan on the PCB. 9) Now, carefully, without burning yourself, heatup the hotend to 245C. Yep. Do it. Carefully. Put on gloves if you have to. If the heatsink fan isn't spinning, do stop right here. Something is wrong. put in a comment or raise a flag on the forum. And seriously, be careful. 245C is crazy hot. Like insta brand on your hand hot. 10) Grab a wrench, and carefully tighten down the nozzle and heater block without touching jostling the cables. Again, those things tend to fail in my experience. 11) Cool down the whole thing so you can touch it again. We 'mericans, that means wait a good long while. 100C is still hot enough to boil water. 12) Carefully take apart the assembled mount. Leave the hotend assembly alone. 13) Align the heater block so that it is as far away from the cooling fan as possible and is parallel to the heatsink fan. See the picture I posted of the bottom of the assembly. 14) Carefully, put it all back together. 15) Bolt down the assembly to the effector. 16) Bolt together the remaining fan to the layer cooling fan shroud. 17) Bolt it down to the effector and connect it to the PCB. 18) Load up your favorite arduino terminal and start plugging away at M503, G28, M206, and ultimately M500. My Z ended up at 6.75mm. Take a good long look at Luis's bed leveling forum post. that is definitely in your future if you go with this mount. 19) This bit is optional. I Kapton taped the heck out of my heater block once it was all assembled. Made me feel better, not sure it did anything though.
With this file you will be able to print Overlord Pro - E3D V6 hotend mount v1 with your 3D printer. Click on the button and save the file on your computer to work, edit or customize your design. You can also find more 3D designs for printers on Overlord Pro - E3D V6 hotend mount v1.