Ozito Battery to Ryobi Skin
prusaprinters
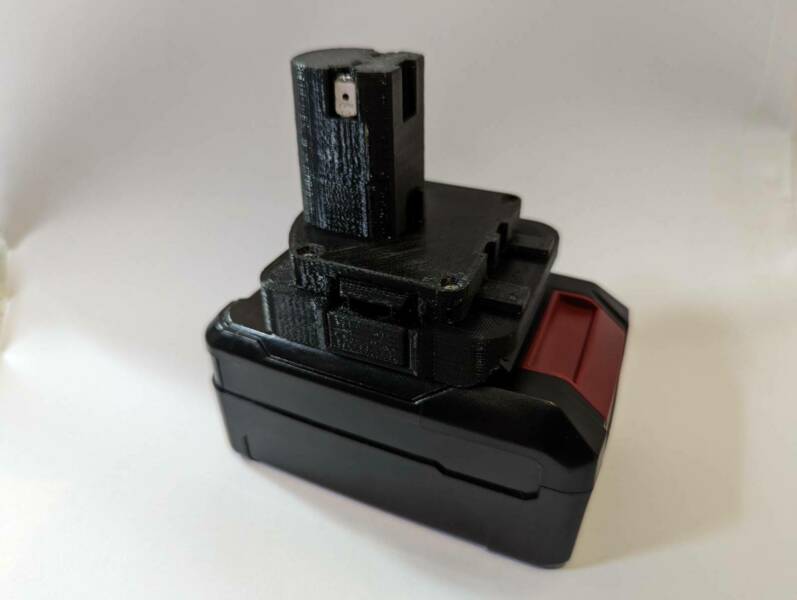
<p>Probably a bunch of people in Australia wanting this, all the other parts are from the donor object this was remixed from.</p><p>Remixed from:</p><p><a href="https://www.thingiverse.com/thing:2007996">https://www.thingiverse.com/thing:2007996</a></p><p><a href="https://www.thingiverse.com/thing:1811192">https://www.thingiverse.com/thing:1811192</a></p><p>Thanks Simhopp</p><p>Extra requirements</p><p>4 x 6mm male spade connectors<br>4 x M3 nuts<br>4 x M3 10mm socket head bolts<br>2 x wires<br>40mm long, 5mm diameter, 0.5 gauge spring</p><p><a href="https://www.aliexpress.com/item/4000282581926.html">https://www.aliexpress.com/item/4000282581926.html</a></p><p>https://www.aliexpress.com/item/4000253156130.html</p><p><a href="https://www.aliexpress.com/item/4000404713325.html">https://www.aliexpress.com/item/4000404713325.html</a></p><p><a href="https://www.aliexpress.com/item/1005002536637698.html">https://www.aliexpress.com/item/1005002536637698.html</a></p><p> </p><p>Assembly Guide</p><p>I find if I run a 3mm drill bit through all the bolt holes, it helps with getting the bolts in smoothly.</p><p>Remove the insulation from the spade terminals and install one on one end of each wire and feed it through the holes in the base plate, matching the polarity. Use some pliers to push the terminals in for the last few millimetres, they should fit nice and snug.</p><p>Load the nuts into the base plate.</p><p>Load the spring and buttons into the top plate, then feed the wires into their respective holes inside to the top of the male Ryobi section, then screw down the top plate to the base plate whilst ensuring the wires are pulled through to minimise slack inside the adaptor.</p><p>Cut the excess wire exiting the top and install the terminals, removing the insulation the same as the base plate. I find if I bend the terminal just a little, when I push it down into the top the terminal will keep themselves in place with friction.</p><p>If you want to help keep all the terminals in place you can add a few drops of super glue, I find that I don't need it.</p>
With this file you will be able to print Ozito Battery to Ryobi Skin with your 3D printer. Click on the button and save the file on your computer to work, edit or customize your design. You can also find more 3D designs for printers on Ozito Battery to Ryobi Skin.