Ozobot "Hardwear" Helmet Upgrade Accessory Kit
thingiverse
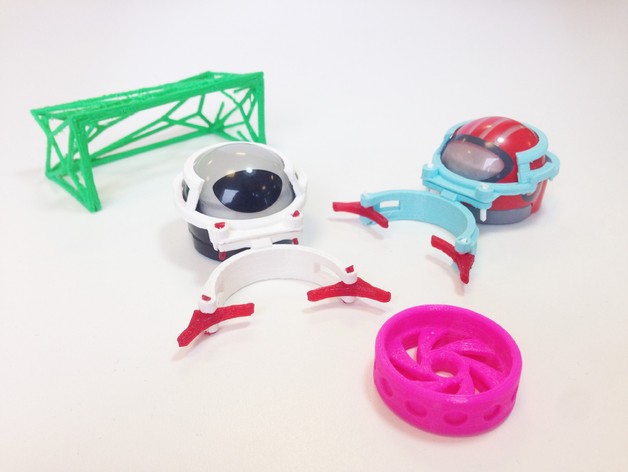
Get your Ozobots suited up with customizable HARDWEAR helmet for capturing Ozo-Energy Disks A universal Ozobot helmet featuring accessory attachment to outfit your Ozobots for mission success! Mission operators, utilize these Ozobot "hardwear" upgrades to help you overcome any obstacles in your path. The supplied Grabber Arm can be used to maneuver energy disks back to your base hanger. Educators, the following thing details include classroom exercise prompts and suggestions to help you expand your Ozobot curriculum with your students. Imagine, create, and navigate your very own specialized missions for your Ozobots. Team Members:David Choi, Meghan Vellotti, & Michael Parker These Ozobot helmets are an expansion to Michael Parker's classroom exercise for 3D printing with Ozobots at Dimension Learning based in NYC. Print Settings Printer Brand: MakerBot Printer: MakerBot Replicator (5th Generation) Rafts: Yes Supports: Yes Resolution: 0.20 mm Infill: 10% Notes: Supports Needed: "Ozo_Universal_Helmet.stl" "Ozo_Grabber_Arm.stl" "Ozo_Home_Base_Hanger.stl" Rafts Needed: "Ozo_Grabber_Claws.stl" Recommend to use supports for other files as necessary (especially those that require supports) Shells: We printed using 3 shells (1.2 mm walls with a 0.4 mm nozzle) for strength Post-Printing Tools Needed & Asssembly For these prints, due to their small scale and mechanical parts, we opted to use 1.75mm diameter filament as shafts and pegs for assembly. Use pliers to pinch the ends of the filament once it is installed. This will hold it in place. The Ozobot Helmet is a modular design and can accommodate custom grabbers or other accessories. Provided is the file "Ozo_Universal_Accessory_Attachment_Mount.stl" which can be added to a custom design in order to fit the Ozobot helmet attachment. It is recommended to use thin bead file or hobby knife to clear away any excess print material from the filament mounting holes in the prints! 1.75mm filament to hold parts together. Use pliers to pinch and capture the ends in place as shown in the picture above. Capturing the Ozobot Profile The Ozobot is mostly round but that "mostly" part makes it difficult to create nice dimension diagrams. We used a top view photograph of an Ozobot to replicate the finer details of its profile to make a proper-fitting helmet. How I Designed This Vectorizing the profile of Ozobot's top view image... Adding circles and curves to match the details... Clean up and rescaling to actual size Adding mechanical tolerance offsets and an outer profile for the helmet prior to extruding in CAD Iterations of test fitting. Pink = Lower profile test, Yellow = Upper profile test, White = Weight reduction test, Blue = Final The Base Hanger The base hangers come directly from our Ozobot dystopian future. It was modeled with simple rectangles then fed through nTopology Element's advanced freeware algorithms. Original hanger file prior to processing Quickly generating a wireframe lattice Thickening up the lattice structures Overview and Background Students in teams will create an Ozobot game, with their own mission board and own rules. They will need to program Ozobots to succeed in their respective missions, as well as 3D print Ozobot "hardwear" for the game. Ozobots will need to maneuver an obstacle course in order to get an energy disk back to their hanger, while the defending Ozobot team will attempt to hamper all efforts by any means necessary. Students have the option to design and 3d print custom grabber arms or shields for the Ozobot using a 3D design program such as Sketchup, 123D, or Morphi. The key focus is to strategically pre-program the Ozobot to navigate the game field in order to win. Objectives Teamwork & Collaborative Design 3D CAD Design 3D Printing Mechanical Engineering Computer Programming Game Design Lesson Plan and Activity Sample Game Break students up into teams of three or four (make sure you have an even number of teams). Have each team come up with a team name. Randomly pair up teams (for instance, team 1 and team 4 are a pair, etc.) Have each pair of teams design their mission board together (mission board not be bigger than 1’ x 2’). A feasible strategy would be to draw lines on the mission board that the offending team’s Ozobot cannot cross (or they lose points). Example mission board shown below (blue lines cannot be crossed by offending team). Each pair of teams should also come up with rules for the game (or they can use the Game Rules listed below). Have students design a helmet attachment for the Ozobot on a 3D design program such as Sketchup or Tinkercad. They can use the sample files provided, or create their own, depending on their skill level. Students will then 3D print these designs. Students will write programs for the Ozobot in Blockly to both defend the hanger and attempt to deposit energy disks in the hanger. Once all teams are finished, teams will compete in a tournament, using the missions board and game rules they created, or by following the game rules listed below. Sample Game Rules: Objective of offending team: Maneuver the energy disk to the hanger (scoring) Objective of defending team: Prevent offending team from retrieving energy disk. Each team only has one Ozobot to program. Offending and defending teams both load their respective programs onto their Ozobot. Energy disk is placed in the center of the mission board (halfway between the start and hanger). Offending team starts at the “Start,” defending team starts anywhere in between the hanger and the center of the board. Offending team has 30 seconds for their energy disk to reach the goal. During this time, the defending team will attempt to defend their hanger. Judge (typically the teacher or a neutral student) will award or take away points from both teams. See “Points” for instructions. Teams will then switch, and repeat steps 1 – 3. Points: Offending team points: +5 points for getting their energy disk in the hanger -1 point each time they cross a line on the board -2 points for going off the mission board Defending team points: +5 points for successfully preventing the offending team from scoring -2 points for going off the mission board Materials Needed One Ozobot per three or four students Mission boards (three would be sufficient); this could be large whiteboards, cardboard, and the like. Construction paper works too. Ozobot Blocky programming software installed 3D printer 3D modeling software, such as Tinkercad or Sketchup Skills Learned Duration of Lesson 8 – 9 hours Preparation Students should have a basic knowledge of 3D design, and 3D design for 3D printing. Students should also have a beginner’s coding experience with Ozobot and Blockly. Rubric and Assessment Students will have created and designed a game, mission board, and have competed in that game by programming their Ozobot and 3D design/printed appendages to their Ozobot. Grading will be based on how well each team worked together, sportsmanship, as well as how many points were awarded to each team (see Game Rules description for points). Mission Board Example References Ozobot Support Videos Ozobot Blockly Sketchup 123D Morphi nTopology Element PROJECT: Ozobot Robotics "Hardwear" Upgrade Accessory Kit Ozobot "Hardwear" Upgrade Accessory Kit Ozobot "Hardwear" and Accessories created for the Makerbot Makeathon 2016 (May 21-22)
With this file you will be able to print Ozobot "Hardwear" Helmet Upgrade Accessory Kit with your 3D printer. Click on the button and save the file on your computer to work, edit or customize your design. You can also find more 3D designs for printers on Ozobot "Hardwear" Helmet Upgrade Accessory Kit.