Ozone generator box / case / enclosure (lightweight) DIY.
prusaprinters
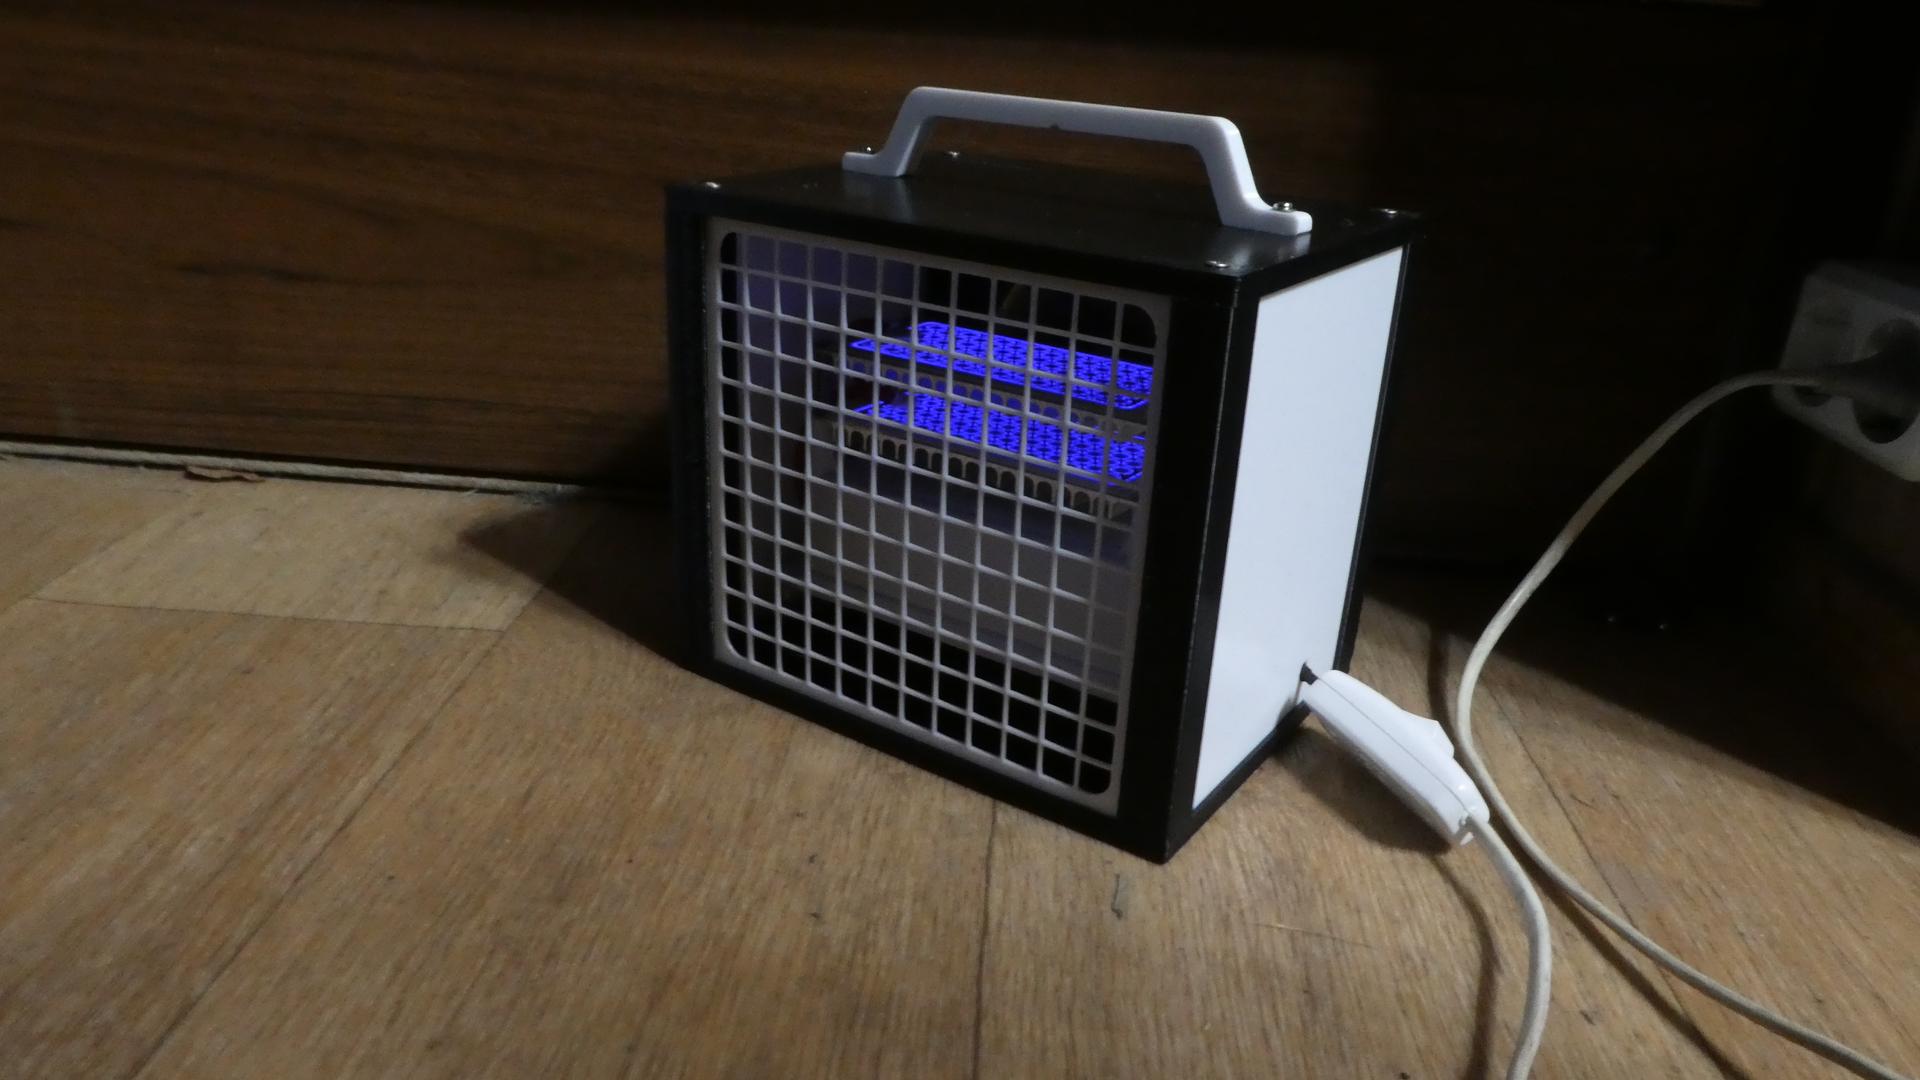
<p><strong>MAKE IT YOURSELF - OZONE GENERATOR!</strong></p><figure class="image"><img src="https://media.printables.com/media/prints/300653/rich_content/b5ed20d2-5a99-47b4-9580-4b3f0e2fea65/demo-inside_tn.jpg#%7B%22uuid%22%3A%225f95080a-1dc9-472e-8b80-d4841688d7b2%22%2C%22w%22%3A1920%2C%22h%22%3A1080%7D"></figure><p>When I saw the prices for assembled ozone generators that range from $35 to $50, I thought it would be much cheaper to make it myself. So I bought an ozone generator (10g/h, 220V) on Aliexpress for $9.50 and got 50% refund for it because it’s mount hole was broken during delivery (I finally glued it with superglue without any problem). I also bought a fan (110-220V) for $5 on Aliexpress. The wire with a plug was taken from some other old broken thing. So the total cost of the electronics was only $9.75 for me.</p><p>The most challenging thing was to make a cheap but reliable case for it. I decided to make all the walls of the box separate, because in case of failure during printing it would be cheaper and faster to reprint one failed part than the whole box completely. Besides, the plates of the generator should be cleaned once in a while, and the easily removable walls will make this process easier. It took me 3 days to design and print the thing. So the final weight of all the plastic parts turned out to be 441 grams – more than I expected.</p><figure class="image"><img src="https://media.printables.com/media/prints/300653/rich_content/00a9020c-7798-4c1f-8473-0da1832ba39f/weight_tn.jpg#%7B%22uuid%22%3A%2234bdac14-134d-4ccb-af17-feeed341c3df%22%2C%22w%22%3A1920%2C%22h%22%3A1080%7D"></figure><p><br>I used PETG that costs $15/kg, so the price for the plastic parts is $6.60. Now summing it up with the price of the electronics and we get a working ozone generator for only $9.75+$6.60=$16.35. This is twice cheaper than the cheapest assembled ozone generators from Aliexpress. And if you ask me if it is worth making it rather than buying an assembled device, I’d say that evidently the saved $18 doesn’t cover the time and effort that I spent on the model development and printing, but anyway I don’t regret that I made it myself because it was good practice in 3D-modelling and nice experience in 3D-printing. It was the first time I printed something with 1-mm nozzle and 0.5-mm layer height and it was funny. I thought it would look like crap but it actually looks pretty much neat because the outer surfaces of the box used to lay on the bed and they are perfectly flat as if the box was molded but not 3D-printed.</p><p>So, if you decided to save a few bucks and make an ozone generator yourself, then read further.</p><p>The thickness of walls is only 2 mm – this is not super-strong, especially for the front and rear grids, so don’t expect to see it in one piece after you throw it hard or kick it with your feet, but the case is stable enough for casual use. The main purpose of it is to prevent fingers from touching the blades of the fan and the high-voltage stuff.</p><p>As I already mentioned, I designed this model for 1-mm nozzle and 0.5-mm layer height, because when I saw the calculated printing time with 0.4-mm nozzle and 0.2 layer height, I thought that I would die before the work is finally finished. You can try to use some other nozzle if you don’t have a nozzle of 1-mm but check the preview before printing to make sure that everything will be printed correctly.</p><p>Initially I had another design of the grids:</p><figure class="image"><img src="https://media.printables.com/media/prints/300653/rich_content/f3ddc1d8-fa8c-467b-a708-aa4a588ec6e8/grids_tn.jpg#%7B%22uuid%22%3A%22cf7d3f00-5311-42de-90c3-4da20a1053cf%22%2C%22w%22%3A1920%2C%22h%22%3A1080%7D"></figure><p><br>But it turned out that they reduce air flow considerably and the fan becomes rather loud with them. This is why I decided that the best grid is the one that has as little plastic as possible, and this is why I used 1-mm lines with 10-mm step. This is the largest possible cell that doesn’t let my small finger get inside :) And this is why these grids are not rock-solid, but they transfer as much air as possible and they don’t add too much noise.</p><p><strong>PRINTING.</strong></p><p>1-mm nozzle, 0.5-mm layer height. I used 0.32-mm first layer height for better adhesion, so the actual thickness of my walls is 1.82-mm instead of 2-mm.</p><p>As all the parts have at least one flat surface, there is no problem to print them, just rotate them in your slicing software so that the flat surface faces the bed. Support is not needed, but little support for the bottom part may improve the accuracy of the holes that are used to mount the generator. If you enable support for these holes, adjust it so that you could easily get it out of the holes after all!</p><p>The “wing” is an optional part (not strictly required).</p><figure class="image"><img src="https://media.printables.com/media/prints/300653/rich_content/3c455cde-9f96-408a-84a2-466f768f1264/wing_tn.jpg#%7B%22uuid%22%3A%2293856d39-2008-4d95-947d-43dac2d06155%22%2C%22w%22%3A1920%2C%22h%22%3A1080%7D"></figure><p>If you don’t print the wing, you can save 30 grams on plastic :) The purpose of the wing is to smoothly redirect more air from the bottom to the top, where the ozone is generated. The wing still has a small cut at the bottom to allow some air to reach the heat-sink on the bottom of the AC-adapter (there are a couple of powerful transistors attached to that heat-sink inside so it’s not a bad idea to cool them a bit). This cut requires support to be printed accurately (I used tree support in Cura). The wing is installed between the bottom part and the generator as a spacer. You can install it closer to the generator plates or farther from them and it will change the form of the airflow. I installed it 2-3 mm before the generator wall.</p><p><strong>FASTENERS.</strong></p><p>I didn’t buy anything, found some in the household…</p><p>Dimensions that I used:</p><p>2pcs 3mm x 30-35mm bolts and nuts // to mount the generator</p><p>4pcs 2.5 x 40 mm bolts and nuts // to mount the fan</p><p>2pcs 2.5 x 15 mm bolts and nuts // to mount the handle to the top cover.</p><p>4pcs 2.5 x 25 mm screws // to fix the top cover</p><p>You can use some other ones that fit the hole diameter which is up to 5 mm in some places…</p><p><strong>WIRING.</strong></p><p>Solder fan and generator wires together and connect them to the wire that goes to the AC socket (I used a detachable connection for this purpose, but you can solder all three pairs of wires together).</p><figure class="image"><img src="https://media.printables.com/media/prints/300653/rich_content/e18912c9-cdd7-4579-b27a-a54143ff161f/wires_tn.jpg#%7B%22uuid%22%3A%22745a5602-3687-44d6-b175-a40680e3948b%22%2C%22w%22%3A1920%2C%22h%22%3A1080%7D"></figure><p><br>I attached a switch to the AC wire for safety reasons as you can see in the photo, but this is optional. The thing that I highly recommend to do is to use some insulating tape to make the wire thicker near the hole in the wall so that it won’t go out of the box when somebody decides to pull it out for some stupid reason. If the wires inside are too long and can accidentally touch the fan blades, use some clips to fix the wires to the side wall. It’s easier to do it if you slightly raise the side wall and remove the front grid.</p><figure class="image"><img src="https://media.printables.com/media/prints/300653/rich_content/cd3fe6f7-9168-4a55-8bab-a2e0ad6aaf5e/wires-fix_tn.jpg#%7B%22uuid%22%3A%2210405351-151d-4902-8f86-507999e4f1f0%22%2C%22w%22%3A1920%2C%22h%22%3A1080%7D"></figure><p><br><img src="https://media.printables.com/media/prints/300653/rich_content/d9b57c29-5593-4416-8802-17ba25ad4587/top_tn.jpg#%7B%22uuid%22%3A%22ba00951d-df24-43cd-b026-3c7e202456c9%22%2C%22w%22%3A1920%2C%22h%22%3A1080%7D"></p><p>Turn on the device and test that everything works during less than 1 second. The plates should be blue and the fan should blow on the plates.</p><p>Do not run it longer than 1 second as ozone is a toxic gas and this little thing generates it very fast! If everything works as it should, insert all other walls and close the top cover.</p><p><strong>MAKING FILLETS FOR THE TOP COVER (optional).</strong></p><p>I didn’t make fillets on the top cover in my model because the shape and size of the fillet much depends on the screws you are going to use. Some screws don’t need fillets at all. But if you need fillets there, the easiest way to make them is to take a thick philips-shaped screwdriver, heat its end with gas until it gets hot enough to melt the plastic and gently rotate it inside the hole until you get the required depth of the fillet. Alternative solution is to use a drill bit of the required diameter to make the hole slightly deeper.</p><p><strong>USING THE DEVICE.</strong></p><figure class="image"><img src="https://media.printables.com/media/prints/300653/rich_content/a82afb5a-3e46-4cdc-8c19-4fc0b2d4cdba/demo-works_tn.jpg#%7B%22uuid%22%3A%22cd1c3fe7-ca52-4837-91cf-e2ecea8428fa%22%2C%22w%22%3A1920%2C%22h%22%3A1080%7D"></figure><p>The best way to position the device is as high as possible as ozone tends to go down with time. This is why the handle has a small hole in the center – you can use it with a hook or a rope to mount the device under the ceiling.</p><p><strong>Never breathe ozone as it is a toxic gas and do not use this device when there are people and animals in the room. Never watch the blue light that goes from the plates as it is hard UV radiation that is harmful for skin and eyes. Plants can be killed by the UV radiation, so never direct the grids of the working device to places with plants.</strong> You should have a timer that will turn on the device after you leave the room and turn it off after some time automatically. I use a plug-in timer socket to turn on and off this device automatically. Usually these devices are used during 20-60 minutes for the room of 100 square meters depending on how many viruses you are going to kill. After the device turns off, wait for 30+ minutes before entering the room, then open all windows and change the air in the room during 30-60 minutes (this time may be reduced in case of strong wind). If you don’t have a timer to turn the device off automatically, it is possible to hold the breath, enter the room, turn off the device and leave the room at once, but you shouldn’t breathe while you do it…</p><p><strong>PRINTED MODEL PHOTOS.</strong></p><figure class="image"><img src="https://media.printables.com/media/prints/300653/rich_content/4ac7abf5-1d07-424a-b986-6bed64547781/demo-front_tn.jpg#%7B%22uuid%22%3A%22eab10f32-0c74-4ecc-996b-3077da982cbf%22%2C%22w%22%3A1920%2C%22h%22%3A1080%7D"></figure><figure class="image"><img src="https://media.printables.com/media/prints/300653/rich_content/c5da3ef7-cdcd-4fdb-907d-a46b75355c10/demo-back_tn.jpg#%7B%22uuid%22%3A%224da2dd87-1c0a-4d71-981a-ba31406ca5bf%22%2C%22w%22%3A1920%2C%22h%22%3A1080%7D"></figure><p> </p><p><strong>PARTS TO BUY.</strong></p><p>Go to AliExpress, Amazon, Ebay, etc and look for “<i>ozone generator</i>” and “<i>ozone generator fan</i>” or “<i>120mm 220V fan</i>”. They should look as in the following photos:</p><figure class="image"><img src="https://media.printables.com/media/prints/300653/rich_content/9d8e330f-f22c-482c-b941-8b073de3cd73/gen.jpg#%7B%22uuid%22%3A%22119afe8b-2c91-495c-8b7f-8c488340d569%22%2C%22w%22%3A1080%2C%22h%22%3A1080%7D"></figure><figure class="image"><img src="https://media.printables.com/media/prints/300653/rich_content/c6c45b1c-a2c0-49f7-badc-5cfaa8f068c4/fan_tn.jpg#%7B%22uuid%22%3A%220165432b-c24f-4825-9cb4-792a6d776024%22%2C%22w%22%3A1117%2C%22h%22%3A1080%7D"></figure><p>There are also generators with 1 and 3 plates of the same style and dimensions, they also should fit in this box. There are 120mm fans for 12V DC, and if you buy it, you should connect it to the 12V output wires that power the generator plates but not to the input 220V AC wire! </p><p>Optionally, you can buy “<i>timer for ozone generator</i>” for $4.30, it looks like this:</p><figure class="image"><img src="https://media.printables.com/media/prints/300653/rich_content/96bf2caa-6680-4763-942d-e540d4eab6e0/timer_tn.jpg#%7B%22uuid%22%3A%223a69f324-ba31-429a-b322-9de39969b9ac%22%2C%22w%22%3A1080%2C%22h%22%3A1080%7D"></figure><p>I didn't used it in my model because I have a digital plug-in timer, but if you need it, you can easily attach it somewhere to the left wall near the AC wire or to the top wall - just drill two holes for small bolts and one hole in the middle for the handle, and that's it. The timer scale can be seen on the last photo of this description.</p><p>I do not give the any links because they always change prices. Buy the ones that are cheaper because the quality is the same!</p><p><strong>PRE-ASSEMBLED SOLUTIONS.</strong></p><p>And here is what you can buy for $35 on Aliexpress:</p><figure class="image"><img src="https://media.printables.com/media/prints/300653/rich_content/605a383a-1dc4-41e3-b69c-9b2c4d8b2438/gen_tn.jpg#%7B%22uuid%22%3A%22a78e6b8a-a788-40ce-ad39-79243105faae%22%2C%22w%22%3A1080%2C%22h%22%3A1080%7D"></figure><p>There are more expensive versions with a built-in timer though:</p><figure class="image"><img src="https://media.printables.com/media/prints/300653/rich_content/8aadd7fe-3861-479b-a785-686702a11b77/gen2_tn.jpg#%7B%22uuid%22%3A%223c00990c-2bac-4bc5-8ed3-901e11659179%22%2C%22w%22%3A1080%2C%22h%22%3A1080%7D"></figure><p>But according to customer reviews, the assemble quality is rather poor - the components may just shake inside separately when you receive it so it may be even dangerous to use these things… this is one of the reasons why I decided to make it myself.</p>
With this file you will be able to print Ozone generator box / case / enclosure (lightweight) DIY. with your 3D printer. Click on the button and save the file on your computer to work, edit or customize your design. You can also find more 3D designs for printers on Ozone generator box / case / enclosure (lightweight) DIY..