PanelDue 4.3" Touchscreen Faux Carbon Fiber Case
prusaprinters
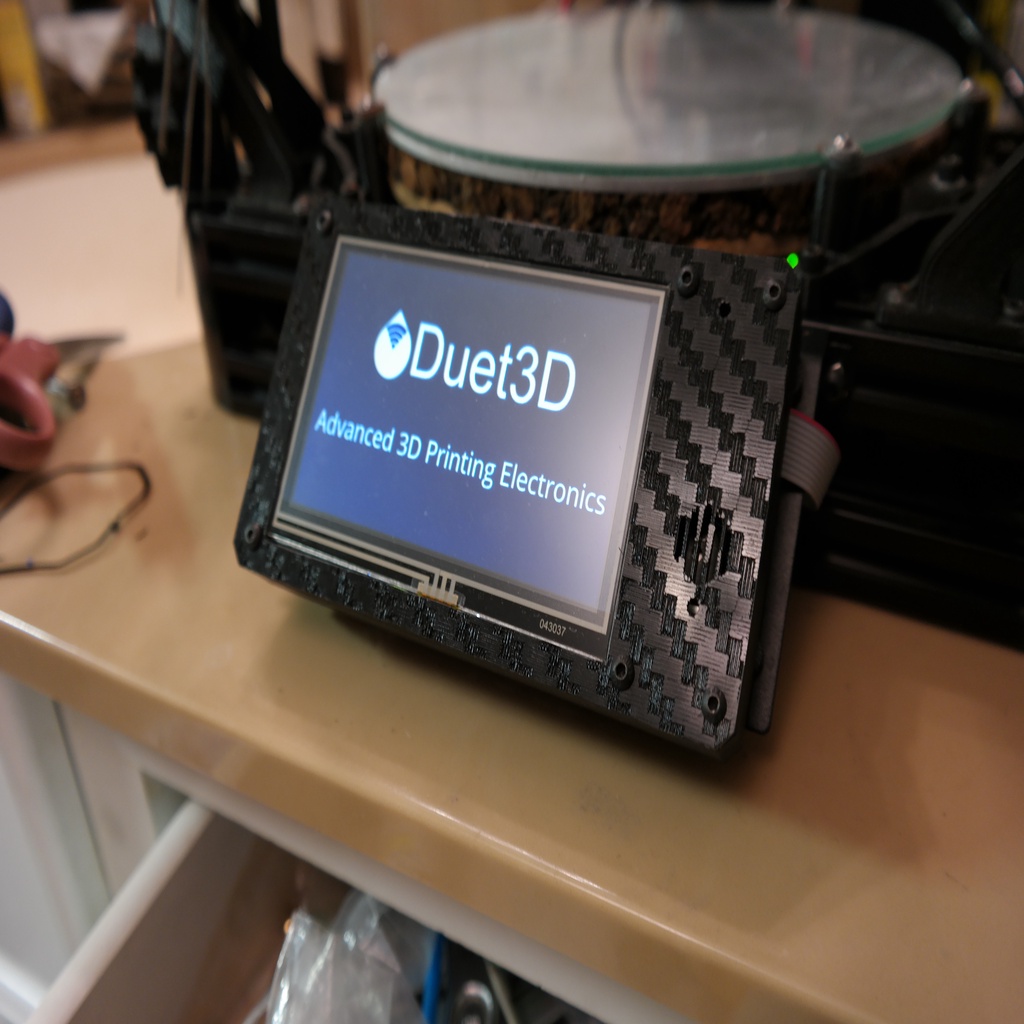
<p>I didn't entirely like any of the available options for 4.3" PanelDue Touchscreens, so I made my own. With a faux carbon fiber twill faceplate, even! The effect is hard to capture up close on camera, but looks great in person. It's also a tricky print, though, so you don't have to do it if you don't want to (see print settings for hints on how to make it work). This is, I think, about as compact as a case could be for one of these touchscreens, at least without doing a stepped back plate.</p> <p>Note that this requires you to use the 10-wire SD connector ribbon, unless you want to do a little hacking to make a second slot for the 4-wire connector. It does give SD card slot access.</p> <p>You'll need to print:</p> <ul> <li>1x Case walls.</li> <li>1x Case back -- PICK ONE of the (currently) 2 options: one is specially designed to fit the stock control panel mount of an Anycubic Kossel Linear Plus, the other has M3 holes in a 45mm cross pattern that should fit the mounting arm of this fine other case design: <a href="https://www.thingiverse.com/thing:1976962">https://www.thingiverse.com/thing:1976962</a></li> <li>1x Top plate -- PICK ONE of the 2 options: plain or faux carbon fiber. NOTE that both are provided upside-down; I don't think the carbon fiber will look right if printed right-side up (feel free to prove me wrong), but the plain version will work fine either way, just depends on whether you prefer top-layer skin lines (or ironing) or your build plate's texture.</li> <li>2x M3 2mm spacers for mounting the right-hand side of the touchscreen circuit board inside the case, plus 4x more if you're using the Anycubic Kossel case back.</li> <li>2x M3 13.4 or 13.6mm spacers -- I included two heights of these just to allow for variation. These stand off the left-hand side of touchscreen circuit board.</li> </ul> <p>Hardware:</p> <ul> <li>6x M3 nuts (possibly more depending on your mounting scheme).</li> <li>4x M3 x 24.6mm buttonhead screws. You could get away with a little longer or shorter, maybe. These are for the outer corners of the case.</li> <li>2x M3 x 12mm buttonhead screws. These are for the right-hand side of the touchscreen board.</li> <li>4x M3 x 8mm screws for mounting the Anycubic version, or whatever works for you.</li> </ul> <h3>Print Settings</h3> <p><strong>Printer:</strong></p> <p>Anycubic Linear Kossel XL</p> <p><strong>Rafts:</strong></p> <p>No</p> <p><strong>Supports:</strong></p> <p>No</p> <p><strong>Resolution:</strong></p> <p>.2</p> <p><strong>Infill:</strong></p> <p>10-20%</p> <p><strong>Filament:</strong> Hatchbox PLA</p> <p>Black</p> <p><strong>Notes:</strong></p> <p>Print all parts except the top plate with whatever perimeters and infill settings make sense to you. The nut holes in the case back are skinned so they shouldn't require supports.</p> <p>The faux carbon fiber top plate is a tricky print to set up, and won't work if you don't have good bed adhesion.</p> <p>Instructions for the faux carbon fiber top plate:</p> <ul> <li>This needs to be sliced at .2mm layer height.</li> <li>Important: slice with NO PERIMETERS, JUST top/bottom lines. You may need to turn off "extra skin walls" as well.</li> <li>No brim or supports!</li> <li>Ideally, print with settings that will be terrible for bridging -- the droopier the second layer is, the better.</li> <li>Print on glass if you want the shiny look. I guess most other build surfaces will give a matte finish. I haven't tried it.</li> <li>Use black filament, of course.</li> <li>Finally, and most crucially, rotate the part in your slicer to align the bottom layer lines along the long axis of the plate. See the screenshot if you're not sure what I mean (it's looking UP at the bottom layer from below). This makes it look like the "fibers" run as you'd expect.</li> </ul> <p>I actually sliced this one twice, once with no perimeters and again with normal perimeters, and swapped the perimeters GCODE into the first file starting at LAYER:3. It's probably not necessary but gives better edges. If you don't know how to do this, it's not hard (google it).</p> <h3>Post-Printing</h3> <p>If printing the faux carbon fiber top plate, you'll need to cut off the fairly thick built-in brim. Use a utility knife CAREFULLY. Sanding the edges afterward will enhance the carbon fiber illusion by making them more matte in appearance.</p> <p>Enjoy!</p> <h3>How I Designed This</h3> <p>Designed from scratch in Sketchup.</p> Category: 3D Printer Accessories
With this file you will be able to print PanelDue 4.3" Touchscreen Faux Carbon Fiber Case with your 3D printer. Click on the button and save the file on your computer to work, edit or customize your design. You can also find more 3D designs for printers on PanelDue 4.3" Touchscreen Faux Carbon Fiber Case.