Panelolu 2 for MendelMax
thingiverse
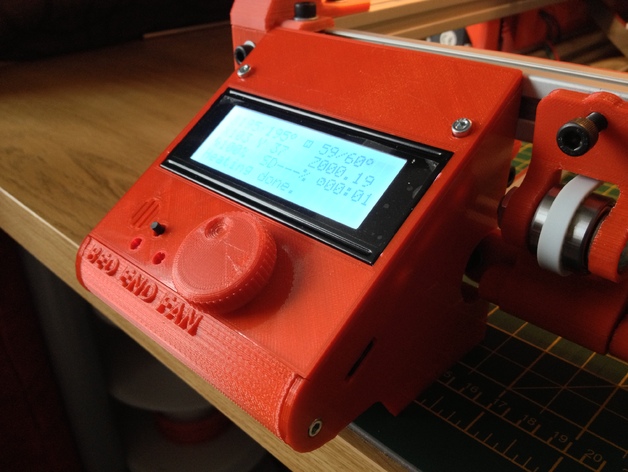
This is a box for the Panelolu 2 for MendelMax 3D printer. It requires 24mm clearance minimum underneath the printer. [UPDATED - 3 Sept 2014] Added "(Thicker)" versions of Left, Right & Screen - Recommended Changed "Knob.stl" for a better design Instructions (NB. These parts are designed for PLA, if using ABS you may need to slightly scale up your prints to compensate for the shrinkage.) As well as the parts included in the Panelolu2 kit to fit this to your MendelMax you will need: 4x T-Slot nuts 4x M5 Washers 2x M5 10mm Socket Cap Machine Screws 2x M5 10mm Dome Cap Machine Screws Fit 2 M3 nuts into the back of the curved front part. Fit 1 M3 nut into the left part and 1 more into the right. Pop the support holes on the screen.stl, left.stl & right.stl with the M3 bolts. Attach the left.stl & right.stl parts to the front.stl using the shorter M3 bolts. Fit the left.stl, right.stl & front.stl parts to your MendelMax inserting the support.stl as you fit it. Use the 2x dome cap screws on the top 2 holes and the machine screws on the bottom (you can use 4x dome screws if you wish). Place the Panelolu2 board on the support and attach the cable. Fit the screen.stl part to the box by placing the front of the screen.stl part into the recess in the back of front.stl. Screw the screen.stl to the rest of the box. Push fit the knob. Attach the Panelolu2 cable through the access hole.
With this file you will be able to print Panelolu 2 for MendelMax with your 3D printer. Click on the button and save the file on your computer to work, edit or customize your design. You can also find more 3D designs for printers on Panelolu 2 for MendelMax.