Panic Button with attiny85 and RCSwitch 433Mhz module
thingiverse
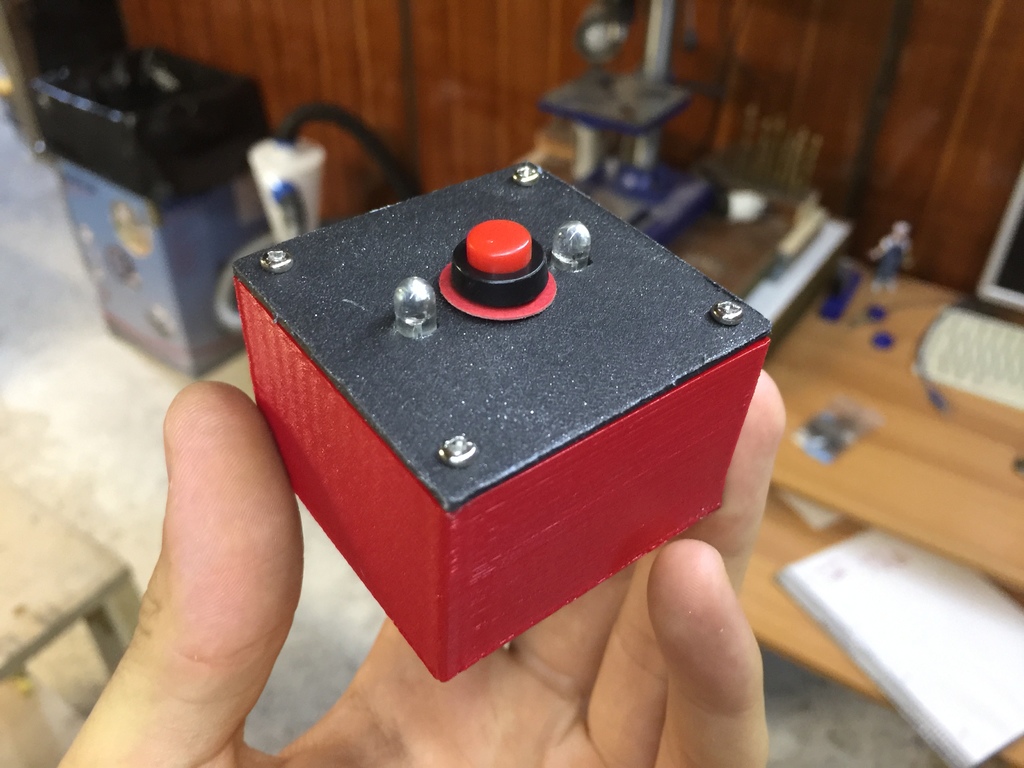
I've built this panic button for emergency situations, with a domotic system set up in my house using Arduino. The button sends a 433 code that the base can receive and do whatever is needed. It's battery operated with a 12v battery and a 220ohm resistor, so the voltage for the circuit is around 4.5v. The Attiny85 is an "Arduino" but for really simple operations, due to low memory available, it must be programmed with an Arduino Uno or 2009. I'll link the guide: https://create.arduino.cc/projecthub/arjun/programming-attiny85-with-arduino-uno-afb829 Attiny85 has pins on 0 and 1. Material: * 10PCS LOT Original NEW ATMEL ATTINY85-20PU ATTINY85-20PU DIP-8: https://it.aliexpress.com/item/10PCS-LOT-Original-NEW-ATMEL-ATTINY85-20PU-ATTINY85-20PU-DIP-8/32242662241.html?spm=a2g0y.search0104.3.17.FxKMf6&ws_ab_test=searchweb0_0,searchweb201602_2_10152_10065_10151_10068_5430020_5410020_10304_10307_10137_10060_10302_10155_10154_10333_10334_10056_10335_10055_10336_10054_10059_10332_100031_10099_5400020_10103_10102_10052_10053_10107_10050_10142_10051_5380020_10326_5390020_10084_10083_5370020_10080_10082_10081_10177_10110_10111_5420020_10112_10113_10114_10312_10313_10184_10314_10078_10079_10073-10050_10110,searchweb201603_16,ppcSwitch_5&btsid=94f3b377-9391-4c37-aef4-379f568b0891&algo_expid=450e5a3b-c015-4955-b12b-df8d5a66770e-2&algo_pvid=450e5a3b-c015-4955-b12b-df8d5a66770e-2&transAbTest=ae803_1 * A couple of LEDs and a push switch * The holes are 5mm for LEDs and 12mm for the switch The button just activates the circuit that sends signal immediately in a loop. // CODE #include <RCSwitch.h> RCSwitch mySwitch = RCSwitch(); void setup() { // Transmitter is connected to Attiny Pin PB3 <-- // That is physical pin2 mySwitch.enableTransmit(3); pinMode(1,OUTPUT); pinMode(0,OUTPUT); } void loop() { mySwitch.send(123123,24); for(int i=0;i<255;i++) { analogWrite(0,i); delay(2); } digitalWrite(0,LOW); for(int i=0;i<255;i++) { analogWrite(1,i); delay(2); } digitalWrite(1,LOW); delay(100); for(int i=0;i<255;i++) { analogWrite(1,i); delay(2); } digitalWrite(1,LOW); for(int i=0;i<255;i++) { analogWrite(0,i); delay(2); } digitalWrite(0,LOW); } // END The lib: https://github.com/sui77/rc-switch Thanks to the creator of the initial box that I've modified a bit: https://www.thingiverse.com/thing:399005
With this file you will be able to print Panic Button with attiny85 and RCSwitch 433Mhz module with your 3D printer. Click on the button and save the file on your computer to work, edit or customize your design. You can also find more 3D designs for printers on Panic Button with attiny85 and RCSwitch 433Mhz module.