"Paper" airplane
thingiverse
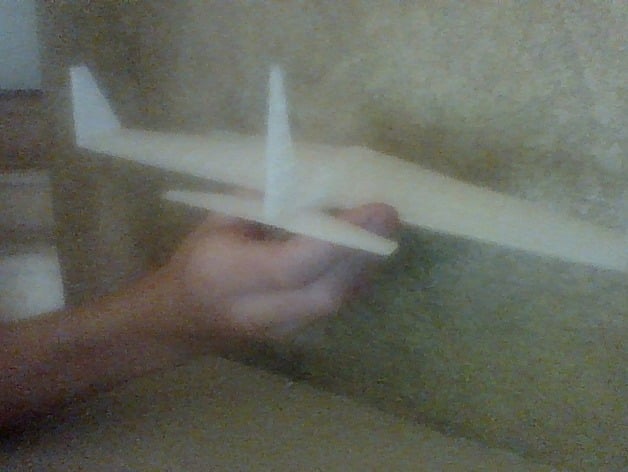
This is the 3rd version of this airplane that I built. In my opinion, it doesn't look great, but unlike the other two (that looked slightly nicer-see http://www.thingiverse.com/thing:1543100), it can actually fly! If you are going to try and fly it, know that it flies poorly outdoors. Hold it between the wings and the tail if you can. Print Settings Printer Brand: MakerBot Printer: MakerBot Replicator 2 Rafts: Yes Supports: Yes Resolution: Doesn't matter Infill: 10% or less Notes: Print it with the tail on the platform, so the supports don't attach themselves to the bottom of the wings. How I Designed This I used Onshape to make this. Here the link to the file is. https://cad.onshape.com/documents/947e08a05a633555b937a636/w/912d59786a05bc1b98d09eef/e/2393a31951fa4805a1eea2bc Full detail of sketches, extrusions, and dimensions of the original design are available at the above link. The file linked above can be copied and edited by anyone with an OnShape account. Overview and Background I have always been interested in aerospace, and I made this project for fun initially. I modified it for the MakerEd 2.0 Challenge Lesson Plan and Activity *This activity must be done indoors, wind significantly changes how this plane flies 1) Students should be divided into groups of 3-5. (4 works best) 2) Each group should receive a model of "Paper" Airplane (thing 1541691) 3) One student will lightly throw the plane along a geometric plane parallel to the floor, and the other students should observe the flight path of the plane. (Under proper conditions, the plane glides gently to the floor) 4) Repeat step 3 a reasonable number of times so that all students can observe the flight path 5) A student should throw the plane slightly harder along a geometric plane parallel to the floor and other students should observe the flight path of the plane. (Under proper conditions, the plane will rise slightly before it starts to glide to the floor) 6) Repeat step 5 enough times for all students to observe the flight path. 7) Students should discuss what causes the plane's flight pattern to differ when thrown at different initial velocities. 8) Depending on the class level, students could fill out a worksheet on what happened in the activity and why. 9) An instructor should explain lift to weight ratios to the students using knowledge the students obtained from the activity. Custom Section Project: Lift to Weight Ratios Overview and Background By completing this project, students will learn about the relationship between various forces acting on a flying object that generates lift. Objective Students will understand how in aviation, the lift to weight ratio of an airplane is greater than one at liftoff, equal to one while at a constant elevation, and less than one during decent. Audiences This could be covered in an early high school physics class, or as an introductory activity in an aerospace class at any level. Subjects Aerospace, Science, Math Skills Learned A basic understanding of what allows heavier-than-air flight. Activity *This activity must be done indoors, wind significantly changes how this plane flies 1) Students should be divided into groups of 3-5. (4 works best) 2) Each group should receive a model of "Paper" Airplane (thing 1541691) 3) One student will lightly throw the plane along a geometric plane parallel to the floor, and the other students should observe the flight path of the plane. (Under proper conditions, the plane glides gently to the floor) 4) Repeat step 3 a reasonable number of times so that all students can observe the flight path 5) A student should throw the plane slightly harder along a geometric plane parallel to the floor and other students should observe the flight path of the plane. (Under proper conditions, the plane will rise slightly before it starts to glide to the floor) 6) Repeat step 5 enough times for all students to observe the flight path. 7) Students should discuss what causes the plane's flight pattern to differ when thrown at different initial velocities. 8) Depending on the class level, students could fill out a worksheet on what happened in the activity and why. 9) An instructor should explain lift to weight ratios to the students using knowledge the students obtained from the activity. Duration Depending on students, 30-45 minutes Preparation The teacher would need enough of the printed models. Students should have taken Algebra 1 before attempting to understand this activity. References My physics and engineering teachers at my school. Rubric Depending on class and teacher, this is intended as an intro to a new unit and a participation activity. Knowledge gained from this would be assessed on a unit exam. Handouts Depending on teacher preferences and use of this lesson, handouts would vary dramatically.
With this file you will be able to print "Paper" airplane with your 3D printer. Click on the button and save the file on your computer to work, edit or customize your design. You can also find more 3D designs for printers on "Paper" airplane.