Parametric remake of Hero Me Gen 5 Bases - OEM, V6, V6 Style, Mosquito (with additional files for threaded inserts and for not using nuts)
thingiverse
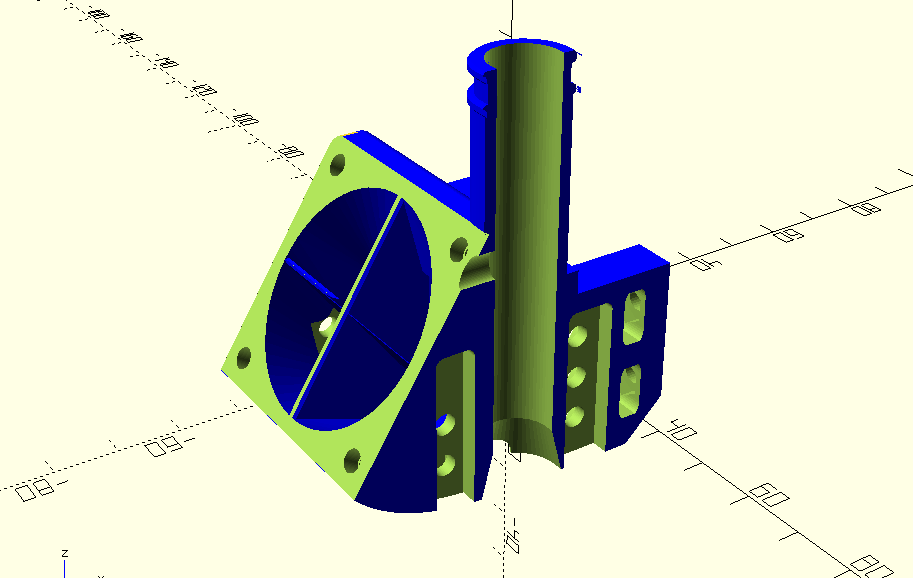
# Parametric remake of Hero Me Gen 5 Base. The original Hero Me Gen 5 is pretty good. It supports dozens of hotends and printers, went through many revisions and tests to checks to improve the applicability and the air flow, and offers many additional parts for different parts cooling fans, z probes, and other variations. However, despite all the good things it has to offer, there is a change on Gen 5 it in comparison to the previous generations that I do not like: the excessive usage of nuts. When I used the original base for a few days, I had problems with nuts falling when changing the parts cooling fans and problems with nuts breaking the layers when applying too much pressure. Hence I decided to create this remake to be able either to use it as it used to be in the previous generations (i.e, screws directly on the plastic) or to use it with threaded inserts (I remade the Ender 3/CR-10 gantry adapter as well with this goal: https://www.thingiverse.com/thing:4530852) During the remake, I noticed that most things in the base are not symmetrical nor aligned, even when they appear to be. Additionally, some faces that look perpendicular to the floor have small inclinations. I decided to fix most of these issues while attempting to be as compatible as possible with the original model. I could not fix all the symmetry issues due to the costraint of being compatible with the original Hero Me Gen 5. Notably the V6 Screws have a different distance from the center (11.3mm to the left and 10.75mm to the right). Additionally, there are two consequences you might expect from the decision of recreting it from scracth: - Some dimensions are off. Not only because it is hard to recreate a model from scratch and keep the original dimensions, but also because I tried to align elements and round positions to the 0.05mm place. - This model has not been as extensively validated or tested as the original thing. I've been using the insert variation of the V6 direct drive style for a week with no problems so far. The main source file is base.scad ## Configuring and printing This section presents the three main configurations of this model: hotend style (Creality OEM, E3D V6, Creality OEM 'V6 style', and Slice Engineering Mosquito); direct driveness (bowden or direct); screw style (original nuts, threaded inserts, screws on the plastic). STL Files in this thing use the pattern: `PHMH5_{h}_{d}_{s}_{n}.stl`, where: - `{h}` indicates the hotend style - `{d}` indicates the direct driveness - `{s}` indicates the screw style - `{n}` indicates the original base number You only need to print ONE file from this thing! If the original instructions indicate to print a Collar and/or Air Dam for your model, get it from the original thing. ### Hotend Syle The following configurations change the style of the hotend mount - Creality OEM, MK8, Micro Swiss, and other MK8 clone hotends (Base 1 and Base 4 of the original thing): ``` STYLE = "oem"; ``` STLs: `{h} = oem` - E3D V6, E3D V6 Volcano, Tough, and other V6 clone hotends (Base 2 and Base 4 of the original thing): ``` STYLE = "v6"; ``` STLs: `{h} = v6` - Creality OEM ‘V6 style’ and other large hotends (Base 5 and Base 6 of the original thing): ``` STYLE = "v6_style"; ``` STLs: `{h} = v6style` - Slice Engineering Mosquito hotend (Base 7 and Base 8 of the original thing): ``` STYLE = "mosquito"; ``` STLs: `{h} = mosquito` ### Direct drive or bowden This configurations change the size of the cable management tube to support direct drive (in my opinion, it is better to print the direct drive version even if you use bowden, as it is compatible with either) - Direct drive "MDD ready" (Bases 3, 4, 6, 8 of the original thing): ``` CABLE_H2 = 49.9; ``` STLs: `{d} = dd` - Bowden (Bases 1, 2, 5, 7 of the original thing): ``` CABLE_H2 = 64.2; ``` STLs: `{d} = bow` ### Screw style This configuration change the style of gantry and part cooling fan screws. It does not change the style of hotend fan screws nor the style of hotend mount screws (i.e, even if you use nut-less style, you still need a nut for a V6 mount) - Nut style (Original Hero Me Gen 5 style): ``` FRONT_INNER = true; GANTRY_CUT = true; INSERT_SIDE = false; INSERT_GANTRY = false; ``` STLs: `{s} = nut` - Threaded inserts (use M3X3X4mm threaded inserts instead of nuts): ``` FRONT_INNER = false; GANTRY_CUT = false; INSERT_SIDE = true; INSERT_GANTRY = true; INSERT_R1 = 2.4; INSERT_H1 = 0.4; INSERT_R2 = 2.1; INSERT_H2 = 4; INSERT_R3 = 1.55; INSERT_COVER = 0.5; ``` STLs: `{s} = thi` - Only screws (it is similar to previous generations of hero me, but uses M3 screws instead of the smaller ones): ``` FRONT_INNER = false; GANTRY_CUT = false; INSERT_SIDE = true; INSERT_GANTRY = true; INSERT_R1 = 1.5; INSERT_H1 = 0.4; INSERT_R2 = 1.5; INSERT_H2 = 4; INSERT_R3 = 1.5; INSERT_COVER = 0; ``` STLs: `{s} = scr`
With this file you will be able to print Parametric remake of Hero Me Gen 5 Bases - OEM, V6, V6 Style, Mosquito (with additional files for threaded inserts and for not using nuts) with your 3D printer. Click on the button and save the file on your computer to work, edit or customize your design. You can also find more 3D designs for printers on Parametric remake of Hero Me Gen 5 Bases - OEM, V6, V6 Style, Mosquito (with additional files for threaded inserts and for not using nuts).