Parametric Self Watering Planters w/ Water Level Indicator
prusaprinters
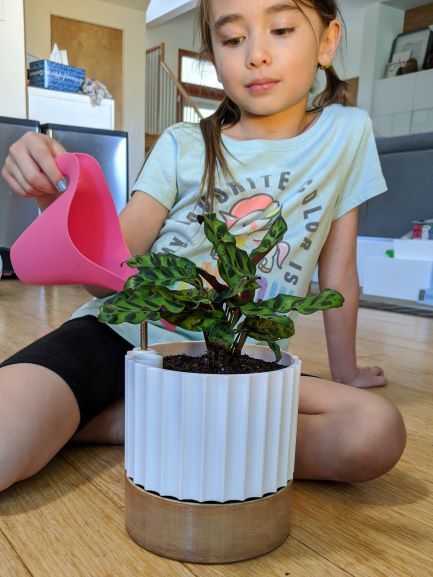
<p>This is a parametric planter with a vented, self-watering reservoir and water level indicator. I designed this in Fusion 360 and have included STLs for a 4", cylindrical version with interchangeable smooth, fluted, and knurled variants in the correct orientation for printing <i>(please follow the detailed printing instructions below)</i>.</p><p>If you want to make other sizes, shapes, or configurations, the Fusion 360 projects have the appropriate parameters favorited, with comments explaining their use. Each file includes two projects (a base planter and the derived planter), so they must be uploaded first, because they will fail to open locally in Fusion 360:</p><ul><li><strong>Fluted_Planter.f3d</strong> - Fluted Planter.f3z - Varying these parameters can get looks ranging from Roman columns, to steampunk gears, or even ice cream confections (like the yellow and pink planter in the picture).</li><li><strong>Knurled_Planter.f3d</strong> - This style is great for shiny filaments and hiding seams. The golden pineapple pot from the picture is an example of extremely chunky knurling parameters. <i>Warning: very fine knurling can take a loooong time to compute, slice, and render (e.g. 3mm knurl_spacing took ~20 minutes for Fusion 360 to apply, and it appeared to hang while processing, but it looked awesome when it finished).</i></li><li><strong>Smooth_Planter.f3d</strong> - This one just lets you increase the outside wall thickness, in case you want a chunky style, or to get the right thickness to pair with the other styles.</li></ul><h3>Print instructions</h3><p><strong>Rafts:</strong> No</p><p><strong>Supports:</strong> No</p><p><strong>Resolution:</strong> 0.2mm</p><p><strong>Infill:</strong> 20%</p><p><strong>Filament:</strong> PLA</p><h4><strong>Notes:</strong></h4><p>The <strong>Common Parts</strong> required for every planter are the: <strong>drain</strong>, <strong>float</strong>, and <strong>float_cap</strong>. You can then pick a <strong>base </strong>and <strong>pot </strong>from the <strong>Fluted Planter</strong>, <strong>Knurled Planter</strong>, or <strong>Smooth Planter</strong> folders. You can mix and match the pots and bases to get a different look (as some of the pictures show).</p><p>The <strong>float</strong> needs the following settings for a 0.4mm or 0.6mm nozzle, to ensure that it is sufficiently light and strong:</p><ul><li>0.65mm perimeter extrusion width</li><li>Single perimeter; no retraction, wiping, or coasting <i>(vase mode should work)</i></li><li>No infill</li><li>Low layer height <i>(0.15mm works for me)</i></li><li>Print slow <i>(18mm/s should be good)</i></li></ul><p>The <strong>drain</strong> must be printed at 0.2mm layer height in PLA, as both the mesh layer at the floor of the pot and the parts of the drain column that sit on the base must be porous enough to allow water to be wicked through into the roots.</p><p>You can print the <strong>pot</strong> and <strong>base</strong> parts with 2 or 3 perimeters, and anywhere from a 0.1mm to 0.3mm layer height (depending on the look you want) at 20% infill.</p><h5><strong>Sealing the base and float</strong></h5><p>You should probably seal the inside of the <strong>base</strong> and the bottom bulb of the <strong>float</strong> with a clear polyurethane (or whatever sealant you prefer). You don't even need to worry about how it looks, because the parts you need to seal are hidden once the pot is assembled.</p><p>That stated, I have had prints that came out watertight without sealant. However, the sealant doesn't hurt, and I prefer to not run the risk of leaks</p><h5><strong>Attaching the pot to the drain</strong></h5><p>The <strong>drain</strong> should snap fit into the <strong>pot.</strong> I first test the snap fit, and after I verify it's good I pop it back out to put a small bead of superglue on the inside lip of the pot before permanently snapping the drain in.</p><h5><strong>Determining the maximum fill level</strong></h5><p>Once you know everything is watertight:</p><ol><li>Assemble the pot and sit it in a pan or on some surface you don't mind getting a little wet.</li><li>Then fill the pot until the water is at the top of the reservoir (some water might spill out the side of the vent).</li><li>Use paint or a permanent marker to mark the notch on the float that's just above the top of the float cap .</li></ol><h5><strong>Potting considerations</strong></h5><p>You must use a soil with a strong capillary action, such as a coconut coir fiber soil. Top water once, immediately after you transplant, and until you see the float rise a moderate amount (no need to overwater). From then on always bottom water, through the fill hole at the top of the pot.</p><h5><strong>Modifying the Fusion 360 source files</strong></h5><p>When you export the <strong>pot,</strong> <strong>drain,</strong> and <strong>float_cap</strong> components, they all need to be inverted 180 degrees to print correctly, just like they are in the STLs for the 4" versions that I've uploaded here.</p>
With this file you will be able to print Parametric Self Watering Planters w/ Water Level Indicator with your 3D printer. Click on the button and save the file on your computer to work, edit or customize your design. You can also find more 3D designs for printers on Parametric Self Watering Planters w/ Water Level Indicator.