Parkrun Barcode Card
prusaprinters
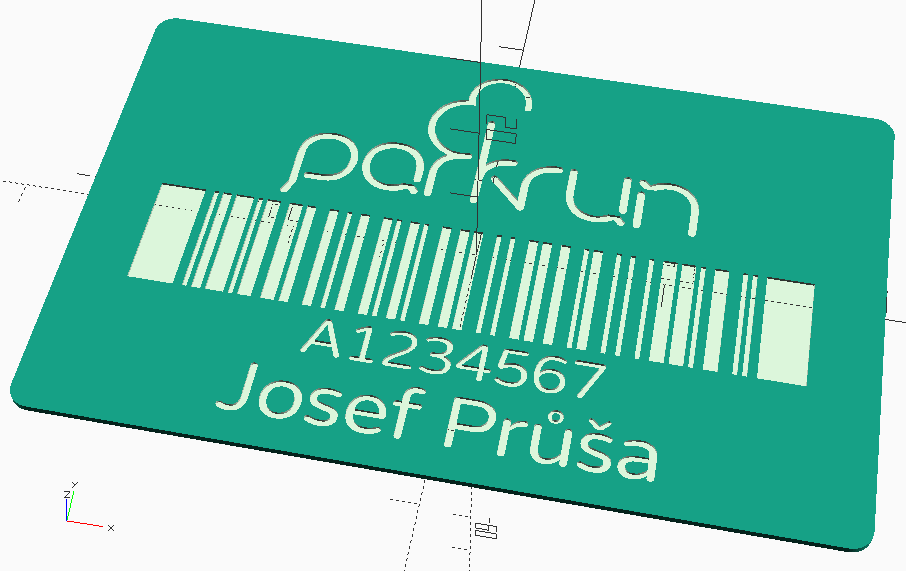
<p><a href="https://www.parkrun.us/">parkrun</a> is an international organization of free 5K races, every Saturday. The only thing you need to bring is a <i>printed</i> barcode. But 2D printing is so 20th century. This simple model generates a valid credit-card-sized parkrun barcode card based on your parkrun ID (found on the paper barcodes).</p><p>To create your own barcode you will need to use <a href="https://openscad.org/">OpenSCAD</a> along with the <a href="https://github.com/revarbat/BOSL2">BOSL2 </a>and <a href="https://github.com/X-Illuminati/glyphinator">glyphinator </a>libraries. Simply update the <code>parkrun_card()</code> call at the bottom of the file with your parkrun ID and name. Several other variables can be tuned as well but the defaults should be fine. If OpenSCAD isn't your thing you can also message me your parkrun ID and name and I can generate an STL for you.</p><p>---</p><p>This model is intended to be printed with a dark face and white back, so that the barcode is visible. I used Gentlemen's Grey Prusament PLA for the face and Amazon Basic White PLA for the back. With .15mm layers you'll have two layers of dark and three layers of white.</p><p>Although the model is simple, getting a high quality looking print is fairly tricky. I encourage you to experiment with different settings and report back what you found worked best. Here's some tips I found helpful.</p><ol><li>Print face-down; although it can be hard to get good adhesion on all the little details the smooth surface is much nice than what you get if you print face-up, even after sanding.</li><li>Print the details <i>slooowly</i>. This will help with adhesion. I manually set my printer to 50% speed while laying down the perimeters of the first layer, bumped it up to 75% for the first layer infill, and then back to 100% once it was onto subsequent layers.</li><li>Use a single perimeter. I found this reduces gaps the printer leaves behind and looks much better as well.</li><li>Pay attention to where the slicer will move the nozzle after the color change. At least on my Mini color changes return the nozzle to the last point on the prior layer, rather than the first point on the subsequent layer, which can lead to blobs of filament being deposited where you don't want them. I added a small throwaway cube off to the side so that the unwanted blob would go there; see the print photo and slicer screenshot for what I mean.</li><li>Settings I tweaked from PrusaSlicer's defaults:<ul><li>Avoid crossing perimeters</li><li>Detect thin walls</li><li>Bottom layers: 100 - top layers: 1 (this disables any infill and I find makes fiddling with other settings easier than setting infill to 100%)</li><li>Elephant foot: 0/off (otherwise all the details on the bottom layer will be mangled)</li></ul></li><li>Additional settings you might tweak for aesthetics<ul><li>Bottom fill pattern: Hilbert Curve (I felt it looked better than monotonic)</li><li>Bridging angle: 30 (PrusaSlicer seems to align the first white layer's bridge infil along the barcode)</li><li>Bridge flow ratio: 1 (I found that the bridge infil could seep down to the print bed, creating a nice smooth card face, but I'm still experimenting with how to most reliably cause that effect)</li></ul></li></ol><p>Even with these settings it's not perfect, some details still get lost and some points fail to adhere to the bed. You can see a lot of the issues in the close-up print photo, but in-person these flaws are much less noticeable. I imagine with a .25mm nozzle it would come out much better, but I haven't tried it yet.</p>
With this file you will be able to print Parkrun Barcode Card with your 3D printer. Click on the button and save the file on your computer to work, edit or customize your design. You can also find more 3D designs for printers on Parkrun Barcode Card.