Part 3 M1EL one cylinder engine keychain ball bearings
thingiverse
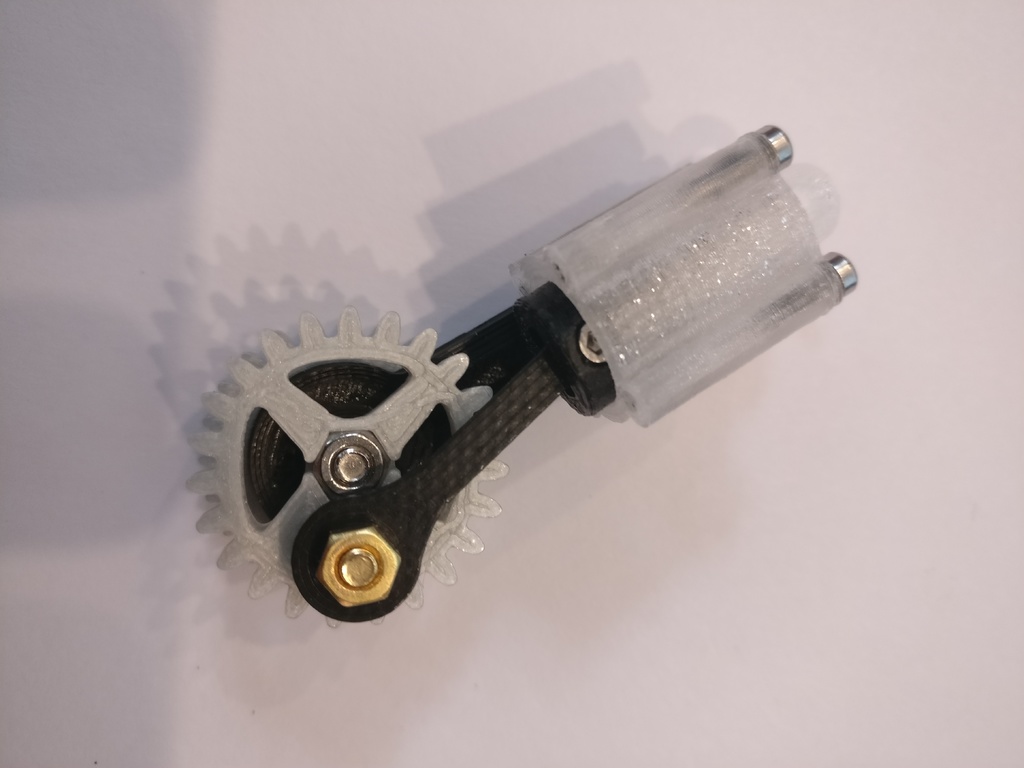
https://youtu.be/nAyrqUFWp4s Deutsch: Dies ist Teil 3 des Workshops – der gleiche Einzylindermotor wie in Teil 1 und 2, diesmal jedoch die Luxusversion mit Kugellagern und damit extrem laufruhig. Verwendet werden wieder der gleiche Kolben, der gleiche Zylinder, der gleiche Zylinderkopf. Geändert haben sich die Basis, die Kurbel und das Pleuel. Außerdem ist in dieser Version ein Handrad möglich. Dieses zusätzliche Zahnrad (Modul 1) erleichtert den Antrieb und lässt auch elektrische Antriebe zu. Außerdem werden zwei Schrauben und zwei Kugellager benötigt: 2 Kugellager 3x6x2,5mm 1 M3x8mm Senkkopfschraube an der Kurbel zum Pleuel 1 M3x12mm Zylinderschraube mit Mutter an der Basis bei Verwendung des Handrades oder 1 M3x12mm Senkkopfschraube an der Basis mit Mutter Der Zusammenbau sollte aus den Bildern ersichtlich sein und dauert ca. 10 Minuten. Die Kugellager sind „Press-Fit“, also in die 6mm Bohrungen (haben bei meinem Drucker immer leichtes Untermaß) zum Beispiel an einem Schraubstock einzupressen. Tuninghinweise: Ein wirklich geschmeidiger Lauf wird erreicht, wenn Kolben und Zylinderlaufbahn leicht mit Schlüsselfeile oder Sandpapier geglättet werden. English: This is Part 3 of the workshop - the same single-cylinder engine as in Parts 1 and 2, but this time the luxury version with ball bearings and thus extremely smooth running. The same piston, the same cylinder, the same cylinder head are used again. Have changed the base, the crank and the connecting rod. In addition, a handwheel is possible in this version. This additional gear (Module 1) facilitates the drive and also allows electric drives. In addition, two screws and two ball bearings are needed: 2 ball bearings 3 x 6 x 2.5mm 1 M3 x 8mm countersunk screw on the crank to the connecting rod 1 M3 x 12mm cylinder-head screw with nut on the base when using the handwheel or 1 M3 x 12mm countersunk screw at the base with nut The assembly should be visible from the pictures and takes about 10 minutes. The ball bearings are "Press-Fit", so in the 6mm holes (always have a slight undersize on my printer), for example squeezed on a vise. Tuning instructions: A truly smooth running is achieved when the piston and cylinder bore are smoothed easily with a key file or sandpaper.
With this file you will be able to print Part 3 M1EL one cylinder engine keychain ball bearings with your 3D printer. Click on the button and save the file on your computer to work, edit or customize your design. You can also find more 3D designs for printers on Part 3 M1EL one cylinder engine keychain ball bearings.