Part Cooling Fan Duct for R2X 14T with FlexionHT - MakerBot Replicator 2X mod
thingiverse
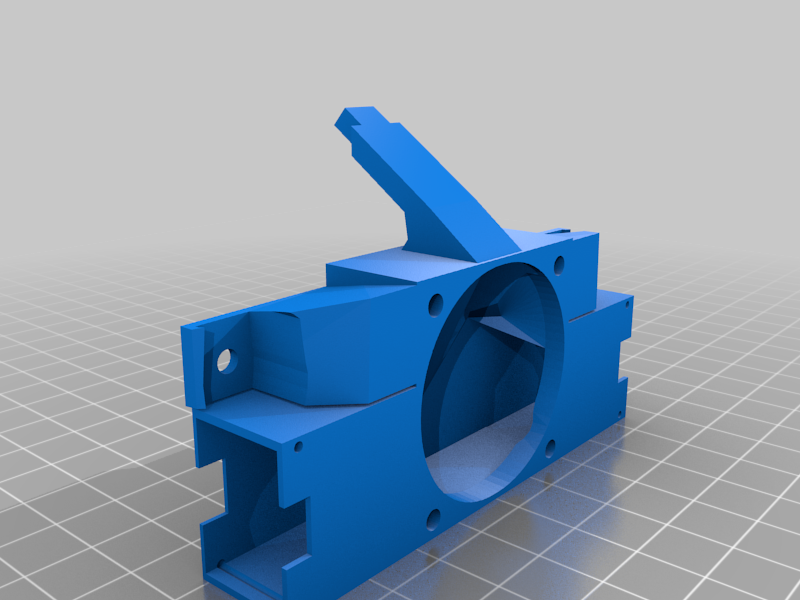
This part cooling fan duct is for cooling the part for a single (left) nozzle with the the ["R2X 14T" mod](https://github.com/poikilos/r2x_14t) for the MakerBot Replicator 2X. The mod includes the use of a the FlexionHT dual-nozzle retrofit kit for the Replicator 2X, as well as BIGTREETECH SKR V1.4 TURBO mainboard (requires replacing the bed and nozzle thermocouples with (3) thermistors--requires drilling on the bed). However, this air duct could be used with the stock parts as long as you use the FlexionHT since the FlexionHT is designed to be compatible with either stock parts (thermocouples and large heater cartridges) or widely-used parts (thermistors and small heater cartridges using the sleeves included with the FlexionHT) for Marlin-compatible boards. ## Measurements (This section is originally from [Add Flexion extruder settings #7]](https://github.com/poikilos/r2x_14t/issues/7)) - The 6.5mm diameter filament guide tubes are 27.5mm apart. - The wiring harness is about 17mm in diameter. It is about 11mm in front of the tubes. - Stock fan spacers: 14mm long ### FlexionHT hardware notes - Cooling block - 15mm deep - 12.75mm high - shoulder bolt segments: - 3mm threaded for 3.75mm length - 4mm shaft for 8mm - 6mm head for 3mm - BLTouch mount - 1.5 from side - 1.5 tall (the self-cleaning brush wheel is about 1.5mm from the cooling block) - I ordered the [Flexion Retrofit Kit for Dual Extruder](https://www.ebay.com/itm/182539748766?ssPageName=STRK%3AMEBIDX%3AIT&_trksid=p2060353.m2749.l2649) but instead got the [Flexion HT](https://www.amazon.com/3DMakerWorld-Flexion-High-Temp-Bundle-Kit/dp/B0724Z3X9J/ref=sr_1_3?dchild=1&keywords=Flexion+Extruder&qid=1631930462&sr=8-3) - I had to lean the drill inward on both mounting holes on the carriage until the the cooling block with holes closer together could be attached. - For the FlexionHT, leave out the stock cooling fins but use the **stock spacers** according to [flexion ht extruder installation wanhao/monoprice I3](https://www.youtube.com/watch?v=zawWTrcnbRc) by [Rawdilz](https://www.youtube.com/channel/UCyxN2N3IU9kCcP4FNn5g1Ww) - The stock spacers are each 14mm long, with ~5.88 OD (outer diameter) and ~3mm ID (inner diameter). - I had to change from the long factory screws to customized screws. I got (4) M3x55 partially-threaded screws, hack-sawed them down to 44mm depth, then beveled them with a file. - The extruder fans end up being recessed 7.9mm from the front of the carriage. - The tips of the nozzles are 14.17mm lower than the bottom of the low parts of the carriage (where the screw heads meet the plastic). - Add unthreaded (or oversized) 3mm deep spacers (such as 4mm nuts) around the 3mm screws, between the BLTouch and Poikilos' BLTouch mount (to prevent z gear grinding caused by the BLTouch never getting close enough to the bed to trigger). #### Setup - Ensure that no filament is installed before calibrating the set screw (See [0:42](https://www.youtube.com/watch?v=JrcoZ5x06ws&t=42s) in the setup video). > - "Remove the cam follower set screw by a few turns to make sure there's room for the cam to rotate" > - "Then put the cam in position 1 and re-tighten the set screw until you feel just a little bit of resistance. Don't torque the set screw at this point--You're just using it to define the position of the arm, not to apply a force to it." > > "Position 1 is the highest compression setting, with the idler roller in contact with the main drive roller, so this is the dial position that will provide the highest compression on the filament--so it should be used with the softest materials. But, in this case, we're going to load PLA which is a very hard filament so we're going to set the dial to position 4. And, notice when we do this that the brush starts rotating [the hotend is hot and the extruder motor is extruding] so the higher the dial setting, the more the brush engages with the drive to provide more cleaning for harder filaments, which dust more than flexible materials. To load the filament just insert it into the entrance guide tube and allow the drive roller to pull it through...There is no need to push it by hand. . . . For Ninjaflex we'll use the exact same procedure except with the cam dial in position 2. As you get more experienced with this extruder, you'll probably end up tweaking the adjustment of the cam follower set screw, but in general, the 4 dial positions give you bulk changes in compression which are adequate for going from very soft, to soft, to medium hard, to hard filaments. The sticker which we include with the kit gives you the durometer ranges to be a little bit more precise for these cam settings."
With this file you will be able to print Part Cooling Fan Duct for R2X 14T with FlexionHT - MakerBot Replicator 2X mod with your 3D printer. Click on the button and save the file on your computer to work, edit or customize your design. You can also find more 3D designs for printers on Part Cooling Fan Duct for R2X 14T with FlexionHT - MakerBot Replicator 2X mod.