Pathfinder Symbols for Wax Imprints
thingiverse
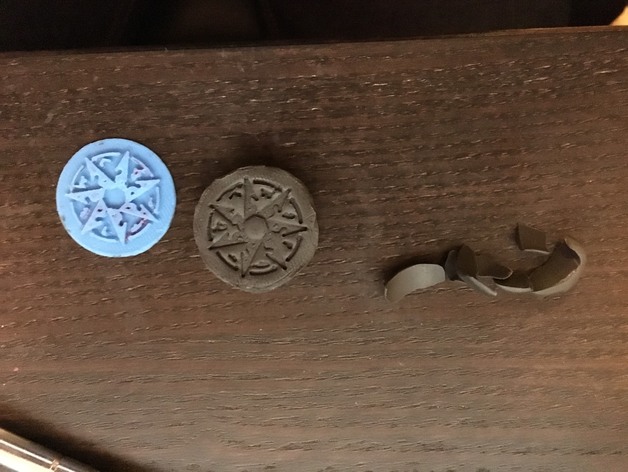
I'm creating Sihedron and Sczarni Symbols for making wax imprints on envelopes, etc. I make the handouts I give as a GM more fun and immersive with these. These things are used as molds to create clay stamps. If you have any special requests, let me know! Print Settings Printer Brand: Robo 3D Printer: R1 ABS + PLA Model Rafts: No Supports: No Infill: 100 Post-Printing Things needed Printed mold(s) Oven-bake clay Hobby knife/Xacto Wax Stamp candles aka sealing wax (you might be able to use regular candles, but I've had no such luck) Paper/Envelope/Thing to stamp Fire source The wax is a lot cheaper on Amazon. Sealing wax: http://www.amazon.com/Traditional-Postable-Sealing-Invitations-Envelope/dp/B00DQNJ9AA/ref=sr_1_8?ie=UTF8&qid=1449395199&sr=8-8&keywords=sealing+wax Oven-bake clay (Sculpey): http://www.amazon.com/Sculpey-Premo-Polymer-Accents-Twinkle/dp/B00CEHFS0Y/ref=sr_1_9?s=arts-crafts&ie=UTF8&qid=1449395449&sr=1-9&keywords=sculpey+premo You can also find the wax and oven-bake clay at your local hobby store like Michaels, Hobby Lobby, Joanne's (I think) and more. The cost is significantly higher, though. Step 1 Once your print is done and cleaned up (if necessary), you will want to roll out a small ball of oven-bake clay to fit your mold. Press it onto the mold, making sure it's on there nice and good. Step 2 Flip the mold over and again, make sure the clay is completely on your mold. Then trim the excess clay around the mold. Flip and inspect - notice the clay is overhanging the mold. Trim excess. Step 3 Roll the clay trimmings, plus a little more as needed to make a handle. While the clay is still on the mold, press the handle into the clay. Make sure it attaches well! Step 4 Slowly and evenly peel back the clay from the mold. I found it easiest to go a little at a time around the mold until it started to loosen from all sides. Then it was somewhat easy to remove the whole mold. Don't worry too much if it curls a little bit as you remove it as this is fixable. Step 5 Take your removed clay and place it stamp-side down on your work surface. Now level it out to get rid of any curls that might have occurred while removing it from the mold. Wonder how it looks.... Woohoo! Perfect! Step 6 Now your casting is complete! If it looks good, it's time to bake it. Follow the directions for the clay you used. If it's not up to your expectations, don't worry! You can re-cast the clay. Just start back at step one. Step 7 Once it's done baking, let it rest for several hours to harden and set. Step 8 Time to stamp! You're going to want to moisten the stamp surface before stamping to prevent wax from sticking in any crevices. I use olive oil and it works well. Read this how-to to learn how to properly stamp: http://www.artofmanliness.com/2013/02/13/wax-seals-a-history-and-how-to/ The key mold and stamp. Stamped wax! This was my first try so it's a little messy.
With this file you will be able to print Pathfinder Symbols for Wax Imprints with your 3D printer. Click on the button and save the file on your computer to work, edit or customize your design. You can also find more 3D designs for printers on Pathfinder Symbols for Wax Imprints.