PBAH Panobridge At Home
thingiverse
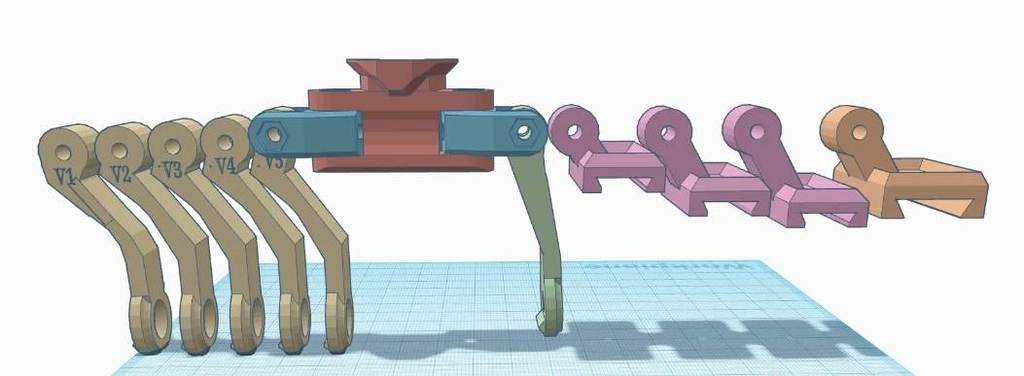
LET ME KNOW WHICH OF THE 5 RIGHT ARMS WORKS BEST I started this project because I felt $550 for a piece of printed plastic is outrageous and I also wanted to address some concerns in the original where your nv would shift with movement. So I added detents to help prevent this from happening so it can be locked in standard bino configuration and about a 60-65 degree pano. I decided to do this because any more requires really high spec tubes that many people don't have but still allows for a greater FOV. Compatible mounts (more will be added as I receive feedback) Standard wilcox g24 mount and clones Printing Instructions You are welcome to experiment. However these are the settings I've had the most success with. 0.16 MM Layer Height. At least 6 Walls 100% gyroid Infill. I like to keep print speed under 50 MM/s for optimal layer bonding. All other settings are dependent on filament and circumstances, but I would recommend to use pla+ at the bare minimum with nylon being preferred Materials list The following parts are needed to complete this project: 4x M4x20 Bolts 4x M4 Nuts 2x Ar15 bolt catch detent 2x Ar15 bolt catch detent spring 1x Sandpaper block Optional Materials 1x M3x10 per Mum Arm 1x M5x10 per Mum14A 1x 1/4-20 screw per PVS14 Assembly Instructions Put the springs and detents into the hub then slide the cams into the slots. Use 2 of the M4 nuts in the recesses for them and then slide the M4x20 bolts into the holes and tighten. Take the necessary arms for your nv or thermal and fit into the cams. Use the last 2 M4x20 bolts and the last 2 m4 nuts to lock it together. Attach to your nv or theremals and enjoy! Additional Instructions For Opsin & Thermal Users This only applies if you are using both an Opsin and a thermal together at the same time. You will need to print both the mum arms the L & S. the Short one is to be used on the opsin to bring its viewer up and the Long arm will be for the Breach or ML19 to lower its viewer. this should bring both their screens level with each other. License These files are provided free of charge under Creative Commons NonCommercial. Attribution — You must give appropriate credit, provide a link to the license, and indicate if changes were made. You may do so in any reasonable manner, but not in any way that suggests the licensor endorses you or your use. NonCommercial — You may not use the material for commercial purposes. Happy Printing! PBAH Team
With this file you will be able to print PBAH Panobridge At Home with your 3D printer. Click on the button and save the file on your computer to work, edit or customize your design. You can also find more 3D designs for printers on PBAH Panobridge At Home.