PCB Workstation with Articulated Arms
thingiverse
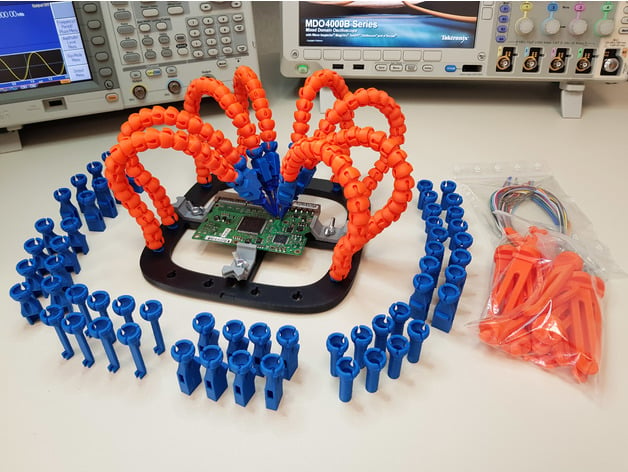
The Advanced Electronics Lab Platform with Extendable Jaws is an incredibly versatile tool for your electronic workshop. Equipped with a vast range of connectors and attachments, it allows precise and stable connections to any electronic component on printed circuit boards in testing or development phases. READ THE IN-DEPTH PROJECT REPORT PUBLISHED ON MAKE MAGAZINE:http://makezine.com/projects/3d-print-the-premiere-electronics-workbench-for-a-professional-lab/\ "The Advanced Electronics Lab Platform" Ranks High among the TOP 8 SMART JIGS featured in Make Magazine:http://makezine.com/2015/12/13/8-clever-jigs-for-your-workshop/ If you do not own a 3D printer or wish to have an entirely assembled lab platform with extendable arms, 24 Grabbers and full set of probe adapters available quickly, a user-friendly Assemble-it-Yourself Kit is now accessible. ADVANCED ELECTRONICS LAB PLATFORM KIT PREMIUM EDITION: now only $89.90 USD + shipping Order Now with PayPal your Electronics Lab Platform Kit! The kit includes the following components: Large Base Frame (18x18 inches) with Multiple Mounting Points for various arm types 6 x Articulated Arm Sections ( Extendable Up to 14 inches) 8 x Probe Attachments including alligator clips and micro sprigs If you wish to make your extendable arms more rigid, use the provided special ball and socket joints that have a slightly smaller ball size allowing a rubberized coating for improved grip and stability. Step-by-Step Instructions: 1. Mounting Extendable Jaws Attach the articulated arms sections by securing them into designated slots on the large base frame. Use the mounting clips to secure cables internally, simplifying installation and removal of extension arm units at any time. 2. Assembly of Grabbers Articulated arm parts are composed of multiple ball & socket joints allowing for various configurations from different lengths. 20 or more pieces might be necessary for full arm formation; however, using the pre-provided attachments will usually suffice. If you want to apply a coating on the joint balls use a piece of heat shrink tubing with specified dimensions, making sure that the surface adheres well. Additionally, if thicker tubing is preferred an alternate joint model has been added into the STL file archive. 3. Installation of Terminals & Wires Attach various types of electronics tools such as: - Alligator clips for electrical measurements or disassembly. - Probe tips in assorted configurations (all-in-one probe for example) Or micro test probes suitable for high-frequency or precision electronics tasks Step 4: Optional Expansion with LED Illumination and Accessories Mounting Extend the functionality of your workbench with custom attachment pieces available via downloadable STL file formats that fit perfectly onto pre-existing lab structures. Step 5: Utilization Guide Learn about all possibilities, customization methods and practical tips provided for making use of each included component as part of optimizing your daily laboratory routine
With this file you will be able to print PCB Workstation with Articulated Arms with your 3D printer. Click on the button and save the file on your computer to work, edit or customize your design. You can also find more 3D designs for printers on PCB Workstation with Articulated Arms.