PCB Workstation with Crane Arms
thingiverse
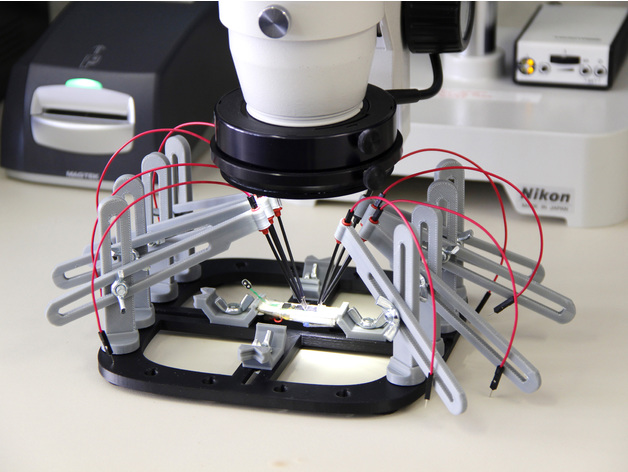
New product released: PCB Workstation with Nano-Probes!https://www.thingiverse.com/thing:3615910 "PCB Workstation with Crane Arms" is an evolution of my original project "PCB Workstation with Articulated Arms" (http://www.thingiverse.com/thing:801279). Each crane arm can be easly positioned to make precise electrical connections in very small points of a printed circuit board. This tool uses the Hirschmann spring loaded needle point test probes (http://it.rs-online.com/mobile/p/sonde-ad-ago/0775726/). The base of the "PCB Workstation with Crane Arms" can be equipped with the articulated arms and custom accessories available for the original project "PCB Workstation with Articulated Arms" (http://www.thingiverse.com/thing:801279/#files). HAVE A LOOK AT THE ARTICLE PUBLISHED ON 3DERS.ORG WEBSITE:http://www.3ders.org//articles/20170220-giuseppe-finizias-popular-3d-printed-pcb-workstation-gets-crane-arms-update.html Print Settings Printer Brand: Zortrax Printer: Zortrax M200 Rafts: Yes Supports: Yes Resolution: 0.19mm Infill: High Post-Printing Step 1: Mount the silicone bumpers I suggest to apply 5 silicone bumpers beneath the base piece, so it will be more stable on the desk. You can use bumpers with a diameter up to 20mm. Step 2: Assemble the PCB holders The central part of the base consists of 4 sliding pieces arranged in a cross along which can be moved the anchoring blocks to firmly keep the printed circuit board in place. The assembly of the PCB holders to the base piece requires some wing nuts (5mm) and Hex bolts (5×12 mm). The PCB holders have two faces, one for straight sides, the other for the corners of a printed circuit board. You can choose the right face simply turning the holder. Step 3: Assemble the crane arms Fit the vertical crane arm into the hole of the rotating base support, then mount the horizontal crane arm using a wing nut (5mm) and a Hex bolt (5×12 mm). Step 4: Install micro sprung probes The horizontal crane arm ends with a clamp to fit a micro sprung probe (http://uk.rs-online.com/web/p/needle-point-probes/0775726). Step 5: Add optional parts Now that you have almost finished your customized "PCB Workstation" perhaps you would like to add a magnifying glass, or a LED lamp, or even other accessories available from my original project "PCB Workstation with Articulated Arms" (http://www.thingiverse.com/thing:801279).
With this file you will be able to print PCB Workstation with Crane Arms with your 3D printer. Click on the button and save the file on your computer to work, edit or customize your design. You can also find more 3D designs for printers on PCB Workstation with Crane Arms.