Pegboard grommet and mounting spacer
prusaprinters
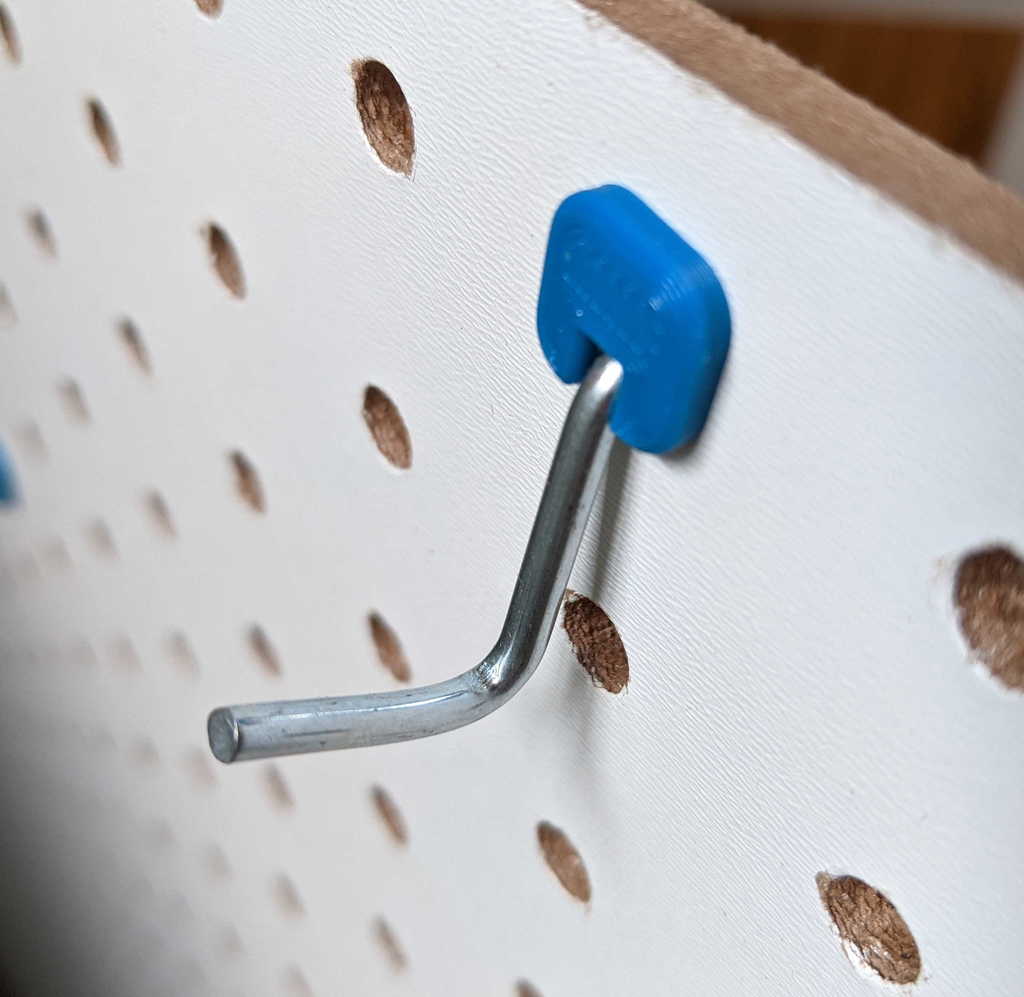
<p>The<strong>grommet</strong> is for pegboards with 1/4" holes where the 3mm thick hooks are too loose. The hooks fall out when you remove tools and items on them. They always seem to fall in the most difficult place to retrieve them</p> <p>I bought a 8' x 4' pegboard sheet, 6mm thick (1/4"). The holes are larger at 6.6mm (1/4") than the usual 4.2mm (5/32") holes my 3mm hooks are designed for. Having about 60 hooks of various shapes it makes sense to print a grommet to tighten up the fit so the hooks don't drop out every time I remove something from the pegboard. They look cool too!</p> <p>This grommet can be inserted before or after the hook and will make the fit a little firmer.</p> <p>If you colour code them you can be even more organised.</p> <p>The<strong>spacer</strong> is so that you can mount your pegboard directly to the wall and still have some space behind the board for the back of the pins. Although mine is 17mm long you can scale this with your slicer (Z axis only) when you slice the model to change the space from the wall. Use as many as you need around the edges, corners and middle parts of the perforated board.</p> <p>The spacer hole diameter is just over 6mm and your screw should obviously be long enough to go through the board, spacer and into the wall. If you cant find a stud, just use more spacers.</p> <p><strong>Pins</strong> hold the spacers in position as you mount the board. You can use 6mm screws or print the pins. These pins are temporary, you pull them out one at a time whilst pressing the pegboard against the wall and putting in a screw. If they are too loose then put some masking tape or paper in the spacer centre hole when you insert the pin. If they're too tight the clear out the spacer hole with a drill or sand the pins a bit.</p> <h3>Print Settings</h3> <p><strong>Printer Brand:</strong></p> <p>Creality</p> <p class="detail-setting printer"><strong>Printer: </strong> <div><p>Ender 3</p></div> <p><strong>Rafts:</strong></p> <p>No</p> <p class="detail-setting supports"><strong>Supports: </strong> <div><p>Doesn't Matter</p></div> <p><strong>Resolution:</strong></p> <p>.2</p> <p class="detail-setting infill"><strong>Infill: </strong> <div><p>20%</p></div> <p><strong>Filament:</strong> Amz PLA Blue</p> <p><br/> <p class="detail-setting notes"><strong>Notes: </strong></p> </p><div><p>After printing one I saw that the fit was good for my pegboard so I printed a set of 40 pins at one time, takes 4 hours and 20 minutes and they cost $0.80 for the set. Tell Cura to multiply the number when you slice the design.</p> I suggest you**print the pins upside down** and with a**brim** because the contact area is quite small <p>If you remix or design your own you can even emboss the grommets with pictures or text.</p> <h3>Post-Printing</h3> <p><strong>Using the spacers and pins</strong></p> <p>Pins too tight? Just run a 6mm or 1/4" drill through the spacer hole or use a round file, problem is likely a bit of material spread on the surface in contact with the bed.</p> <p>To prepare the pegboard simply lay it on a flat surface with the spacers at the best location to support the board and then pin the spacers into place with the pins. Put some in the middle if the board is very big else just around the edges should do.</p> <p>You may be able to use studs in the wall, just measure 16" between the spacers (count 16 holes if the hole spacing is 1")</p> <p><strong>Make your own custom hooks</strong> using wire from a wire coat hanger. The wire is a little thin but the grommet works well. You can make longer hooks or more custom designs to match what you're trying to hang from your board. Just bend the part that goes through the board the same as your current hooks, I've shown some examples.</p> <p><strong>Prepare the board by positioning the spcers while the board is horizontal</strong></p> <p><strong>Mount the pegboard</strong></p> <p>The pins will hold the spacers while you move the pegboard against the wall for mounting. Pull a pin and insert a screw, continue for other spacers until all the pins have been replaced by screws.</p> <p><strong>Screw replace the first pin</strong></p> <p><strong>Seen from the top</strong></p> <p><strong>Tweezer rack</strong></p> <p><strong>Solder stand now also hangs from the board</strong></p> <p><strong>Hanger for my solder sucker</strong></p> </div></p></p></p> Category: Organization
With this file you will be able to print Pegboard grommet and mounting spacer with your 3D printer. Click on the button and save the file on your computer to work, edit or customize your design. You can also find more 3D designs for printers on Pegboard grommet and mounting spacer.