Pen plotter attachment for Prusa MK3s
thingiverse
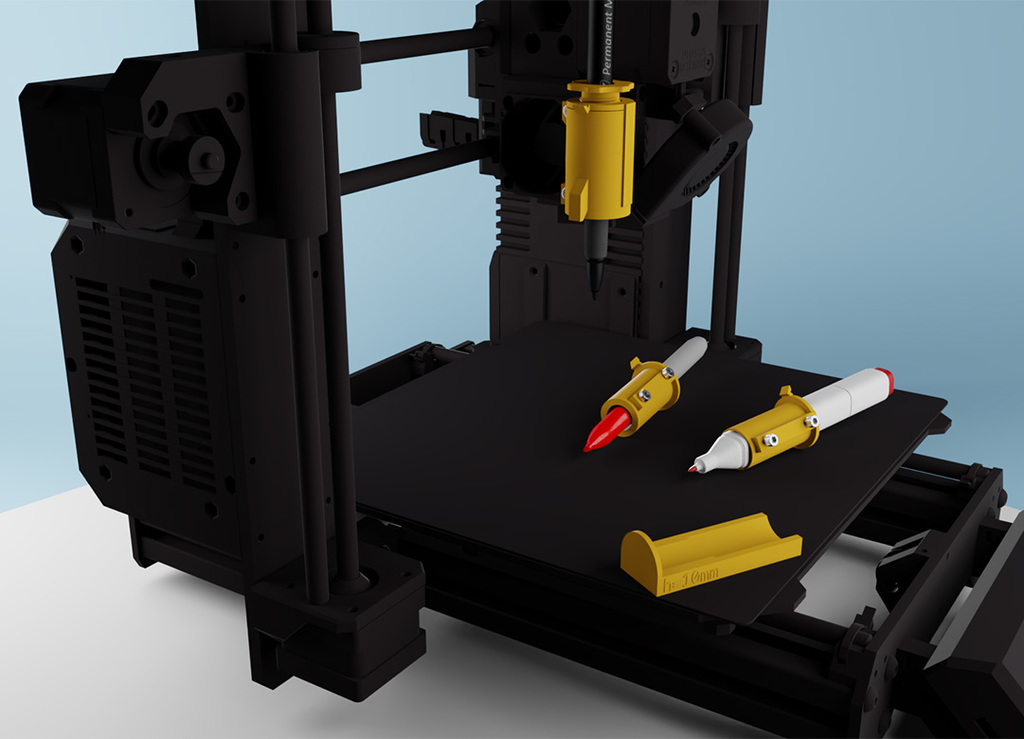
This is a simple mod for your MK3 to use it as a penplotter. The main design objective was for it not to interfere with printing and to not have to assemble or disassemble any parts to change from one to the other. I tested multiple designs found here and on thingiverse, but most interfered with printing in one way or another, required heavy modification to the E-axis, or didn't hold the pen with enough stability to draw precisely. I found [this design](https://www.thingiverse.com/thing:3515956) on thingiverse that had the easiest assembly and based the holder on that, then just iterated and tested a bunch of different pen holders in order to have a modular and stable system that accepted multiple types of pens. The holder installs onto the extruder fan, and just needs a couple of screws that are 5mm longer than the installed ones (I got them from the extras pouch in my update kit). It doesn't block the fan or compromise the assembly in any way, and the E-block is able to home and print without issue with the holder attached. For the pen-holders themselves, the design is quite simple but very stable. A slot in the holder acts as a key and leaves space for the screws that fix the pen's position. An elastic band provides vertical tension on the pen and some forgiveness with the Z height. I've also designed a spacer block in case you don't want the screws to damage your pens. I've also designed a collet holder that works without any screws and also keeps alignment of the pens constant for multi color plots. And finally, there's a simple calibration tool to ensure that the height of your pens is also constant and you don't have to readjust the z-height on every print. Notes: *All the components should be printed in the orientation the appear. A brim usually helps a lot. *The All the modules are designed for the pin tip to sit at 10mm, which allows leveling even with the pen installed. When generating g-code, 10mm would be your pen down height and you can use 13 or 15mm as your pen up height. *This will create an offset of the pen that you will have to account for in your gcode: 45mm for X and 30mm for Y. These are the bare minimum values, use slightly bigger ones based on the size of the drawing and the clips or magnets that you use to hold the paper in place. *The collet holder requires a bit of lithium grease on the thread. *The tolerances on the fitting pieces are quite tight, for added stability. Play with a couple of pieces and if your printer's dimensional accuracy isn't that great, you might have to slightly scale some pieces. Resources: There are a ton of resources online to generate gcode from images; I might write something up and link it here, but if you want a few pointers: * [Inkscape](https://inkscape.org/) gcodetools plugin (included in inkscape install): works great once you get around config and gcode modification. * [DrawingBotV3](https://github.com/SonarSonic/DrawingBotV3) a desktop app to convert photos to paths that exports gcode. * [Plotterfiles](https://plotterfiles.com/) has some amazing images to play with * [Plotterfun](https://mitxela.com/plotterfun/) to convert images to svg paths with multiple styles * [Awesome plotter](https://github.com/beardicus/awesome-plotters) a curated list of links if you want to go deeper down the rabbit hole
With this file you will be able to print Pen plotter attachment for Prusa MK3s with your 3D printer. Click on the button and save the file on your computer to work, edit or customize your design. You can also find more 3D designs for printers on Pen plotter attachment for Prusa MK3s.