Penny Gemstone, Vacuum fill 3DPrinted fountain pen.
prusaprinters
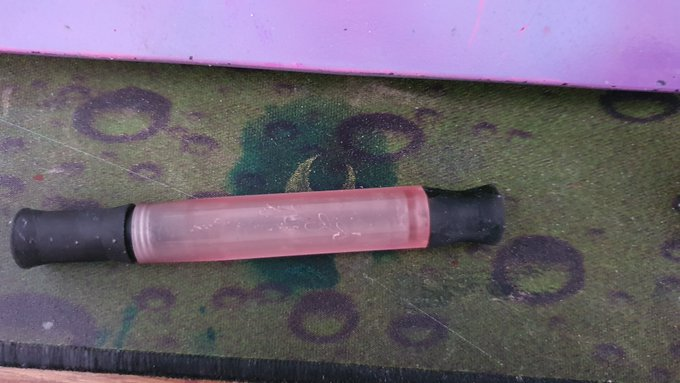
<figure class="media"><oembed url="https://www.youtube.com/watch?v=7CAl6Ae-Ni0&ab_channel=AmeliaBuns"></oembed></figure><p>Penny Gemstone, The 3DPrinted (FDM, SLA versions separate) Vacuum fill fountain pen :)</p><p>Inkwell coming soon! This project is currently in Beta. SLA hasn't been finished yet due to lack of an SLA Printer. FDM works well outside of my iron rod corroding. This project will be on pause until I move to Canada, due to unavailability of parts here.</p><p>Also note that I've found this version of the one way syringe to not work well with certain syringes. I'm working on either a mold for RTV silicone or an improved design that works with more syringes.</p><p> </p><p><a href="https://github.com/AmyTheCute/Penny-Gemstone">https://github.com/AmyTheCute/Penny-Gemstone</a></p><p>Also check the GitHub for more up to date files :)</p><p>The FDM is as big as a Lamy safari, the SLA is slightly smaller but you can resize both to whatever size you prefer.</p><p>3~ml of ink capacity on both versions (you can get 4ml on FDM if you remove the double plunger seal! it only has droplets of ink on the plunger when you're re-drawing the ink so not a big deal)</p><p><strong>To assemble the FDM: </strong></p><p><i><strong>You'll need: </strong></i></p><p><i>3ML Syringe</i> (Future versions might find a way to bypass this? the O-ring shape is impossible to find outside of Macmaster Carr, Casting RTV molds coming soon!) <a href="https://www.amazon.com/gp/slredirect/picassoRedirect.html/ref=pa_sp_atf_aps_sr_pg1_1?ie=UTF8&adId=A01838383LPPSQH50YSHC&url=%2F3ml-Sterile-Luer-Slip-Syringe%2Fdp%2FB08R6JPMDD%2Fref%3Dsr_1_1_sspa%3Fkeywords%3D3ml%2Bsyringe%26qid%3D1640187518%26sr%3D8-1-spons%26psc%3D1&qualifier=1640187518&id=6705994275663879&widgetName=sp_atf">https://www.amazon.com/gp/slredirect/picassoRedirect.html/ref=pa_sp_atf_aps_sr_pg1_1?ie=UTF8&adId=A01838383LPPSQH50YSHC&url=%2F3ml-Sterile-Luer-Slip-Syringe%2Fdp%2FB08R6JPMDD%2Fref%3Dsr_1_1_sspa%3Fkeywords%3D3ml%2Bsyringe%26qid%3D1640187518%26sr%3D8-1-spons%26psc%3D1&qualifier=1640187518&id=6705994275663879&widgetName=sp_atf</a> this specific one wasn't tested by me, I live in Iran so I can't show you mine, but They're apparently standardized, 10.5mm outside, 8.5-9~mm inside.</p><p><i>(Optional and FDM ONLY, customizable) 10-8mm tube </i>:</p><p>You can use PETG/ACRYLIC/PC but keep in mind acrylic is apparently fragile. Any Diameter can work since the files are modifiable, it all depends on you preference and ink capacity 8.8mm~ is recommended for the stock files, but you can use 9-8mm ID. The outside diameter is 10.5mm max for the STLs. since you have bought the syringe for it's O-Ring, you might as well rub off the lettering and cut the handle/tip of and use it as a tube, it's not very visible unless you want to leave it visible. Up to you! <br>The photo i showed uses the Syringe, and with a light proper coat of resin it looks nice, Keep in mind i used an unsuitable epoxy without the proper application so it doesn't look amazing.</p><p><i>Copper/Stainless steel or other water resistant tube/rods:</i></p><p>3mm Outside Diam. Buy an optional M3 die if you want the assembly to not be permanent and easier, But friction fit works great for FDM. 57.5mm length for the stock STL files, but I'm clumsy so please check it before cutting!</p><p><i>Nib/Feed</i>: </p><p>The Platinum Preppy 0.5 or Pilot Kakuno Nib+Feed is supported right now. Keep in mind that the Preppy writes wetter and better In this pen. Message me to request files for your fav fountain pen nib. please don't choose hard to design for ones! Kaweco is incredibly simple to design for yet unavailable in my country. Buy me one or simply measure me one so I design one for you :) but I recommend you to try the Preppy first, it works way nicer than it does in it's own body now that it writes wetter! Pilot Kakuno is also awesome, sadly I only have the SLA version so far ;s and i'm too scared to try to test fit it again in FDM. stupid me didn't save the files... Message me if you're willing to test fit it :)</p><p><i>O-Rings: </i></p><p>7mm outside 3mm inside for plunger (buy many anyway, you need 2 tho) 10mm inside 14mm outside O-rings for the handles. video uses 10-15 which is a bit ugly. You can Optional cast them if you do end up buying RTV to save shipping.</p><p>you can alternatively cast all these in RTV Silicone at home which isn't super hard if you 3DPrint the mold, don't use silicone grease in case you do, use apparently Vaseline works but eats ABS so be sure to use PETG/PLA. You can also use PTFE/superlube. For Nitril O-rings, use silicone grease (100% to be safe)/O-Ring grease</p><p>FDM Parts: I recommend 0.12mm layer height for all parts. I recommend PETG. but I used PLA. </p><p> </p><p>That's it. ink capacity is customizable. stock included .STL for a syringe are approximately 3ml-2.5ml. the one shown in the video holds 4ml which is insane and unnecessary so I made it smaller, and added a double seal O-ring in the slot for safety :)</p><p> </p><p><strong>How to make:</strong></p><p><i>Lubrication is NOT OPTIONAL!</i> (unless you enjoy leaks/inky hands :P).For Silicone O-Rings use PTFE grease/SuperLube/Vaseline, hasn't been tested by me sadly due to limited parts available in Iran. For Nitrile ones and the syringe O-Ring you can use 100% Silicone/O-ring grease</p><p> </p><p>Take out the syringe's O-Ring and cut the closed of portion of the O-Ring with a razor, you might need to try twice to get it right but it's easy. slightly move the razor back and forth with light pressure instead of forcing it. Try to make the end flat. Put it with the non-cut side facing the Closed part of the one way valve. Glue it to the rod you have. Test it with the chamfered syringe (Or the barrel in case of SLA). The FDM barrel also has an additional helping chamfer, but it's important to not skip this step regardless. Lubricate the One way valve before putting putting the O-ring inside. Afterwards. try it in the syringe/barrel to make sure directional changes moves the O-Ring into the correct position. you can block the with your finger end to make sure air is moving out when you push down, and that there's no vacuum being created when you pull back.</p><p> </p><p>(Cut your Syringe/Tube to the right size (37mm for STL) and chamfer the inside of one end, mark that end, this insures that pulling the plunger is effortless. Test it with the one-way valve before gluing everything together, Polish/sand the outside too if you please. If you cut a syringe, make sure to remove the little edge that prevents the plunger from being pulled out too much, or put that end near the top. (This step is only for FDM)</p><p>Cut the Barrel STL at the desired location in your slicer. Print the top with the thread side touching the plate. If you're not a fan of my gap-see trough design, it won't matter you can seal it with glue and it'll not be a visible seam with most filaments (specially translucent), pushing the Syringe in in the first prototype was annoying so I did this. After doing this, use any glue you trust (I recommend epoxy tbh) and rub it around the body of the syringe/tube without getting it inside, a light coat on a section is all that's needed to create a seal. push it in both ends and align it, I recommend a test fit and checking before you try it. While doing this, I recommend you to coat the PLA part for aesthetical purposes if you wish to do so, use a high quality resin and preferably a UV one. The Default STL doesn't have a gap. Either use a bigger tube or cut the file in your slicer to remove some of it. (This is also only for FDM).</p><p>Insert the end near the threads (tip of the pen) and make sure it's flush with the chamfer, the other side doesn't need to 100% touch the surface. but this side does, If you make it with a gap then you don't have to worry about this.</p><p>I recommend you to not print these files all at once, specially the barrels. print individually to avoid retractions.</p><p>set the Barrel to cure/harden. Keep in mind superglue cures fast usually and doesn't give you much of a chance to adjust, additionally, unless you cover the exposed portion with tape precisely (if you plan on exposing it) you might get superglue there and it'll look ugly, resin however makes it look prettier if anything to have the syringe coated in a light layer of it! (FDM ONLY!)</p><p> </p><p>Force 2 7mm-3mm O-ring inside the bottom slot one on top of another, this might take a bit of effort but shouldn't be too hard.</p><p>Lubricate the outer O-ring on the one way valve, and insert it trough the threads and pass the rod trough the intended hole.</p><p>If you bought a die, cut threads into the top of the rod that's cut to the correct length, then screw it into the handle. If not, bonk it into the rod with a bat or something, be careful to not break things, you can use your hands, it shouldn't be insanely hard, can use hot glue to create a semi-permanent stronger connection!</p><p>Slide the 10mm ID O-Ring on the handle's threads, apply grease to the O-ring and the threads (don't get greedy!) and screw it in tight, Don't worry about breaking the threads with FDM, it's very tough :) Resin is more fragile tho…. </p><p>Before inserting the nib, apply soapy water to the entire unit expect the nib's hole. then blow very hard into the hole. if there's a leak it should bubble, if not proceed, if it does leak, fix it!). Also wash he nib/feed with soapy water if it's not been used before. If it works, try it without a nib/feed! Use a cup with food coloring or some ink deluded with water. and push the plunger down. You should get a sploosh of ink wooshing up fast, it might fall right down after since the hole is too big to keep water inside.</p><p> </p><p>Check Github for changelogs!</p>
With this file you will be able to print Penny Gemstone, Vacuum fill 3DPrinted fountain pen. with your 3D printer. Click on the button and save the file on your computer to work, edit or customize your design. You can also find more 3D designs for printers on Penny Gemstone, Vacuum fill 3DPrinted fountain pen..