Penny Weight Fidget Spinners
prusaprinters
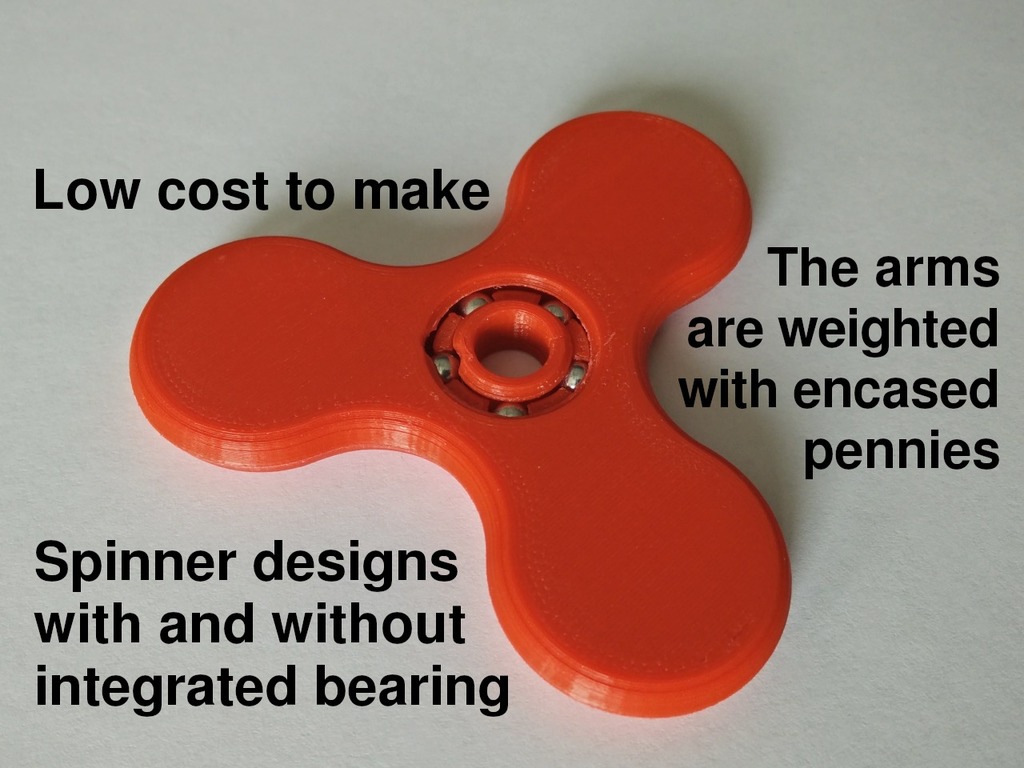
<p>These are fidget spinners that use pennies for weights in the arms of the spinner. The print is paused to insert the pennies and then they're sealed in with the subsequent layers.</p> <p>There are 6 variants of the model included. Three of the variants are designed for insertion of a 608 bearing in the center. The other three have a bearing outer ring at the center and are designed for insertion of 4.5 mm steel BBs and a printed inner bearing ring and a printed bearing BB spacer.</p> <p>4.68 mm penny cavity - sized to fit 3 Canadian pennies minted in 2000 or later, pause it at height greater than 5.84 mm</p> <p>4.92 mm penny cavity - sized to fit 3 Canadian pennies minted in 1979 or earlier, pause it at height greater than 5.96 mm</p> <p>6.00 mm penny cavity - sized to fit 4 Canadian pennies minted in 2000 or later, pause it at height greater than 6.5 mm</p> <p>The other three variants are the same as above, but with the built-in bearing outer ring. They spin really well - about 1.5 times as long as the models with a $1.80 steel bearing inserted. But they're not as smooth spinning so they rattle and shake a tiny bit and aren't silent like the steel bearings. I print the inner bearing ring and spacer at 100% infill for maximum strength. If you're printing any of these models, you may have to do a bit of post-print cleanup. All of mine had a tiny bump on the bottom layer of the bearing parts, which I filed down. You'll probably have to scale the finger pads to 97% or 96% to fit snuggly into the printed bearings. I print mine with 4 perimeter shells so that the twisted pin parts are solid. I put a tiny dab of SuperLube Synthetic Grease on each BB before inserting the finger pads into the bearing.</p> <p>American pennies are the same diameter, so they can be used as well.</p> <p>The best fidget spinner, giving the most weight, will be one that uses 1979 or earlier pennies since they weigh 3.24 grams each, compared to 2.35 grams for the newer pennies. The next best would be one that has 4 pennies in each arm. Since the older pennies are also thicker (1.53 mm) than the newer pennies (1.43 mm), they won't fit so you must use newer pennies. Depending on your printer and filament quality, the layer printed on top of the pennies might be messy and with the 4 penny model there is little room for the subsequent layers to cover the flaws, so the top surface may have some slight ripples. If you want a completely smooth top surface, you might need to print one of the 3 penny models. In the second photo there is a three penny model on the left, and a four penny model on the right where you can see the slight rippling I was getting with the 4 penny model.</p> <p>The prints won't tolerate any warping or else the pennies might not fit in. The cooling fan is definitely needed for the layer printed on top of the pennies since it's essentially bridging at that point. I print mine with the fan off for the first layer and on for the rest of the print.</p> <p>My printer doesn't support pausing via the G code and must be manually paused, so I add a tiny tab at the front of the print so that I know when to pause the printer. I've included the correctly positioned tab file for all three variants of the model. If you use the tab files, you may want to move them so they're poking out a bit more, since they're barely visible where I have them positioned. When the perimeters have been printed and the infill starts for the tab layer, I immediately pause the print and insert the pennies.</p> <p>This is a remix of Tri Fidget Spinner Toy by 2ROBOTGUY. I scaled the model up to 101% in X and Y so that the bearing fits in easily, but still snug. I then added to each arm some hollow cylinders that I created in OpenSCAD. The bearing parts are a remix of 608 bearing (4.5mm steel BB's) by SiberK. The models were designed to be printed with a first layer height of 0.2 mm and 0.12 mm for the other layers. I'm not sure how important the layer heights are, but that's what I used for all my prints.</p> <p>Tip: Use 3M General Purpose Masking Tape High Adhesion for maximum adhesion and to eliminate warping. I had always been printing on 3M Scotch-Blue Painters Tape, but it doesn't really stick that well to the built plate and the spinner arms tended to lift ever so slightly. So I tried the general purpose tape and it works great! The prints stick to it really well, and it sticks to the build plate really well. Unlike the blue tape which I would leave on the build plate and would be used for dozens of prints, the general purpose tape is single use only. So instead of covering the whole build plate with the blue tape I cover only the area needed with the beige tape.</p> <h3>Print Settings</h3> <p><strong>Printer:</strong></p> <p>FlashForge Creator Pro</p> <p><strong>Rafts:</strong></p> <p>No</p> <p><strong>Supports:</strong></p> <p>No</p> <p><strong>Resolution:</strong></p> <p>0.20 mm first layer, 0.12 mm other layers</p> <p><strong>Infill:</strong></p> <p>40%, solid layers every 7th, 8th, and 9th.</p> Category: Mechanical Toys
With this file you will be able to print Penny Weight Fidget Spinners with your 3D printer. Click on the button and save the file on your computer to work, edit or customize your design. You can also find more 3D designs for printers on Penny Weight Fidget Spinners.