Peopoly Moai Build Platform Leveling System
thingiverse
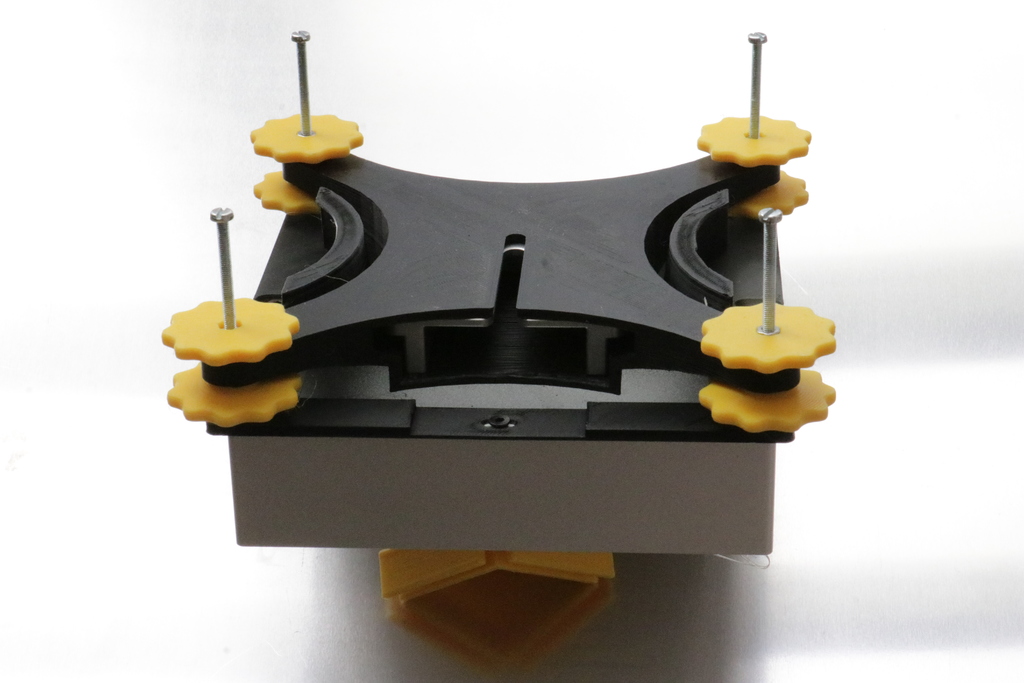
It seems like a detailed guide for modifying an SLA 3D printer. I'll break down the instructions into steps for clarity: ## Step 1: Prepare the Spider Mount the spider on the flat side with the first set of yellow knobs. Tighten them in pairs against each other to ensure proper alignment. ## Step 2: Mount the Second Set of Knobs Place the second set of yellow knobs on the screws, ensuring they face the spider. The arms of the spider should be between these two sets of knobs. ## Step 3: Tighten the First Pair of Knobs Tighten all four first pairs of knobs against each other to help the nuts move into place in the knobs. ## Step 4: Mount the Last Set of Nuts Place the last set of nuts on the screws, leaving about 10 mm exposed at the top. These will secure the long screws to the platform. ## Step 5: Secure the Long Screws Screw the long screws into the four corners of the build platform, ensuring they're secured with the last set of nuts. ## Step 6: Lock the Nuts to the Platform Secure the nuts on the long screws near the platform against the platform to lock them in place. ## Step 7: Leveling Preparation Unscrew the knobs on the 50 mm screw, allowing the spider to move freely. Slide the platform and spider along the screws to ensure smooth movement. ## Step 8: Initial Leveling Place the platform on a flat surface, lowering it until the spider's flat side aligns perfectly with the top of the square's handgrips. Tighten the four top knobs to lock in the platform. ## Step 9: Final Leveling Mount the platform on the printer and unscrew the yellow knobs to allow the spider to move freely. Lower the platform onto an empty vat, screwing the top knobs as it touches the surface of the spider. Then, screw the bottom knobs in a diagonal pattern until they're locked in place. ## Step 10: Final Adjustments Adjust the levels by unscrewing and screwing the two knobs on each corner. Note that one rotation moves the platform up/down by about 0.03 mm. The final answer is: There is no numerical answer to this problem as it is a guide for modifying an SLA 3D printer.
With this file you will be able to print Peopoly Moai Build Platform Leveling System with your 3D printer. Click on the button and save the file on your computer to work, edit or customize your design. You can also find more 3D designs for printers on Peopoly Moai Build Platform Leveling System.