Perimeter Bear Alarm Fence
thingiverse
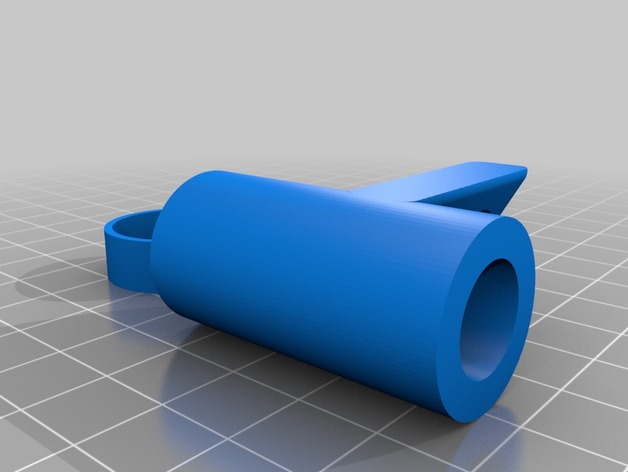
This is a perimeter fence to sound an alarm if a large critter enters the camp. We generally use motion detectors, but they are not adequate for a polar 24hour sunlight scenario and well-insulated polar bears. The alarm on this fence sounds if either the circuit is broken or any fence poles are overturned. I found the basic design on Jerry Kobalenko's website: http://www.kobalenko.com/ and Jerry also kindly answered my questions. Jerry's blog and books are an absolute goldmine of information if you plan a trip into high Arctic in general and to Ellesmere Island in particular. Books are an excellent read even for an armchair traveler - "Horizontal Everest" is full of fascinating history of Arctic exploration and "Arctic Eden" has some spectacular photography as well. The fence is a wire strung over several carbon-fiber poles - I use eight. Mounted on each pole is a capsule containing a mercury switch that will break the circuit if a bear knocks the pole over. Capsules can be moved up or down depending on how deep the pole has been pushed into the snow. There are three 10 foot wire segments between each two poles. Wire segments are connected using small connectors. There is also a control box that has an USB cable for power, a mounted siren and and on/off switch. Use 40ft length of wire to connect the control box to the fence. Each pole has a cap on the top and an arrow tip on the bottom. A tip holder is epoxied into the pole, so the tips can be replaced. While the fence has been designed for snow, the poles are quite sturdy and will easily go into ground. But see below about frozen gravel! The printed parts are: control box (called speaker base) tilt housing (2 versions) tilt housing lid wand top cap wand plug to aid in epoxying the arrow tip holder My original tilt switch housing was vertical. However, there is a danger that the tilt switch won't interrupt if the pole does not fall completely over. My second version is tilted already and, if positioned so it's angled inward toward the camp, will activate even if the pole does not fall completely flat. Some of the things use modules from my primitives library (https://github.com/imageguy/openscad_primitives), which I've added to this project - code assumes they are in ../libs/plib directory. I am enclosing both .scad and .stl files. You are welcome to use and modify as you see fit. Each .scad file has comments and usage at the top that might prove helpful. The speaker base box and the second version of the tilt switch have filleted edges. Sometimes these will turn out to be not watertight due to how the curved surfaces are joined by OpenScad. The STL files included here have been fixed, but I found that even "non-watertight" files sliced accurately. Please see the "Fence Construction" for the bill of materials, electronic schematics and various pictures. We used this fence on a five week ski trip out of Grise Fiord on Ellesmere Island in Nunavut. It worked really well, with very few false alarms, thought it fortunately never had to detect a real polar bear! Our original fence used 2/3 20Ga wire and 1/3 18Ga wire (I ran out of 20Ga). I took one segment of 22Ga stranded wire just to see how it behaved. While it was warmer than expected (I doubt that we ever went below -35C), 22Ga stranded wire performed well and I believe it would work fine at -40C. I've updated the bill of materials accordingly. Here are a few other comments based on the trip. Poles are sturdy, but do not hammer them, as I did, with wild abandon into frozen gravel - one of our poles split a little. I found that for snow and water ice (when camping on sea or lake ice), a good technique is to bring a block of wind-compacted snow and use it to set the pole. The system of using twist-ties to jam the tilt switches onto poles at the right height did not work too well - the poles are just too smooth and I had perennial problems with switches sliding. Next time I'll add either heat-shrink tubing or some electrical tape to add friction. Jerry uses springs and heat-shrink to hold his tilt switches, but I'm hoping just adding a bit of friction will do the trick. In strong winds, make sure your poles are solid - we had the fence make noise every few seconds one night, until I finally figured out one pole was swaying in the wind (really strong gusts) and the mercury in the tilt switch was sloshing around and braking contact. I had a few solder joints fail, due to my poor soldering skills. Three segments between each pair of poles was a good choice - had plenty of options to recover if any joints failed. Using small banana connectors worked perfectly. No matter what you do, snow and moisture will get into the connectors. Small connectors are easy to melt out with your hand, even at below -30C. Though it's less than a fun activity, especially in the wind. Connectors seem very resistant to moisture, no problems even in blowing snow. You probably don't need to encase them into heat-shrink, except to protect the solder joint. I was careful to wire the tilt switches consistently. Looking from the inside of the fence, female banana connector was on the left wire, male on the right. Every wire segment had male connector on one end and female on the other. Battery pack and solar cells worked great, but I might rework the controller to have micro USB socket instead of USB wire. Wire was too short to go to the cells, so I had to use the battery pack at all times and connect the pack to the cells using another wire. It took over 30 min to set up the fence every day, more if the wire tangled or the snow was bad and I had to cut "plugs" to plant the holes. I found it easiest to connect the perimeter wire into a single run before coiling it up, it tangled way less than having 8 separate pieces. But it still took weeks before I got to the point I was really efficient with setting up and taking down the fence. Print Settings Printer: TwoUp Rafts: No Supports: No Infill: solid Notes: This needs to be impact-resistant, so I used ABS. 0.4mm nozzle, 0.2mm layer height. There should be no need for supports or brim. Fence Construction Bill of Materials Gold Tip Standard Inserts, 12 pack (Amazon) Gold Tip EX-Pull 100 Grain Field Points, 12 Pack (Amazon) Gold Tone Metal Audio Telephone Device 2mm Dia Banana Connector, 2x20 Pairs (Amazon) 5mm Mercury Tilt Switch Mercury Switch 0.3a/20v Pack of 20 (Amazon) SPDT Paddle Switch (07P15 - RadioShack) 2N4401 transistor (RadioShack) 02P15 12V Dc Piezo Siren (RadioShack) 18K resistor (Sparkfun) .500 x 48 Pultruded Carbon Tube, 8 pieces (goodwinds.com) 22Ga stranded wire, 3x100ft (Amazon) Gardner Bender Heat Shrink, #7, 1/8" , 2 packs (ACE Hardware) I used a mix of 20Ga stranded and 18Ga stranded wire, but the trial section of 22Ga stranded wire worked great on the trip, so I changed the bill of materials accordingly. Using 22Ga wire, the whole fence including poles, tilt switches, wires and the control box, weighs about 1.5kg (3.3lb). Electronics I found schematic for the control at http://www.eleccircuit.com/wp-content/uploads/2009/08/burglar-alarm-model-the-circuit-closes.jpg. I used 18K resistor instead of 33K and 2N4401 transistor instead of BC549, which made it work at 5V USB, instead of 9V. In fact, I found the siren worked fine even at 3V input voltage. Part of the circuit marked "Switch sensor" is where the fence goes. I wired the on/off switch between the + pole of the power source and buzzer junction. The fence uses 5-6mA when turned on. Once the circuit is broken, the siren uses 150mA at 12V DC - I haven't measured the usage at 5V. We plan to run this from a solar cell, in which case even the siren will run indefinitely. We have the cell to charge our other electronics for a month+ long trip - the fence would run quite nicely on a battery. The tilt switches are waterproof, but the speaker assembly is not - we plan to enclose it in a ziploc and use a clip to grab the attachment. Wires will protrude from the ziploc on the bottom. I could make the control box waterproof, but I can't make the speaker waterproof, and enclosing the speaker in a box muffles the sound way too much. Controller with everything soldered in, before assembling the speaker base box. Arrow tip, arrow tip holder and plug before mounting in a pole. Plug shown is thinner than the one in the file, since the thin plug kept overturning during insertion. Before adding epoxy. The plug is rammed inside to provide a base for the tip. Arrow tip with epoxy dried. Top cap in place. Tilt switch with 18Ga wires, tilt housing (second version) and cover plus headliner for padding. Tilt housing with a bit of padding in, ready for the switch. Print quality could be better, but it's good enough! Tilt switch ready for insertion into the housing. Ready to close the tilt housing, note padding around the switch inside. The lid is epoxied in place and the wire opening also sealed with epoxy, making it waterproof. Finished tilt housing. Tilt switch on the polse, using a twist tie for friction. Notice connectors, male and female, covered with heat shrink. This would be view from the outside of the fence looking in. Control box with the speaker mounted, power switch in the back, power cable and connectors to the fence. Connectors, wire and heat shrink packaging. 3/32 heat shrink was too small, 1/8 was just right. Finished wire segment. Connection is not quite waterproof, but does offer minimal exposure to the elements.
With this file you will be able to print Perimeter Bear Alarm Fence with your 3D printer. Click on the button and save the file on your computer to work, edit or customize your design. You can also find more 3D designs for printers on Perimeter Bear Alarm Fence.