PGM Hecate II
thingiverse
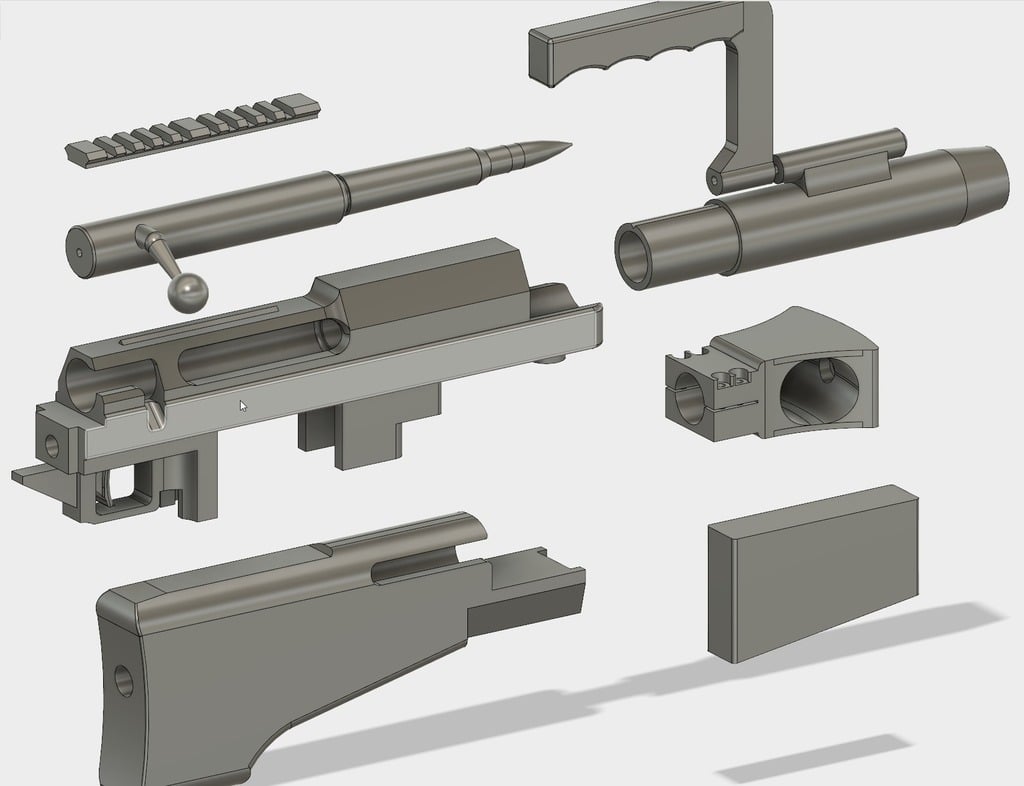
First, here's a thank you to Waffleman for finding this asset and introducing it to Thingiverse. The low-poly 'parent' allowed me to rough in the dimensions and then refine a crisp, clean model that I'm really happy to share with everyone. Whether it is in the hands of an NCR Ranger, or big tiddy anime girls, the PGM Hecate II has made a name for itself in the entertainment world and on the battlefield as a hard hitting anti material rifle, built around the BADASS 12.7x99mm NATO .50BMG cartridge. This remix is based on the dimensions used in Fallout 3 New Vegas, but was evolved to suit my tastes and fall closer in line with real reference images. This rifle will certifiably raise your intimate appeal with whatever combination of adjectives, indecisiveness, Tumbler profiles, and glitter you could possible want! This weapon's power is so monumental, when leveled against a foe, the bullet will actually travel BACK IN TIME and lay waste to their grandmother to ASSURE you that your adversary is ERASED from the space time continuum. Undoubtedly, this is WHY the PGM HECATE II exists on a tier all its own in the sacred annals of the Brotherhood of Nod. I've tried to make assembly EASIER by providing holes that are already sized to spec for tapping. PLEASE KEEP IN MIND that this is a work in progress. I am going to be printing this, but I haven't perfected the bolt/ receiver articulation and fitment! Joining the buttstock to the receiver I went with a 1/2" 13 length of all-thread about 10" long (slot one end of it so you can tighten it with a flat head screwdriver. About 3" inside the receiver, and 3" inside the buttstock, will be threaded. The rest of the holes have been sized to 4.7mm for easy tapping for M5 screws (I figured since we all have 3d printers it was a safe bet!) YOU WILL WANT/ NEED: * 4x M5x25 for the muzzle brake. * 1x M5x100 for the carry handle * 1x M5x?? for the rear of the bolt. Yes there is a screw there in real life. Doesn't matter how long you use so long as the socket cap head goes in flush. * 1x GI/ MILSPEC (preferably a cheepo knockoff) black rifle pistol grip! I put a 2mm pilot hole in the receiver to act as a guide for whatever finished size you want to drill. I followed dimension drawings for this part of the assembly as much as I could, but some hand fitment might be required for this part! * AND THE BARREL, which should be 20-24" (depending on your sense of aesthetics) of 1" (outside diameter) SCHEDULE 80 PVC tubing. CHANGELOG: 09 November 2019: So I'm happy with the fitment between the bolt, receiver, and bolt handle. Printed, a touch of hand sanding...and it is looking HOSSUM. Uploaded the 'precision' stock monopod files, and actually figured out how to get the M15 threads to render so it should be fully functional. Printing it all now and should have a finished product by tomorrow! 07 November 2019: Back in the saddle! Check the model for some uploaded pictures of printed/ assembled parts! The dimensions between each fitted part are not perfect, but they are requiring very minor hand fitting from what I have assembled. The Chamber assembly was the worst of them but I've since updated it (though I kept my original print and just sanded it down, so I have no first hand experience with the new model). I should be completing my print of this by the end of November and will post pics to show the finished product. 12 Jan 2019: Adjusted the magazine well forward structure, and overall magazine size, to better fit dimensions (as well as relative dimensions to the ejection port). In printing the receiver I noticed the magazine well placement didn't line up with the ejection port! I also finally figured out a crude way to do external fluting on the bolt - give it a look in the part viewer! I think it definitely needed the spiral fluting to make it more interesting. Also separated the bolt ant bullet for easier printing. 10 Jan 2019: I'm finally getting around to printing the current version of the receiver and intend to test the barrel extension fitment! Print is going on 24 hours strong! 18 Jun 18: Truncated the taper of the chamber assembly: it doesn't print well tapered so long and thin. Uploaded my own prints so you can see how things are working out! As a side note, the dimensions are tight, and I think the slight thermal shrink is responsible for that. Minimal sanding got the fitment that I am happy with, so I don't think I'll be changing it unless I find the fitment of the chamber assembly to the receiver to be problematic. Which I don't think I will! 16 Jun 18: Completed the modern buttstock assembly! I plan to re-visit the 'Gen 1' version later, but I wanted to get this out sooner rather than later! Things to know: * Cheekrest holes are for M5 thumbscrews. * The buttstock still attaches with a 1/2" 13 piece of all-thread. Holes sized for your tapping pleasure. * The larger bolt for the integrated monopod is made for an M8x20. * Profit. 15 Jun 18: Modified the Muzzle Brake, Receiver, and Chamber Assembly to accept the actual ~33.67mm OD of 1" SCHED 80 PVC. 11 Jun 18: Continued refinements of fit and finish, focusing on proportions and functional sizes. 10 JUN 18: Corrected proportions of Receiver, fine-tuned bolt articulation dimensions. Changed Bolt and top rail dimensions to scale better with new receiver. Working on buttstock next! 9 JUN 18: Enlarged trigger area of receiver.
With this file you will be able to print PGM Hecate II with your 3D printer. Click on the button and save the file on your computer to work, edit or customize your design. You can also find more 3D designs for printers on PGM Hecate II.