Photo thread library for Fusion360
prusaprinters
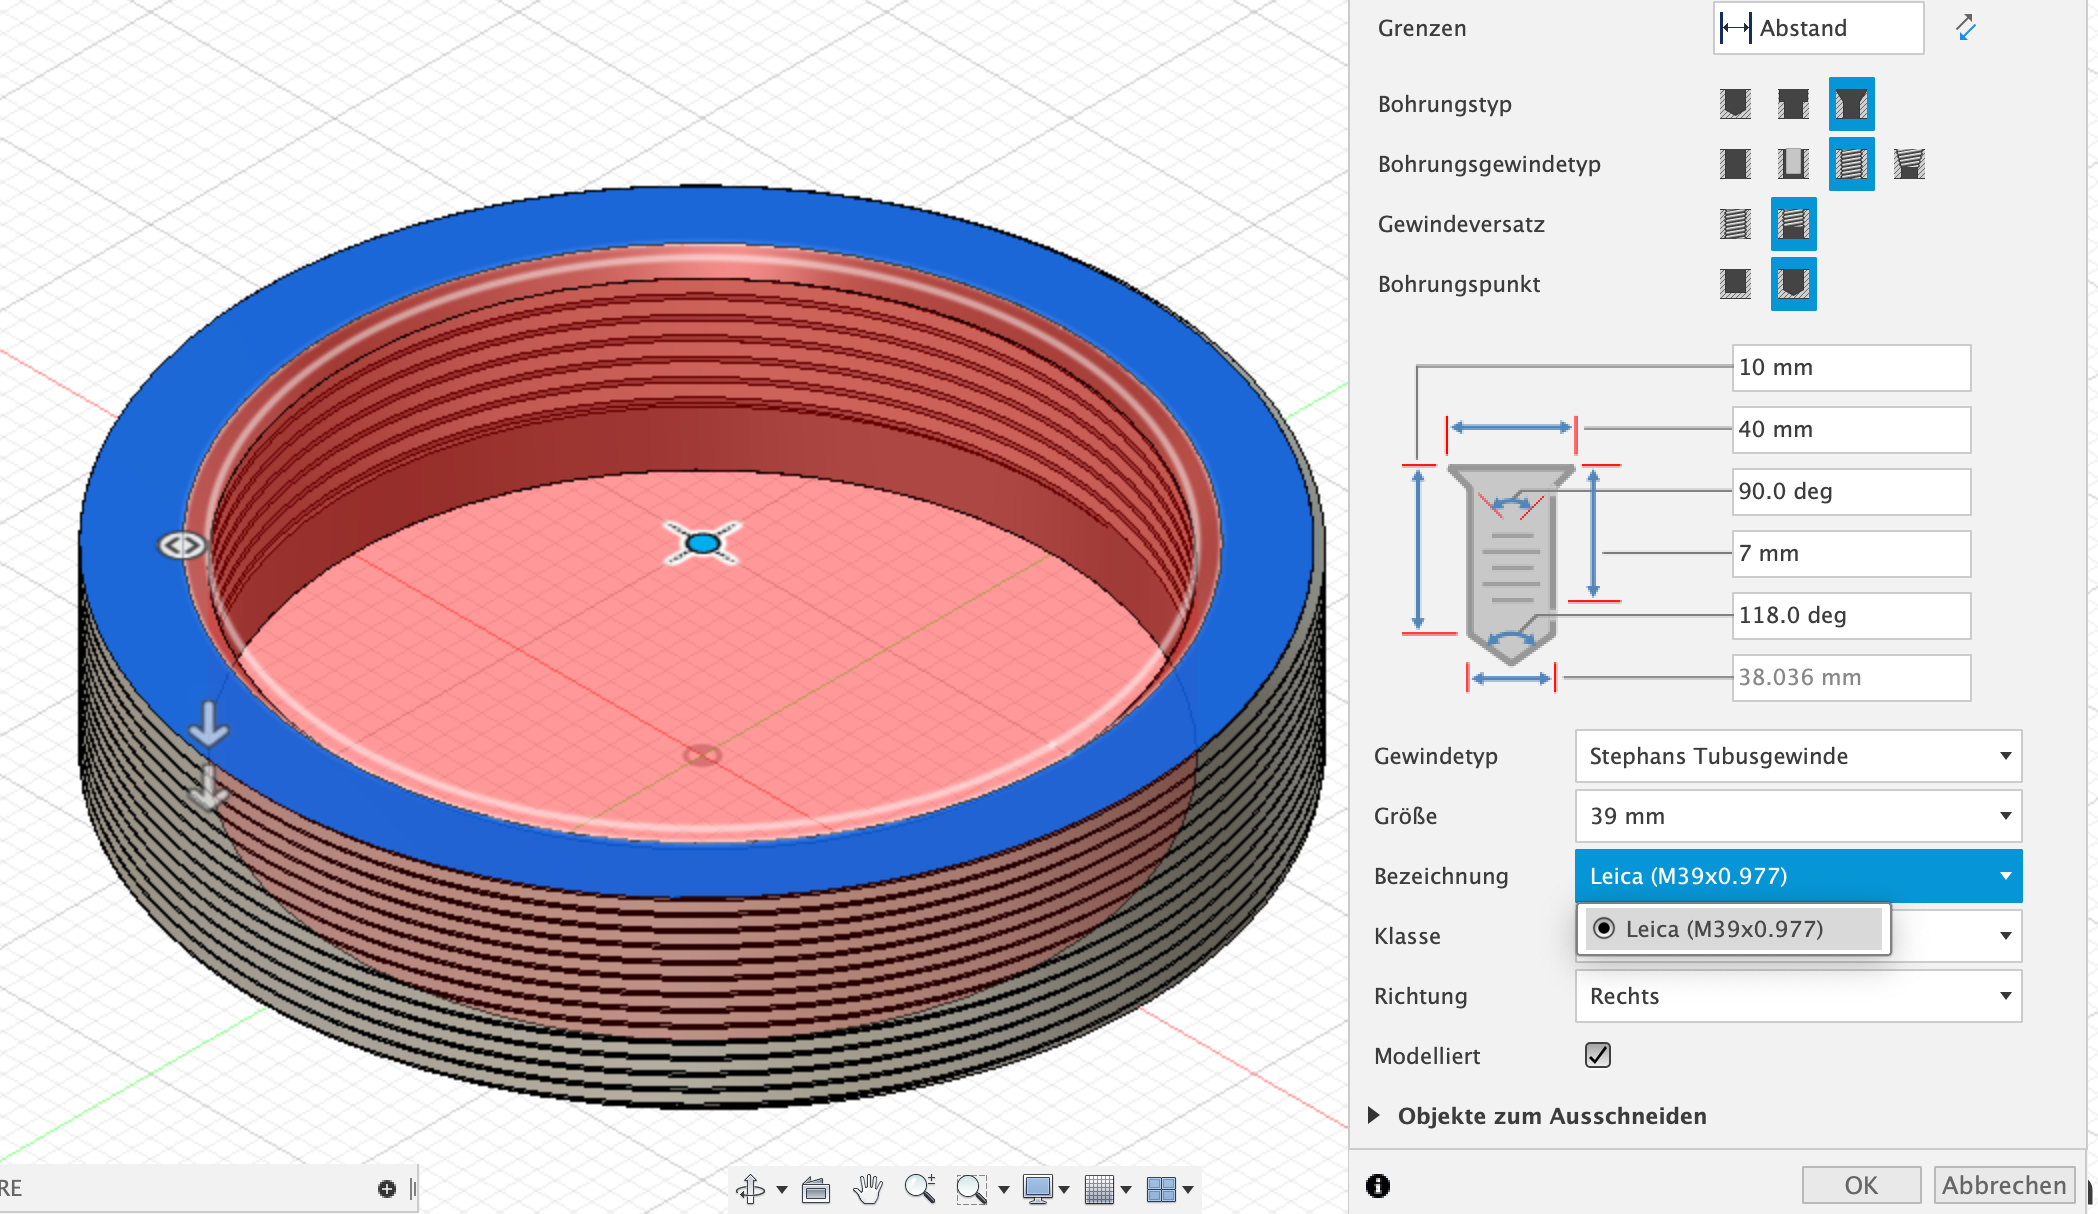
<p><strong>Update, 2022-08-14:</strong> Added 52mm Filter thread.<br> </p><h4>What is this?</h4><p>Some threads that are quite common with optical equipment are too “exotic” to show up in Fusion360's regular thread menu, making it hard to design an otherwise simple lens adapter or extension tube. So I made an XML library that contains the most important thread definitions used with photo gear, including:</p><ul><li><strong>RMS</strong> (0.8"x1/36"): This was the standard thread for finite microscope objectives for decades. With the introduction of infinite objectives most brands switched to proprietary threads, but at least for finite objectives the RMS thread is still the #1 standard. More important for photographic purposes, it is also used for bellows lenses like the famous Zeiss Luminar series, the Zuiko Macro series from Olympus, or the Macrophoto lenses from Canon.<br>Since a Fusion360 thread library can only contain either imperial or metric information, I converted the original inch values to mm. Thus, the thread diameter shows up as 20.32 mm instead of 0.8".</li><li><strong>Nikon Micro</strong> (M25x0.75mm): This is the thread used for newer (infinite) Nikon microscope objectives (and imitations of those). <br>The M25x0.75mm thread is also the standard filter thread for lenses with a front diameter of 25 mm.</li><li><strong>Mitutoyo Micro</strong> (M26x0.7mm): This is the thread used for Mitutoyo microscope objectives (and imitations of those).</li><li><strong>30mm Filter thread</strong> (M30x0.75mm): This is a regular lens filter thread that can be used as an intermediate connection for a (metal) step-down filter adapter to achieve a more robust end connection.</li><li><strong>Leica</strong> (39x0.977mm): The camera/lens connection thread of the early Leica rangefinder cameras. Though quite irrelevant as such nowadays, the thread has gained additional relevance as a de-facto standard for enlarger lenses.</li><li><strong>M42</strong> (M42x1.0mm): A thread that was used for camera/lens connections by different camera brands (including Pentax and Practica) in the past. Today it is used widely for intermediate lens tube connections in macro/microphotography.</li><li><strong>T2</strong> (M42x0.75mm): This similar thread was introduced 1957 by Tamron as a (lens-side) basic thread to be used with various bayonet/thread adapters to fit cameras of different systems. Today it is very common especially with telescope equipment. <br>The M42x0.75mm thread is also the standard filter thread for lenses with a front diameter of 42 mm.</li><li><strong>M48x0.75mm:</strong> Another thread typical for telescope equipment, (obviously) needed for bigger tube diameters.<br>The M48x0.75mm thread is also the standard filter thread for lenses with a front diameter of 48 mm.</li><li><strong>Raynox Back</strong> (M43x0.75mm): The Raynox DCR150 and DCR250 are popular close-up converters, offering very high image quality at a reasonable price. They can also be used as high-quality tube lenses for microphotography. This is the thread to connect one of these converters to a lens or lens tube.<br>The M43x0.75mm thread is also the standard filter thread for lenses with a front diameter of 43 mm (which is just natural since the DCR converters usually are mounted in front of lenses).</li><li><strong>Raynox Front</strong> (M49x0,75mm): This is the front thread/filter thread of the above Raynox converters, needed to attach filters, tubes, or additional lenses.<br>The M49x0.75mm thread is also the standard filter thread for lenses with a front diameter of 49 mm (which is its original purpose as well with the raynox converters when used in front of a lens). This, like the 52mm filter thread, is a very common diameter, so you will typically find more step-up/down adapters for 49 or 52 mm than for most other sizes.</li><li><strong>52mm Filter thread</strong> (M52x0.75mm): Added this because it is one of the most common threads for reverse lens adapters as well as a good inner tube diameter (as smaller diameters may cause vignetting with full frame sensors). Use it to add a bayonet connector to a tube by simply screwing on a reverse lens adapter.<br> </li></ul><h4>Something missing?</h4><p>Well, I have excluded the regular tripod threads for the simple reason that you can't put metric and imperial threads into the same library in Fusion360. Yet these are not exotic threads anyway; you can find them in Fusion's standard thread libraries under <br>ANSI Unified Screw Threads → 0.25 in → <strong>¼-20 UNC</strong> and<br>ANSI Unified Screw Threads → 0.375 in → <strong>1/8-16 UNC</strong></p><p>I would really like to include the 52mm SM2 thread (M52x0.635mm or 2.035"-40) used by Thorlabs and Newport optical tubes, but I have neither full specifications nor tubes to test this thread, so I don't dare to publish an untested version.</p><p>There are also some imperial thread definitions with purposes similar to the T2 and M48x0.75 threads. But even if I had their specifications (I don't), I would at least put them into a separate library since, as said before, a Fusion360 library can only contain either imperial or metric values.</p><p>If there's anything else you would like to see in the library, just drop me a line in the comments - but keep in mind that I can't define a thread I don't know the specifications of. In clear words, if you can't supply complete specifications, at least you will have to do the beta tester job for a thread that I add for your sake.<br> </p><h4><strong>Installation:</strong></h4><ol><li>Download the attached file named “StephansTubusgewinde.txt”.</li><li>Change the suffix from “.txt” to “.xml” (printables.com does not allow the upload of .xml files, so I had to rename it).</li><li>Go to <a href="https://knowledge.autodesk.com/support/fusion-360/learn-explore/caas/sfdcarticles/sfdcarticles/Custom-Threads-in-Fusion-360.html">this page</a> and follow the instructions to find the thread library folder of your Fusion360 installation. Note that you don't need to follow any instructions on the page - all you need is to find the “ThreadData” directory as described under “2. Browse to the following directory:”.</li><li>Put a copy of the file now called “StephansTubusgewinde.xml” into “ThreadData”.</li><li>Start (or restart) Fusion360. From now, whenever you open one of the thread dialogs, a new thread type will show up in the thread types menu, called “Stephans Tubusgewinde”.<br><br><img src="https://media.printables.com/media/prints/247411/rich_content/5e2298e8-0e17-4634-b641-1d676ba878fd/bildschirmfoto-2022-07-30-um-194618.png#%7B%22uuid%22%3A%22ee80f0b9-dac8-4beb-a559-482263f039d9%22%2C%22w%22%3A2098%2C%22h%22%3A1214%7D"><br><br>Please note that the thread definitions are intended to be used for 3D printing only - if you try to use them for CNC milling, your CAM may find my tool designations a little funny.<br> </li></ol><h4>Using the threads: (1) in Fusion360</h4><p>Open a thread dialog in Fusion360 and choose the thread type “Stephans Tubusgewinde”. Now you can choose one of the thread definitions above by diameter and name.<br>To keep things from getting too comfortable, there are two limitations in Fusion360 that affect the use of custom thread libraries:</p><ol><li>After each Fusion update custom libraries have to be installed anew. You can't even bookmark the “Thread Data” folder because for every new Fusion version a new subfolder is created. So keep all your custom thread libraries (I'm sure that mine won't be the last one you will find useful) in a second folder outside your Fusion360 installation.</li><li>Since Fusion's XML syntax is a little unflexible, you have to select the threads by diameter instead of name. Verbose names can only be listed as a diameter's subgroup, so you will find the thread names only after selecting the diameter first:<br>Choose “20.32 mm” to select RMS.<br>Choose “25 mm” to select Nikon Micro.<br>Choose “26 mm” to select Mitutoyo Micro.<br>Choose “30 mm” to select 30mm Filter thread.<br>Choose “39 mm” to select Leica.<br>Choose “42 mm” to select M42 <strong>or</strong> T2.<br>Choose “43 mm” to select Raynox Back.<br>Choose “48 mm” to select M48x0.75.<br>Choose “49 mm” to select Raynox Front.<br>Choose “52 mm” to select 52mm Filter thread.</li></ol><p>The thread definitions do not contain any compensation for “growth effects” caused by 3D printing. In most cases you won't need any compensation anyway, but if your printed threads are too tight to fit (which may be the case for plastic/plastic screw connections), you may want to modify them individually (assumed you don't need to revise your extruder/filament calibration). In case you don't know how to do this, have a look at the .f3d file I attached as a demo for widening/narrowing threads. Just follow the steps in the file's timeline and watch the object change. This works for male threads as well as for female ones.</p><p>If you are designing a long tube ("long" in that respect means bigger in length than in diameter) like the one in this screenshot…<br><br><img src="https://media.printables.com/media/prints/247411/rich_content/51df5d61-3abd-4be6-b33b-8e72bb96acf4/sample-object-v2.jpg#%7B%22uuid%22%3A%22cc32b1d3-ddbf-4c39-ab8f-cab9a9f09eee%22%2C%22w%22%3A1280%2C%22h%22%3A1024%7D"><br><br>…and want to produce it using an FDM printer, I recommend to <strong>not</strong> design it as a single part with threads on both ends, but split into multiple (i.e. at least two) parts (which, of course, have to be glued after printing) as visible in this section view of the same object:<br><br><img src="https://media.printables.com/media/prints/247411/rich_content/7d428e7c-a019-4419-a544-4ed3df81f65e/sample-object-v2-cut.jpg#%7B%22uuid%22%3A%22bf09a8bb-d938-4895-b74b-01c7dc3fd338%22%2C%22w%22%3A1280%2C%22h%22%3A1024%7D"><br><br>Reason is that, as detailed below, the threads should always be printed in a very high resolution (low layer height) while for the tube body a coarse resolution is sufficient. But it's not a good idea to switch from 0.2 mm layer height to 0.05 mm at 100 mm total print height - quite likely the print's surface will be too erratic to keep the nozzle from scratching the surface and kick your object off the buildplate.</p><h4><br>Using the threads: (2) in your slicer application</h4><p>All of these threads are quite delicate, so I recommend to use a layer height of 0.05 - 0.07 mm to print the threads (if using an FDM printer - if you should have an SLA printer (which I think is the better choice but have no experience with), use 0.025 or even less instead). However, for the non-threaded parts of your models there is no need to waste time and energy printing that fine (and slow). In the example below the use of variable layer height saves about 9 hours of printing time (which equals about 1.4 kWh of energy).<br>Unfortunately there is (currently?) no option in PrusaSlicer to change layer height by means of modifiers, so in this slicer, unless you (further) cut your model into multiple parts, you have to use the (laborious) variable layer height option. In case that you (like me) have never used this option before, have a look at the two example .3mf files I attached. One is the very same object as in the Fusion360 screenshots above, two parts positioned for sequential printing featuring layer sizes between 0.05 mm and 0.2 mm. The other one is a short tube, printed as one part with threads on both ends. To see the effects of variable layer height settings, open the files in PrusaSlicer, click the variable layer height button in the horizontal toolbox at the top of the screen, and then select one of the objects on the buildplate. The rest should be self-explanatory.<br>A tip: Before you set layer heights, set the maximum layer height limit in the printer settings/extruder settings to the value you want to use for the thicker layers (0.2 mm in the example file). <br><br><img src="https://media.printables.com/media/prints/247411/rich_content/c15a5529-970f-4c1b-a6db-dd0a15c65b8d/variheight.png#%7B%22uuid%22%3A%226f1f8f6c-92da-46f3-9fcb-3e5689cae48d%22%2C%22w%22%3A1200%2C%22h%22%3A990%7D"><br><img src="https://media.printables.com/media/prints/247411/rich_content/b062a1b2-9b78-440a-9ff8-95286d5ba0f7/bildschirmfoto-2022-07-28-um-174024.png#%7B%22uuid%22%3A%22994b7f77-0beb-4461-8e5f-59209fe140b7%22%2C%22w%22%3A865%2C%22h%22%3A670%7D"><br><br>In Simplify3D it's easy to use multiple layer heights in one print, so if you still have this stone age application, this is one of the rare cases in which it is useful.<br>Last but not least, if you use Cura, I have no idea how to achieve varying layer heights in a single object in this application, so I think that cutting the object to sections is the only option here.<br>Oh, and please do <strong>not</strong> print these example files - they are good for nothing but demonstration purposes. If you want to show me some “makes”, I'd be happy to see screenshots of your Fusion360 designs using the thread library.<br> </p><h4>Material choice (FDM printers)</h4><p>First of all: Use a filament that is as black and as dull as possible. Interfering light reflections caused by a glossy material are a real photo quality killer. Alternatively you can apply some dull black varnish to the inside of your models, but I think that you should take care not to varnish the threads.<br>Second, especially for the finer threads with less than 1 mm pitch, your filament should handle overhangs very well, so PETG is not a good choice. PLA does a better job. My favourite for this purpose is Extrudr Greentech Pro which also features a matt surface. <br> </p><h4>A few words about rigidity</h4><p>Normally lens tubes, adapters, and the like are made of metal. For a reason - plastic threads wear out easily. If you screw and unscrew your printed threads regularly, they will pretty soon be beat-up. But if you use a setup in which you have to screw on gear just once (and for all) and never have to take it off again, even plastic parts are rigid enough to be used for many years. Here's my strategy to accomplish this - cheap but uncompromising:</p><ul><li>First of all, I consider if I need to regularly change connected devices on both ends of the adapter/lens tube I plan to make. While this is needed in most cases on the camera side, there are many cases in which the lens or objective may stay “forever” connected to the adapter/tube.A good example are finite microscope objectives or reversed enlarger lenses - you will never use them without an extension tube, and you need an individual tube length for each of them anyway.</li><li>So, if I want to connect a lens that may remain mounted to the printed part (and that is light enough to be carried by the plastic thread, of course!), I simply settle for a printed thread.</li><li>If, however, I want to make an interchangeable lens connection, I use a different thread for the printed part and buy a step-down or step-up adapter for about five bucks (like <a href="https://www.amazon.de/vhbw-42mm-43mm-Objektiv-Gegenlichtblenden-Objektivvors%C3%A4tze/dp/B01GHI775Y/ref=sr_1_4?__mk_de_DE=%C3%85M%C3%85%C5%BD%C3%95%C3%91&crid=1Q1QRS5JSIMYL">this one</a>, for example). So I can screw the adapter to the tube where it remains forever, and use the adapter's wear-resistant metal thread to attach the lens.</li><li>On the camera side I usually want a connection that's not only rigid and interchangeable but even compatible to different (EVF) camera types. So I use a two-step adaption:</li><li>In the first step I use a printed M42 thread to attach an adapter that features some outdated SLR camera bayonet (outdated SLR is important: Due to the massive back focal length of these cameras (especially Nikon!) these adapters are flat and cheap to produce, yet can be further adapted to any modern EVF camera body with full back focus offset compensation. An M42→Nikon AI bayonet adapter like <a href="https://www.gumptrade.com/14150000301.html">this one</a> costs just a little more than a dollar/euro, so you can buy them by the pound and permanently connect them to all the printed photo gear that may come to your mind. </li><li>In the second step I connect the SLR bayonet to a back focus compensating adapter that fits my camera (like <a href="https://www.amazon.de/Concept®-Objektivadapter-Objektiv-Adapterring-Systemkamera/dp/B00OONJSDY/ref=sr_1_21?__mk_de_DE=ÅMÅŽÕÑ&crid=IHYZVTEHUG0V&keywords=adapter+nikon+ai+z">this one,</a> for example). These adapters are typically more expensive (between 30 and 50 dollars/euros), but I need just one per camera system since it can be connected and disconnected thousands of times without the risk of wearing out.</li><li>What I never, never, <strong>never</strong> do is: use 3D printed bayonet connectors. Yes, you find STL and CAD files for these all over the web, but they would not just be too unstable and unprecise to use. What primarily scares me is the idea of lots of plastic abrasion particles ruining my camera sensor beyond cleaning attempts.</li></ul><p>As a rule of thumb, I still prefer machined metal parts if I can obtain them cheaply enough. But there are so many opportunities to find myself thinking “I wish I had an x to y adapter with a length of z mm" that the chance to simply print it myself is truly a blessing.</p><p>Btw, now that you've learned how to install Fusion360 thread libraries, I recommend you take a look at Dans98's <a href="https://github.com/dans98/Fusion-360-FDM-threads">Fusion-360-FDM-threads.</a> These are some thread libraries optimized for FDM 3D printing. They are not compatible to anything but make easy-to-print and as-stable-as-possible connections especially for male and female threads that are both 3D printed.</p>
With this file you will be able to print Photo thread library for Fusion360 with your 3D printer. Click on the button and save the file on your computer to work, edit or customize your design. You can also find more 3D designs for printers on Photo thread library for Fusion360.