Photon Mono X Heater Kit
thingiverse
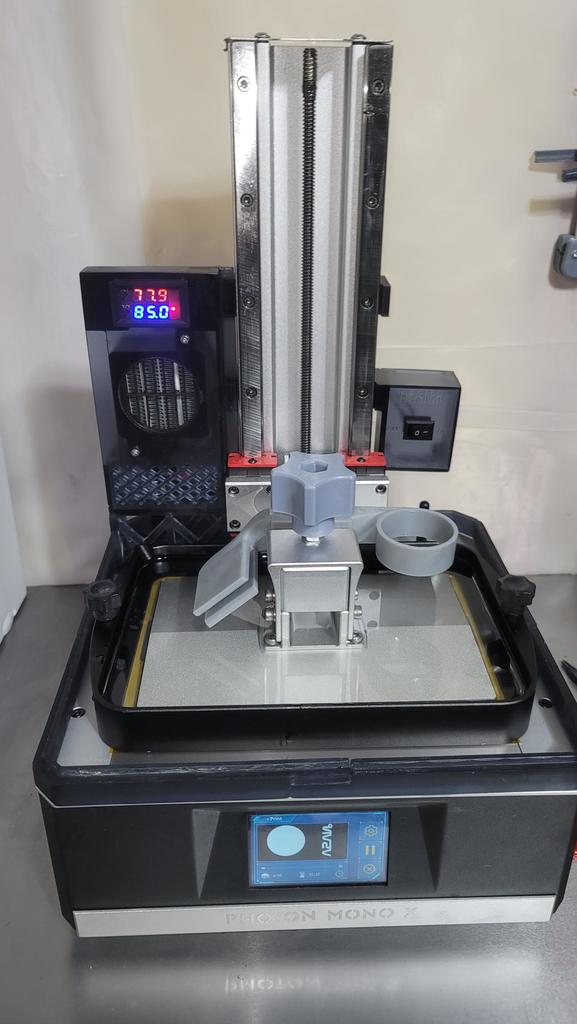
Edit 1/14/2022: I customized some pieces to add an internal ball and socket light to the Heater. There is a clip to mount to the top of the heater, the Ball and Socket pieces (print however many you want) and then i modified the top where you mount the LED Strip to have more room for wires to run through it. I also modified the internal power switch for the Heater so that you can run 2 switches, one for the Heater, and a separate one for the Light. I initially hooked it up behind the one switch but there are times i want the lights on when the heater is not so I decided to add this feature Edit 1/8/2022: I've added wiring schematics and pictures of my final product. So this has been a long time coming, many iterations and modifications, test prints etc. My inspiration came from the following things: Heater enclosure Photon Mono X: https://www.thingiverse.com/thing:4957808 ANYCUBIC MONO X HEATER: https://www.thingiverse.com/thing:4785435 Lid Spacer Anycubic Photon Mono: https://www.thingiverse.com/thing:4831665 Z axis bumper: https://www.thingiverse.com/thing:5137395/ I took ideas from parts of each of these and consolidated into 1 package, Many hours of measuring, designing and printing, changing this and that and printing again etc. I also designed this for another Thermostat to begin with but after receiving 2 DOA units i changed to a different thermostat and it works like a charm. This entire assembly can be made in 3 separate prints, I've shared screen shots of my chitubox build plate layouts above for reference, obviously print how you like, but i was able to do this in 3 print jobs. Also ignore the post processing, as i only printed this in navy gray, Cured them and set them in place for pictures. My final version is cleaned up and has a clear coat on it. Parts List: 12v 100w Heater: https://www.amazon.com/gp/product/B08YX4ZSFX/ AC-DC adapter (12v 10a 120w) with 5.5mm x 2.1mm DC Plug: https://www.amazon.com/gp/product/B07DJ2RSX8/ Thermostat - 12v with digital Display: https://www.amazon.com/gp/product/B07JHMY1M2 Female Threaded DC Jack (5.5mm x 2.1mm): https://www.amazon.com/gp/product/B07S5ZLFDG 18 Gauge single strand Wire: https://www.amazon.com/gp/product/B008UFZ098/ DC Rocker Switch (Optional): https://www.amazon.com/gp/product/B07S2QJKTX 2-Pin White LED Strip (Optional): https://www.amazon.com/gp/product/B075R4X1XL ººº Reference this to know if your existing wire will work within power thresholds as the numbner of strands within the wire diameter impacts its load capacities: https://www.engineeringtoolbox.com/wire-gauges-d_419.html ººº Not all hero's wear capes, This video is excellent to learn how to program and use this thermostat: https://www.youtube.com/watch?v=IAXFV6vCO44 Printed Parts list: ººº MonoX-Heating-Assembly-v7.stlv ººº The main part of this build, I printed this face down on my printer with supports for the wire enclosure, i moved all of the supports to terminate on this part itself, if you let it send supports to the build plate, you wont get the results you want as those cutouts will be filled by your support bases. ººº MonoX-Heating-Assembly-bracket-v7.stl ººº Print 3 of these, unless you decide to use the internal power switch. These i was able to print directly on the build plate, throughout my iterations i discovered you don't need supports even on that notch that slides into the main assembly ººº MonoX-Heating-Assembly-RightBumper.stl ººº This is the exact same file as the "Lid Spacer Anycubic Photon mono" with zero changes, You can print this directly on the plate ººº MonoX-Heating-Assembly-LeftBumper.stl ººº This is a modified version of the bumper from "Lid Spacer Anycubic Photon mono". I've added a clip to slide your Thermometer probe into ººº MonoX-Heating-Assembly-Base-v7.stl ººº My first versions of this did not include the base, I found that if i mounted the DC plug on the bottom and let the power cable come in and bend upwards, the lid closes much better. ººº MonoX-Heating-Assembly-ExternalPowerSwitch-Mount.stl ººº This piece is optional, you can hard wire this, but i added this piece later on as i got bored with unplugging and plugging in the heater every time ººº MonoX-Heating-Assembly-InternallPowerSwitch-Mount.stl ººº I designed this to replace either the top or middle bracket. This was too difficult to find a solution that looked good that could fit on the bottom mount dealing with making it look good while avoiding the wireless antenna. ººº MonoX-Heating-Assembly-InternalPowerSwitch-Dual-v7.stl ººº This too is made to replace either the top or middle bracket but this one has dual switches so you can power some 12v strip LED's inside your printer if you want to. ººº ball_link.obj.stl ººº This file is from https://www.thingiverse.com/thing:2134864 Print as many of these as you want, in the image above i have 4. I will be adding 2 or 3 more to this for more range and flexibility. I found these can be tough to print ººº MonoX-Heating-Assembly-BallSocket-Light.stl ººº This is a modified version from https://www.thingiverse.com/thing:2134864 . I made the cable opening at the base of this larger, as i could not fit 2x 22awg wires through the original authors hole, there is a lot more space in there now. ººº MonoX-Heating-Assembly-ExternalPowerSwitch-Cover.stl ººº This one is Optional if you want to close up the back of the switch. There is room for 4 x M3 nuts to slide into a hex cutout from behind the mount points. Its definitely tricky to get these in place. Then you can secure it with an M3x8mm screw (you can go up to 25mm length) but i found a happy medium at M3x14, where theres enough room to start by tightening with your hands before the hex wrench. ººº Lid Spacer (All Of Them) ººº These i print directly on the plate, i then threw in some supports on the 45's making sure to leave a space so the base does not touch the spacers themselves. These are 100% unmodified from the original author and it will work as is. But what you see in the pictures, i unchecked the aspect ratio and scaled the Y Axis to 125%. This makes the mouse hole for the cable larger, without having to file into the stock one, making that corner a weak spot. After printing completes and i clean them up, i attach the 2 rear and 2 front pieces together with some uncured resin wiped on them and hit them with a UV light to lock these pieces to make the 4 parts, just 2. The rear one you can always leave in place, while the front can easily be removed to clean resin drips etc and you dont have to fiddle around with the cables every time. All of these objects i printed with 5 bottom layers at 16 seconds with 8.5mm lift distance, and the normal layers were printed at 1.4 second exposure (My UV power is at 75%) with 6mm lift distance. I set the Left speed to 110 and retract to 160. I like to let my prints start nice and slow, Once i make sure i have a few hundred layers printed successfully i start to ramp up the speed I printed all of my parts in Sariya Tech Fast resin, this is their Navy Gray color. I printed these parts only for the pictures i took to post this, the final versions are done in the same Sariya Tech Fast resin, but Smoky Black coloring If you decide to add the lighting, If you purchase the spool in my link, the end of it has a pigtail soldered to it when you receive it. You can make this original end work in this fitting with a little file work. It then plugs directly into a 2nd switch, or to the left most (red) and 2nd from left (black) ports from the thermostat. This method makes the light run while the heater is on. If you want to use the light without the heater, you will need to run it to the 2nd switch. I hope that someone is able to make use of these parts, if you do please share a make for me to see!
With this file you will be able to print Photon Mono X Heater Kit with your 3D printer. Click on the button and save the file on your computer to work, edit or customize your design. You can also find more 3D designs for printers on Photon Mono X Heater Kit.