Physics Car
thingiverse
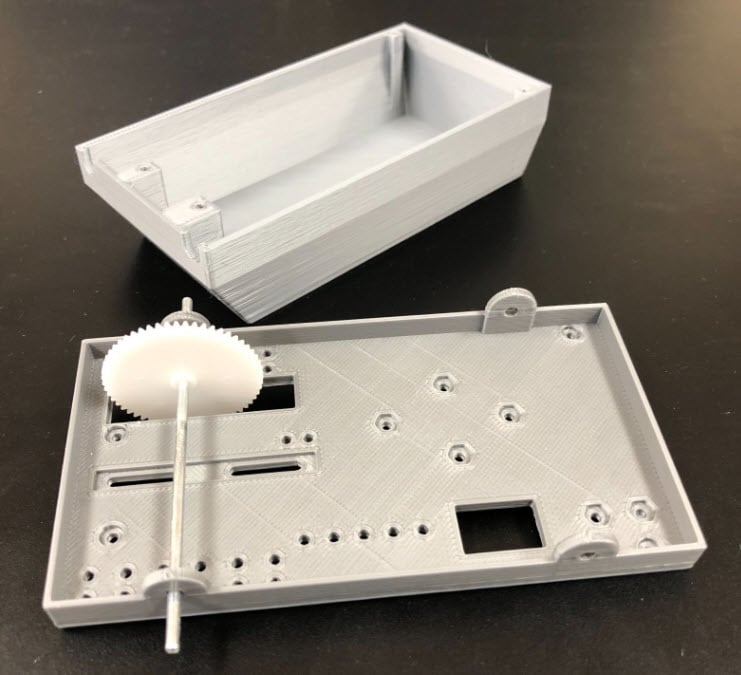
The files in this Thing are the three main structural components (chassis, cover, and motor strap) for a project in which my Physics students build a motorized toy car at the end of our Electric Circuits unit. My students must first design and construct a working circuit containing a motor, two LEDs, two limiting resistors, and a switch. I teach my students to solder connections and use shrink tubing. They love it! The chassis, cover, and motor strap in this "Thing" are designed specifically for the following... ... motors, switches, and AA (dual) battery holders (on Amazon: EUDAX 15set Rectangular DC Motor Mini Electric Motor 1.5-3V 24000RPM with 9.8" Lead Wires with 2 x 1.5V AA Battery Holder Case and Motor Mounting Bracket Holder for DIY Toys) ... 70mm x 2mm axles: (on Amazon: EUDAX 100Pcs STEM Toys Shaft Round Rod Axles for DIY Toy RC Car Boat Helicopter Model Part (2mmx70mm)) ... size 082A gear for motor shaft (on Amazon: uxcell 50pcs Plastic Gears 8 Teeth 082A Reduction Gear Plastic Worm Gears for RC Car Robot Motor) ... size 562A gear for wheel axle (on Amazon: Othmro 50pcs Plastic Gears 56 Teeth Model 562A Reduction Gear Plastic Worm Gears for RC Car Robot Motor) ... M2 x 4.0 mm screws and nuts (Each team needs 8.... Screws on Amazon: Steel Machine Screw, Zinc Plated Finish, Pan Head, Phillips Drive, 8mm Length, M2-0.4 Metric Coarse Threads (Pack of 100) ... Nuts on amazon: VictorsHome M2.0 Hex Nuts, M2 x 0.4mm Stainless Steel 18-8 304 A2-70 Metric Coarse Thread Hexagon Nut 50pcs) ... spade crimp connectors (The switches have plastic parts which melt easily if you try to solder wires to them, so I use these from Amazon: Baomain Red Female Insulated Spade Wire Connector Electrical Crimp Terminal 22-16 AWG 4.8 x 0.5mm (width 0.2") 100 Pack) For each team I provide the LEDs (of their choice), resistors (of their choice), wire, and spade connectors. Each team must calculate what value of resistors to use based on the LED specs I provide them. Each team builds its circuit prior to installing on the chassis EXCEPT FOR THE SWITCH. The spade connectors are a real pain to remove from the switch terminals once connected, so those are connected last after everything is in good order. Oh, and we had to bend the spade connectors a little in order to fit under the cover. No problem. I have provided an image of the circuit as well as an example photo of a team's wiring installed on the chassis. (Ignore the colors of the bands on the resistors in the circuit diagram.) Note: The blue wire in the PHOTO is not electrical. It is only used to secure the LED/resistor assemblies in place. Like a twist-tie. If you examine the photo of the chassis you'll see a few more holes than there are in the stl file I include here. Some prototype holes were unused, so I deleted them from this file for simplicity. My students design their own wheels in Tinkercad and 3D print them. The wheels are the biggest factor determining the differences in each car's acceleration and top speed. I have included a photo of a car I built myself as an example I show my students. My "Rebel Racer!" The cockpit, "engine", and red stripe and insignia are just decorations I made and glued to the cover. My students' 3D-printed wheels are pretty smooth and provide little traction, so I supply #27 rubber bands for each team to stretch around the front wheels of their car. This improves the traction immensely. (On Amazon: Alliance Rubber 24275 Sterling Rubber Bands Size #27, 1 lb Box Contains Approx. 2400 Bands (1 1/4" x 1/8", Natural Crepe)) My students loved this project! And I did too. I spent a fair amount of time over the summer developing it, and it was time well spent. The project went very smoothly. If you are a teacher considering this project, my advice is to build a car yourself first so you can anticipate where students will need help. If you do this project or something like it with students, please share your experience with me on Twitter and let me know how it went and about any improvements you made. Have fun! Pat Twitter: @Misterfizzx
With this file you will be able to print Physics Car with your 3D printer. Click on the button and save the file on your computer to work, edit or customize your design. You can also find more 3D designs for printers on Physics Car.