Pi 4 Case for Prusa MK3/MK3S
prusaprinters
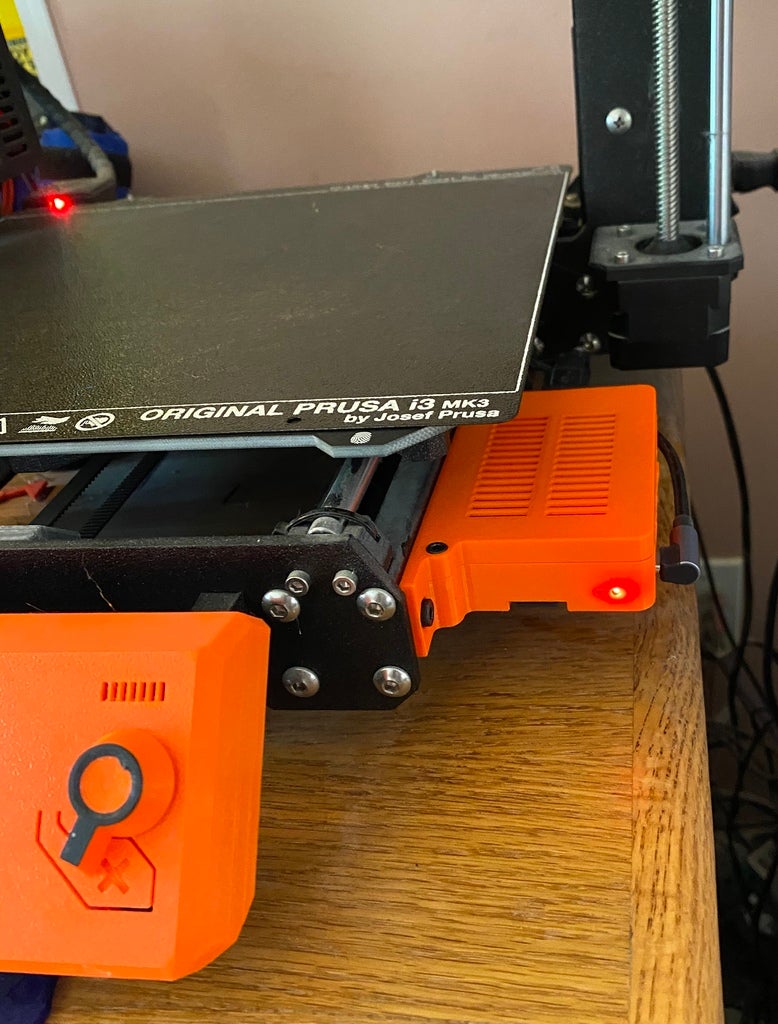
<p><strong>NOTE:</strong> This is for a Rasbberry Pi 4. <a href="https://www.prusaprinters.org/prints/1668-pi-3b-case-for-prusa-mk3">See HERE</a> for the Pi 3/3+ version</p> <p>I've seen many cases for mounting a Raspberry PI to the MK3 over the Einsy case. This mounts a Raspberry Pi 4 on the right side under the bed, which makes cable management a bit cleaner.</p> <p>Print the bottom part and one of the tops depending on whether you need a slot for the camera's ribbon cable or not.<br/> Also needed:</p> <ul> <li>1x M4 T-nut for 30x30 extrusion</li> <li>1x M4x10 cap (or pan head) screw.</li> <li>2x M3 Square nuts</li> <li><p>2x M3x 8MM cap screws up to 12mm length should work<br/> Be sure to look for drop-in T-nuts, so they can be inserted without disassembling the frame.<br/> I wouldn't necessarily recommend buying any of the following, because the kits contain too many parts for this project, but for reference I built my Pi case by pulling from the following products:<br/> https://www.amazon.com/gp/product/B0785PJZTP</p> </li> <li><p>M4 T-nuts for 30x30.<br/> https://www.amazon.com/gp/product/B015A351WS</p> </li> <li>M4x10 Cap screws<br/> https://www.amazon.com/gp/product/B018503K94</li> <li>M3 Square nuts<br/> https://www.amazon.com/gp/product/B072FKMYMF</li> <li>M3 Cap screw kit (various lengths)<br/> Starting your shopping in the Prusa Spares bag is a good idea.</li> </ul> <h3>Print instructions</h3><h3>Category: 3D Printer Parts Summary</h3> <p><strong>NOTE:</strong> This is for a Rasbberry Pi 4. <a href="https://www.prusaprinters.org/prints/1668-pi-3b-case-for-prusa-mk3">See HERE</a> for the Pi 3/3+ version</p> <p>I've seen many cases for mounting a Raspberry PI to the MK3 over the Einsy case. This mounts a Raspberry Pi 4 on the right side under the bed, which makes cable management a bit cleaner.</p> <p>Print the bottom part and one of the tops depending on whether you need a slot for the camera's ribbon cable or not.<br/> Also needed:</p> <ul> <li>1x M4 T-nut for 30x30 extrusion</li> <li>1x M4x10 cap (or pan head) screw.</li> <li>2x M3 Square nuts</li> <li><p>2x M3x 8MM cap screws up to 12mm length should work<br/> Be sure to look for drop-in T-nuts, so they can be inserted without disassembling the frame.<br/> I wouldn't necessarily recommend buying any of the following, because the kits contain too many parts for this project, but for reference I built my Pi case by pulling from the following products:<br/> https://www.amazon.com/gp/product/B0785PJZTP</p> </li> <li><p>M4 T-nuts for 30x30.<br/> https://www.amazon.com/gp/product/B015A351WS</p> </li> <li>M4x10 Cap screws<br/> https://www.amazon.com/gp/product/B018503K94</li> <li>M3 Square nuts<br/> https://www.amazon.com/gp/product/B072FKMYMF</li> <li>M3 Cap screw kit (various lengths)<br/> Starting your shopping in the Prusa Spares bag is a good idea.<h3>Print Settings</h3> </li> </ul> <p><strong>Printer Brand:</strong> Prusa</p> <p><strong>Printer:</strong> i3 MK3</p> <p><strong>Supports:</strong> No</p> <p><strong>Resolution:</strong> 150 or 200</p> <p><strong>Infill:</strong> 20%</p> <p><strong>Filament:</strong> Prusament PETG Orange<br/> <strong>Notes:</strong></p> <p>I don't know how hot it gets under the bed, but I figure if PET is good enough for the Y-belt holder it should work here. Maybe I'm right, maybe not. Customizer also exposes the ability to create this case without the mounting points for the 30x30 extrusion. That version of the case requires no additional hardware; the lid will just press on and depending on printer precision, hold with friction.</p> <h3> Post-Printing</h3> <ol> <li>The case Bottom has built-in support on the extrusion clip. Carefully remove this support after printing.</li> <li>Slide a M3S nut into the slot in the lid</li> <li>Slide a M3S nut into the slot in the base</li> <li>Put the Pi3 (without SD card) into the base. Make sure the board is on all 4 posts.</li> <li>Carefully place the lid on starting from the USB/Ethernet side and then the HDMI side and so on.</li> <li>When the lid is engaged insert the M3x8 screws through the 30x30 mount and through the hole the lid. Tighten until flush. DO NOT over tighten.</li> <li>Install the MicroSD card.</li> <li>Move the MK3's Y-axis to the far rear.</li> <li>Place the T-nut into the right-side of the MK3's front extrusion.</li> <li>Holding the Pi case vertical, USB/Ethernet down, insert the T on the case into the extrusion.</li> <li>Gently rotate the case to be horizontal.</li> <li>Align the hole in the case to the T-nut and insert the M4x10 cap screw. Swearing may be involved in this step.</li> <li>Before tightening the M4 screw, slide the case fully forward to maximize cable clearance for the USB and Ethernet ports.</li> <li>Connect USB and ethernet (if needed)</li> <li>Power up the pi.</li> <li>PROFIT!!!</li> </ol>
With this file you will be able to print Pi 4 Case for Prusa MK3/MK3S with your 3D printer. Click on the button and save the file on your computer to work, edit or customize your design. You can also find more 3D designs for printers on Pi 4 Case for Prusa MK3/MK3S.