Pi & Arduino Mega or Rambo Mini & LCD2004 or LCD Graphic Controller Case
thingiverse
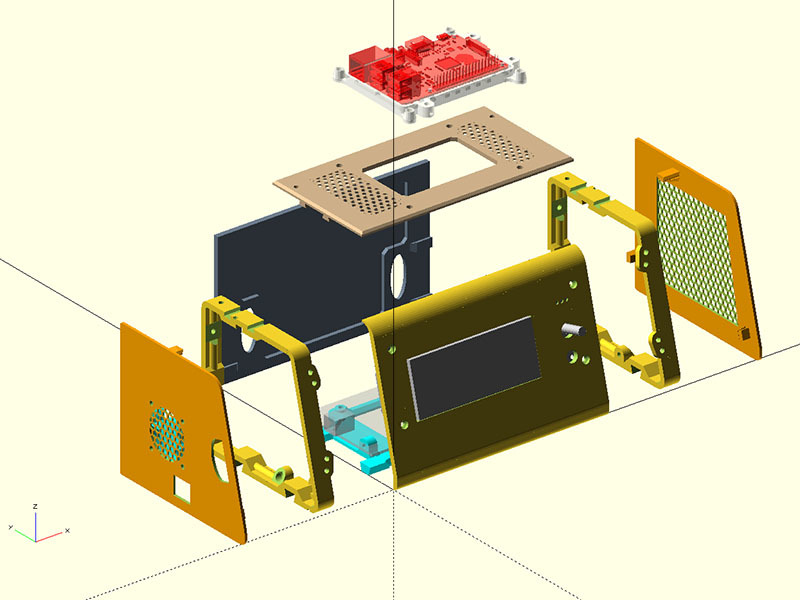
5/7/2018 I updated the Openscad file to add a 1.5mm base under the electronics board. Adding more protection seemed like a better idea than saving a little plastic. The module I added to the Openscad code is Bottom_Flat() for those interested. 1/29/2017 A bug was fixed that arjepsen pointed out, where the backplate dovetails didn't move but the bracket joints did. There was also the same problem with the top plate. This should be fixed now with Rev148. 10/5/2017 Someone found a big problem I missed when adjusting the front faceplate angle from 60 to 75 degrees. A new Openscad file has been added that should correct this problem for the graphics display, but no new STL files have been created or adjusted for the LCD2004 version. This is a remix of the Combo Electronics case https://www.thingiverse.com/thing:2466915 to house the Raspberry Pi and Arduino Mega or Rambo Mini and the LCD2004 or Graphics LCD. The Raspberry Pi can go on the inside or outside back plate or top plate. I changed the angle of the front faceplate from 60 to 75 degrees so I wouldn't have to make the case wider. You can change that using the Openscad source and create all new STL files. If you're putting the Raspberry Pi on the outside backplate or top plate, you'll also need to print the part MonitorMountBottom_88x72Mnt_rev9.stl. This is a modification to the vesa Mount plate that changed the hole pattern from 100mm to 88mmx72mm to fit the back or top plate without making the case taller or wider. You can find the Openscad source of the modified Raspberry Pi vesa mount: https://www.thingiverse.com/thing:795786 I've included the pdf file Case_Configurations.pdf that lists the parts to print for various configurations. First, print the test prints to make sure the dovetail joints fit well for you. Print one of the brackets from DD_LtRt_Bracket_Pi_Elec_LCD_Case_Rev146.stl or DS_LtRt_Bracket_Pi_Elec_LCD_Case_Rev146.stl. The DS version is for mounting the back of this case to a printer like a delta. You may not need to use a backplate if attaching it that way. Then print DD_2_TestDoveTailSize_Pi_Elec_LCD_Case_Rev146.stl If the dovetails are too tight, print DD_4_TestDoveTailSize_Pi_Elec_LCD_Case_Rev146.stl. Then print the corresponding DD_x files you need. Refer back to https://www.thingiverse.com/thing:2466915 for more details about this project. I haven't printed any of these files yet, so they're still subject to change. I did print all the files from the previous design and they fit well for me. If I've missed any files here, let me know.
With this file you will be able to print Pi & Arduino Mega or Rambo Mini & LCD2004 or LCD Graphic Controller Case with your 3D printer. Click on the button and save the file on your computer to work, edit or customize your design. You can also find more 3D designs for printers on Pi & Arduino Mega or Rambo Mini & LCD2004 or LCD Graphic Controller Case.