Pi Stack
thingiverse
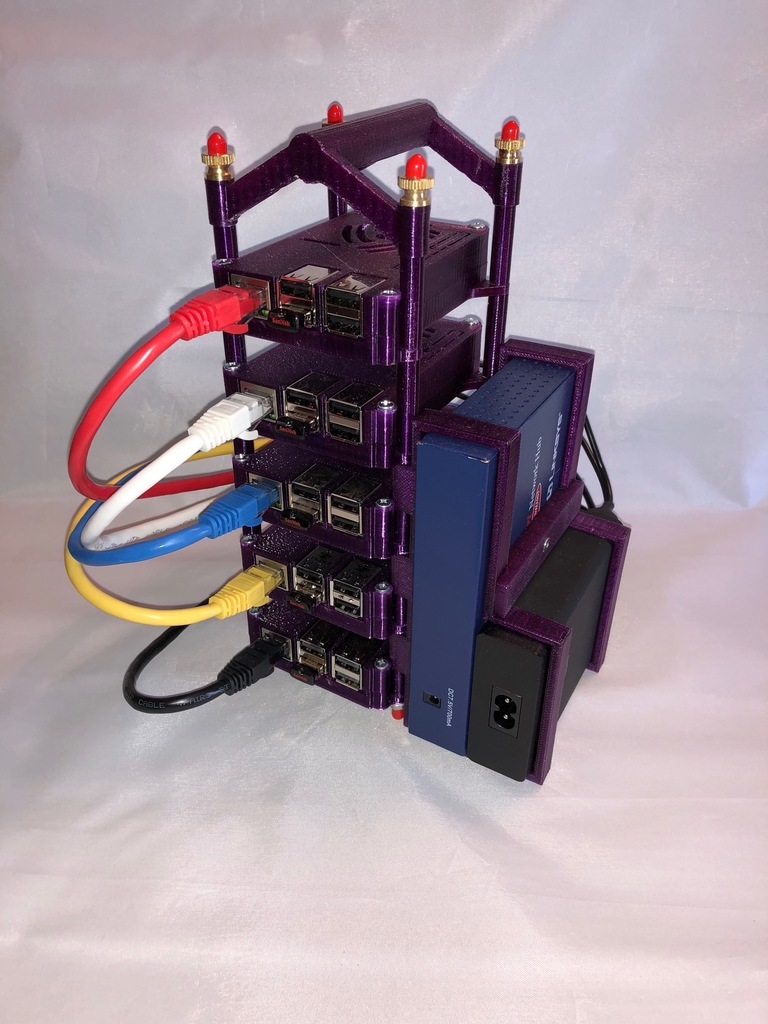
This is my interpretation of a Pi Stack. I wanted to utilize the existing case design by 0110-M-P (https://www.thingiverse.com/thing:922740), but I aimed to stack several Raspberry Pi computers for experimenting with cluster technology. I also wanted to add an Ethernet hub and power supply to make it truly mobile. I chose an Ethernet hub to make it easier to take the stack on the road (no monkeying around with WiFi addresses, etc). I've included all of the files needed to build a stack as tall as you want. You need only print the correct number of spacers and cut your threaded rods to length. You may also need to modify the .scad file to fit your own accessories. Vitamins --- The following vitamins are what is required to make a Pi Stack of (5) Raspberry Pi computers plus the accessory bracket. Use this as a guide and adjust as necessary for your own stack height. (4) #8 threaded rods (or equivalent) 280mm in length (4) #8 nuts (4) #8 knurled nuts (8) #8 rod end covers (optional but highly recommended to prevent scratches to surfaces) (1) Ethernet hub or access point/router (optional) (1) Power hub (optional, but recommended) Printed Parts --- You will also need to print the following parts. (2) Accessory shelf brackets (1) Accessory bar (6) 16mm spacers (4) 30mm spacers (10) 36mm spacers (5) Cases from 0110-M-P (https://www.thingiverse.com/thing:922740) - assemble the case per the instructions on this page Assembly --- I've provided several photos of my assembled stack. Refer to these for clarity. Assembly is best done inserting the two rods on the side with the accessory shelf (opposite the HDMI port). Begin by threading a nut on two rods and insert them in the first (bottom) case. Add one 16mm spacer on top of the case then insert the rod through the lower mount for the accessory shelf bracket. Repeat this for the next two cases. Once the spacers are set for the first three cases on the accessory shelf bracket, you can thread nuts on the other two rods and insert them on the other side of the cases. Use 36mm spacers. Next, insert the fourth case adding (4) 36mm spacers. On top of that, add the fifth case along with (4) 30mm spacers and the handle. Add the threaded knurled nuts and loosely tighten. Add the rod caps at this point trimming them as needed. Next, use a flat surface and adjust the nuts so that all four rods touch the surface and the cases are level. Tighten the knurled nuts. Finally, insert your accessories and use super glue or epoxy to attach the bracket retainer. I made a hole in the retainer in case you want to drill a hole in one of your accessories to make it more secure. My hub had plenty of space for a nut inside the case. I leave that mystery to you to solve how I was able to insert a nut inside the hub and still get it into the bracket. You're done! Accessories ---- For this build, I used the following components for power and networking. You can use whatever accessories you want, but if you want to mount them like I did, you will have to modify the shelf brackets to fit other options. * Anker PowerPort 60W 6-Port USB Charging Hub + [6-Pack] Premium 1ft Micro USB Cables * LinkSys Network Everywhere 5-port Network Hub
With this file you will be able to print Pi Stack with your 3D printer. Click on the button and save the file on your computer to work, edit or customize your design. You can also find more 3D designs for printers on Pi Stack.