PiDash NA Miata Double Din Mount for Raspberry Pi Official 7" Touchscreen
thingiverse
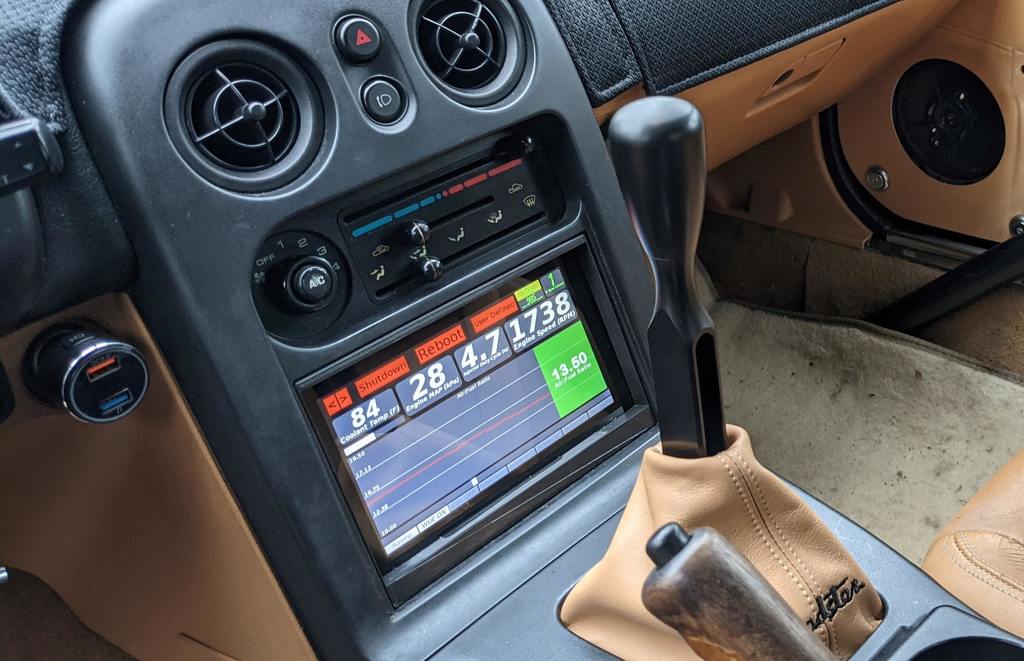
PiDash NA Miata Double Din Mount for Raspberry Pi Official 7" Touchscreen These files are used to fit a Raspberry Pi Official 7" Touchscreen to the radio opening of a NA Mazda Miata using the provided files to 3D print brackets along with an assortment of M3 nuts and bolts and some of the Miata's factory hardware. I used this to build a "dash" for my TunerStudio gauges but it could also be made into a radio for use with OpenAuto or CrankShaft. This was tested to fit in a 1997 Miata M Edition. The Miata interior does not have a standard size double din opening and that is what the spacer is for is to take up the area above and below the screen. Different model years and various trim Miatas have multiple versions of the tombstone with different size radio openings so the spacer may not fit all variations. Although the actual hardware that mounts the screen to the radio opening should work across multiple years and most people should be able to modify the spacer to work if needed or source a different tombstone for a clean install. LH and RH side mounts attach to the screen mount via captive nuts in the screen mount. The slots are designed to use the M3 hardware linked below. Link for M3 Hardware: binifiMux 360pcs M3 x 4mm / 6mm / 8mm / 10mm / 12mm / 16mm /20mm Pan Head Phillips Machine Screws and M3 Hex Nuts Assortment Kit For Toys RC Models 3D https://www.amazon.com/dp/B08N5TJ2XV The acc mount is designed to use the same standoffs as the Raspberry Pi which I believe is M2.5. Note 1: Some of the ribs on the rear of the tombstone will need to be trimmed when fitting it as not to press on the screen. If you make precise cuts, perhaps using some diagonal side cutters, and are careful not to damage the tombstone you should not see any evidence of said cuts when the tombstone is installed. Note 2: Files should be printed in a filament that can withstand the high temps present in a cars interior such as ASA. Note 3: Test fit the screen to the screen mount and get it centered before fitting the side mounts. The mounting holes for the screen are slightly offset so if the screen does not appear centered simply remove the screen from the mount rotate the screen mount 180 degrees and reattach. After you know the top and bottom of your screen mount and its orientation you can then proceed to attach the LH and RH side mounts. Most of the holes in the brackets are slotted and allow some adjustment. Optional parts I used in my build: Metra 70-7901 Radio Wiring... https://www.amazon.com/dp/B0002BETW2 UWAYKEY Bluetooth Amplifier Board: https://www.amazon.com/dp/B08HQSXNST kuman Breadboard Jumper Wires: https://www.amazon.com/dp/B01L6THEE8 Adafruit 4079 2 x 20 Socket Riser: https://www.amazon.com/dp/B07PPD25MK CarPiHat: https://www.tindie.com/products/tjd/carpihat-raspberry-pi-car-interface-pcb/ Attribution: This item is a remix of the two below files along with some original content. https://www.thingiverse.com/thing:2543354 Miata Stereo Universal Double DIN Head Unit Mount by EMRL September 19, 2017 and https://www.thingiverse.com/thing:1503651 Raspberry Pi 7" Touchscreen Super Awesome Portable by DrVegetable April 19, 2016
With this file you will be able to print PiDash NA Miata Double Din Mount for Raspberry Pi Official 7" Touchscreen with your 3D printer. Click on the button and save the file on your computer to work, edit or customize your design. You can also find more 3D designs for printers on PiDash NA Miata Double Din Mount for Raspberry Pi Official 7" Touchscreen.