Piezo bed leveling for Kossel mini with 220mm bed
thingiverse
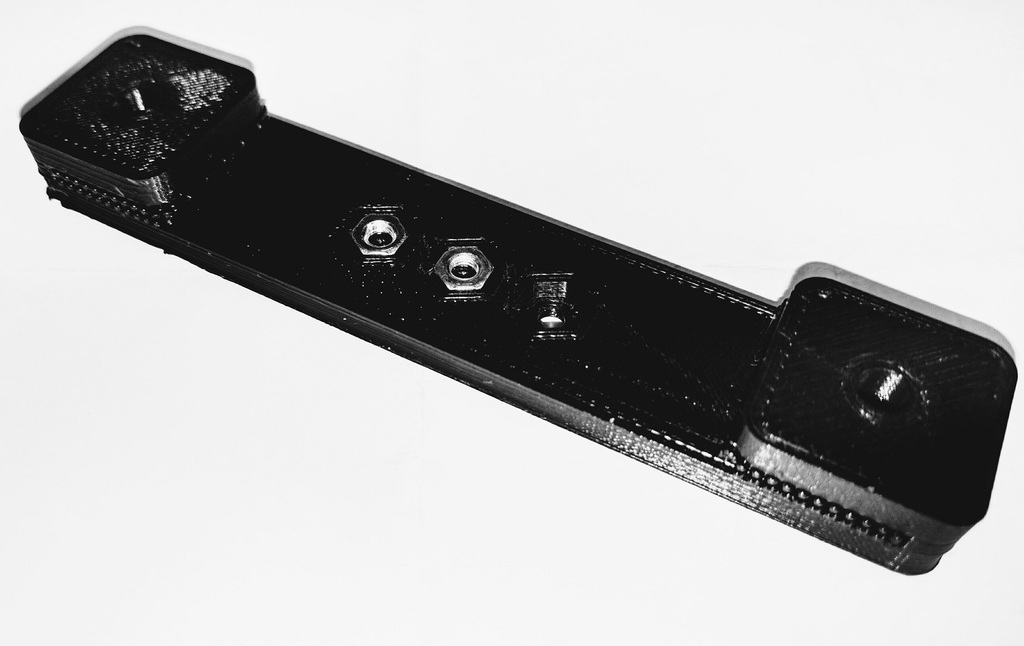
Hi, This is a mod of the Auto bed leveling using piezo discs by elenhinan for the kossel mini. Having a rigid (rigidity is a must!), 0 backlash, all metal (MGN12 rails + MGN12H carriage) printer and good fine tune can make very fine prints. I haven't needed auto bed levelling for a long time. But recently I had to print small figurines with a 0.2 nozzle and 0.1 layer height. Every time I change the nozzle, I had to recalibrate the printer. So, having any other kind of bed levelling (inductive, optical, mechanical switch (etc) on the effector would be useless for this purpose. The piezo bed leveling by elenhinan is excelent in this case. The sensors are in the bed mounts and the measurement is done exactly from the nozzle tip with 0x, 0y, 0z offset. So, as my printer is a little weird (the heated aluminium bed is larger then normal) I had to make my own mounts. I made a simple stick with mounts that can deform a little (to bend the piezo disk) but rigid enough to keep the bed in place. This is done in ABS (not PLA !!!) The bed can be connected in one of 3 holes (for mounting flexibility) with a m3x10mm screw, leaving the other 2 for the piezo actuator screw (also m3x10mm). I am using different screws for the bed and piezo to reduce the piezo disk heating (heat can damage it). You can put a small piece of FR4 (pcb without copper layer), say 5x5 mm, between the disk and the screw as a heat break). Also, I raised the bed from the mount with some washers and a M4 nut(you can use any spacer here al long as it will not deform) so it will not touch the piezo screw. The Piezo disk (20mm diameter) is stuck to the 20x20 aluminium rail with kapton tape (1 layer as isolation on the rail, and 1 layer over the piezo disk). The mount sits over it with the actuator screw touching it (tighten this screw until it puts some tension on the sensor) For the electronics, I used the first schematic (the one with a single LM358M dual op-amp) uploaded by elenhinan. It works very good for me.You can adjust the sensitivity of the bed sensor with the R8 resistor. I set mine to trigger just by lightly tapping on the bed. I used simple electrical wire for the sensors (piezo disks). Twisting them gives some em rejection. I will upgrade the wiring to coaxial microphone cable if I need to. To minimise false triggering, I routed the wires away from the stepper motors. A note on the piezo disks. Use simple, no integrated electronic amp, no plastic case disks. Buy more then 3 (they are very easily damaged during soldering). Test each one with a multimeter by gently bending it in one direction and note the polarity. I found reversed polarity disks in the same batch. They can be used by connecting the wires in reverse. Test each disk by itself on the schematic. To work properly, the sensor neds to trigger when the bed is pushed down, not when it springs back up. Slowly push the bed with your finger. If everything works fine, the led will light up when you push on the bed and stay dark when you let go. If it's dark when you push, and it lights up when you let go, connect that piezo in the other way around. Note that the piezo generates a voltage (negative or positive depending on the direction) when it actually bends, NOT when it stays bent (under load, tension). It is not a button/switch. For 3 mounts you need: 6 m3 nuts 6 m3x10mm screws 6 tslot/vslot nuts and screws (in my case I use m4)
With this file you will be able to print Piezo bed leveling for Kossel mini with 220mm bed with your 3D printer. Click on the button and save the file on your computer to work, edit or customize your design. You can also find more 3D designs for printers on Piezo bed leveling for Kossel mini with 220mm bed.