Pimped 3D Printed Rc Truck V4.1 - Original by MrCrankyface
thingiverse
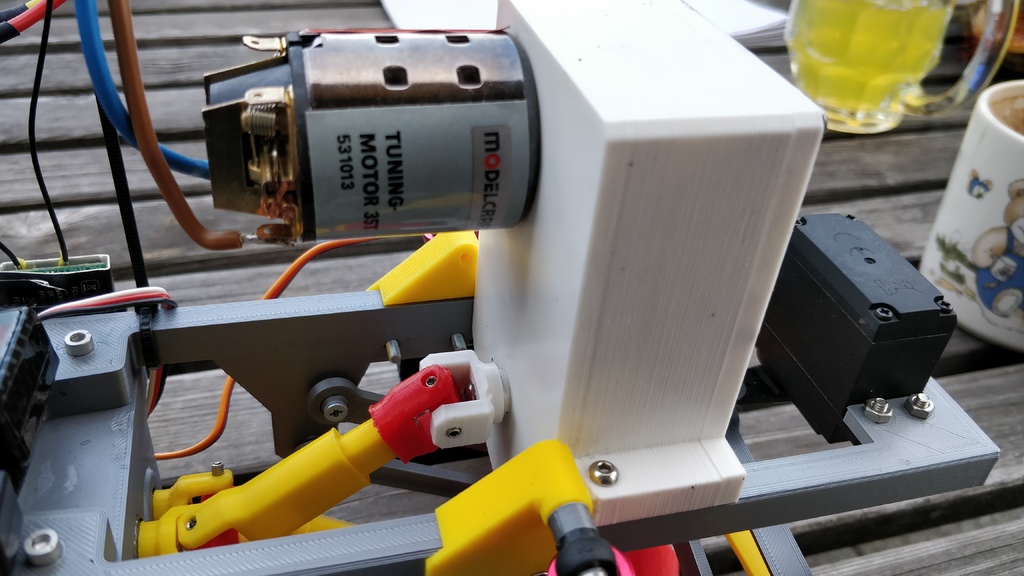
Based on the fantastic work of Mr.Crankyface this is version 4.1 (?) of the wonderful truck. It was pimped in several ways. First of all, I was too greedy to spend any money on panhard-rod or the other rods including the stearing rod, so I used 3d printed ones. The rodend idea is "stolen" with permission by the guys who made the Rancher 4x4, so called 3dsets.com. The Rancher is another fun build, by the way. When I am done with driving the truck, I turn my Rancher on, usually. Thanks a lot for the permission, @3dSets.com! Appreciated! Rods and Rodends ------------------------ The rods created using this idea are working as good as original rods, but are lots cheaper. Basically you print two "rodends" or "Ball joints" per rod, and use a vise and the tool to pressfit the rodends into the holes of the rods. Works fantastic. If you add a little grease those rodends go as easy as original ones. The tool needed to press the things together is 3d printed as well. Just take care to press the jooints into the rods the right direction. The flat surface of the joint is the one pointing to the desired mounting point - usually the frame or axle, while you insert the screw from the round side, always! The rodends are printed with 10 perimeters and 100% infill, basically they are solid. The rods are printed with 4 perimeters, and 50% cubic infill. STLs Tool: 12mm Rodend Balljoint Helper Rod end: Ball joint Rods for rear axles and front axle, 3 pieces per axle: 64mm rod rodend Rods for rear axles, 1 piece per axle, the one that is mounted above differentials: 75mm rod rodend Panhard rod: 75mm rod rodend Stearing rod: 85mm rod rodend Spacer for Suspension ----------------------------- I was in need of some spacers to mount the suspensions, they were too close to the frame on the upper side. So I created some spacers you might find useful. You will need one per suspension. STL Suspension spacer: Spacer Suspension TruckV4 Center gear mounting point ----------------------------------- Another tweak is addressing the kind of strange angle the gearbox is mounted compared to the axles - at least with the 80mm suspensions I am using. So I added part to mount the gearbox a bit lower compared to the original. Just print the gearbox extender, and replace the screws with M3x25 to mount the original gearbox to the frame with the extender in the middle. The extender was printed using 2 perimeters an 15% cubic infill. STL: CentralGearDistance TruckV4 Add a 540 motor and a second gearbox -------------------------------------------------- On top I was not able to buy such a motor MrCrankyface was using. Instead I went for a 540 RC brushed motor, 35 turns, 9000rpm. Now, this was too much RPM, so I created another gearbox to put the RPM down a bit before the power enters the original gearbox. The gearbox uses 6 bearings 10x15x4mm, 6700ZZ. On top you need 12 M3x12 screws, 2 M3x8 screws, and the U-joint that was connected to the old motors U-joint including the U-joint-cross including these small M3 screws. Place the Gearbox housing in front of you. Put the 3 bearings in their pockets. Use the lower bolt, and mount the 33teeth gear on it. The bolts work only one way, and the distance holder of each gear has to point towards the front of the gearbox. Put the bolt into the lowest bearing, if the round part of the housing is pointing downwards. Push it through, it has to up on the backside of the gearbox. Now use the upper bolt, add the 25teeth gear on it. Add the 15 teeth Upper gear to it as well. Mount it into the upper bearing. Now use the middle bolt, add the 15 teeth gear to it, and the 30teeth gear as well. Put it in the middle bearing. Now press the pinion gear to the shaft of your motor. Use a vise and try not to break the gear. Once done, pu t it through the hole of the gearbox. Mount the motor using 2 M3x8 screws. Make sure the screws to not kill the ability of the motor to run freely. If so, use spacers, or shorter screws. Use some grease to eacg spur gear. Put 3 bearings into their pockets of the gearbox front. Close the gearbox using 9 M3x12 screws. Mount the Y-adaptor (or so called U-joint) to the back of the gearbox, the "lower bolt" is showing up there. Use a M3x12 screw to mount the stuff together. Now moint the recycled shaft-u-joint that was connected to the old motor, use these little M3x8 screws you found there before as well. Now mount the gearbox, round side down, motor pointing backwards. Pu the shaft together with the counterpart mounted on the center gear of the truck. Apply some grease to ALL u-joints of your truck. Melting U-joints do not work. There is kind of a mounting instruction available on Youtube: https://www.youtube.com/watch?v=n0J1FvMxPEQ To get an idea of the assembly, there is an explosion video available as well: https://www.youtube.com/watch?v=jW8Df6eUZOA Once you put the thing together, do not forget to apply some grease to these spur gears before you close the gearbox. Print instruction: Gearbox and top go on their front/back, so the pockets for the bearings are pointing upwards. I used 3 perimeters, 15% cubic infill. Gears, bolts and adaptor were printed using 5 perimeters, 50% cubic infill. Gears were printed laying on their backside. Bolts and adaptor were printed standup, and I used a brim. STLs: Lower spur gear: Spur Gear (33 teeth) Lower bolt: BoltLower Middle rear spur gear: Spur Gear (15 teeth) Middle front spur gear: Spur Gear (30 teeth) Middle bolt: BoltMiddle Upper rear spur gear: Spur Gear (25 teeth) Upper front spur gear: Spur Gear (15 teeth) Upper Upper bolt: BoltUpper Motor pinion gear: Pinion Gear (12 teeth) Gearbox housing: GearboxHousing Gearbox front: GearboxFrontcase U-joint: Y-Adaptor Maiden drive with these mentioned addons: https://www.youtube.com/watch?v=mJC_t949Rj8
With this file you will be able to print Pimped 3D Printed Rc Truck V4.1 - Original by MrCrankyface with your 3D printer. Click on the button and save the file on your computer to work, edit or customize your design. You can also find more 3D designs for printers on Pimped 3D Printed Rc Truck V4.1 - Original by MrCrankyface .