Pinball controller cabinet trim
prusaprinters
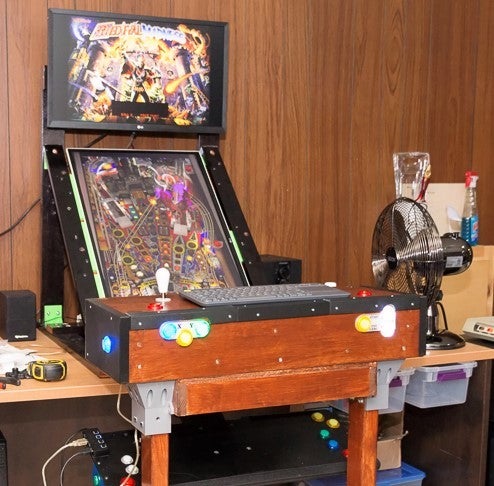
<p>Printed trim for a wooden pinball controller cabinet with button plates specifically designed for Pinball FX3.</p> <p>Pinball lockbar trimmed X2 includes both left and right lockbars and are the only parts requiring 100% (allows for easy filing to fit trim around the button plates).</p> <p>Rounded corner palm rest is not absolutely required, but designed to mitigate some of the sharp corner edges/corners. Secured with double sided gel tape.</p> <p>Joystick hole cover was designed to fit a 30mm hole, adjust your slice accordingly to fit your hole (mine was 29mm so a 95% global adjustment did the trick).</p> <p>My cabinet came it at 27 3/4" wide.</p> <p>I've included the leg brace I used (<a href="https://www.thingiverse.com/thing:4566594">https://www.thingiverse.com/thing:4566594</a>) .</p> <p>This front controller was designed to be used in conjunction with a fixed angle monitor stand (build log <a href="https://hardwarecanucks.com/forum/threads/fixed-angle-32-monitor-stand-portrait-mode-pinball.81834/">https://hardwarecanucks.com/forum/threads/fixed-angle-32-monitor-stand-portrait-mode-pinball.81834/</a>) (monitor shims <a href="https://www.thingiverse.com/thing:4545332">https://www.thingiverse.com/thing:4545332</a>)</p> <p>Build log for the controller starts at post #62.</p> <h3>Print instructions</h3><h3>Category: Video Games Summary</h3> <p>Printed trim for a wooden pinball controller cabinet with button plates specifically designed for Pinball FX3.</p> <p>Pinball lockbar trimmed X2 includes both left and right lockbars and are the only parts requiring 100% (allows for easy filing to fit trim around the button plates).</p> <p>Rounded corner palm rest is not absolutely required, but designed to mitigate some of the sharp corner edges/corners. Secured with double sided gel tape.</p> <p>Joystick hole cover was designed to fit a 30mm hole, adjust your slice accordingly to fit your hole (mine was 29mm so a 95% global adjustment did the trick).</p> <p>My cabinet came it at 27 3/4" wide.</p> <p>I've included the leg brace I used (<a href="https://www.thingiverse.com/thing:4566594">https://www.thingiverse.com/thing:4566594</a>) .</p> <p>This front controller was designed to be used in conjunction with a fixed angle monitor stand (build log <a href="https://hardwarecanucks.com/forum/threads/fixed-angle-32-monitor-stand-portrait-mode-pinball.81834/">https://hardwarecanucks.com/forum/threads/fixed-angle-32-monitor-stand-portrait-mode-pinball.81834/</a>) (monitor shims <a href="https://www.thingiverse.com/thing:4545332">https://www.thingiverse.com/thing:4545332</a>)</p> <p>Build log for the controller starts at post #62.</p> <h3> Print Settings</h3> <p><strong>Printer Brand:</strong> Creality</p> <p><strong>Printer:</strong> Ender 3</p> <p><strong>Rafts:</strong> No</p> <p><strong>Supports:</strong> No</p> <p><strong>Resolution:</strong> .2</p> <p><strong>Infill:</strong> 15</p> <p><strong>Filament:</strong> Generic from Waterbird PLA Black / Transparent<br/> <strong>Notes:</strong></p> <p>As noted above, Lockbar X2 printed @ 100% to allow them to be easily filed to fit around button plates.</p> <p>Printed on creality magenetic bed surface @ 200 / 45C.</p> <p>Button holes designed for 30mm / 24mm arcade buttons.</p>
With this file you will be able to print Pinball controller cabinet trim with your 3D printer. Click on the button and save the file on your computer to work, edit or customize your design. You can also find more 3D designs for printers on Pinball controller cabinet trim.