Pincher V2 - The Ender 3 Adjustable Spool Holder Add-On
thingiverse
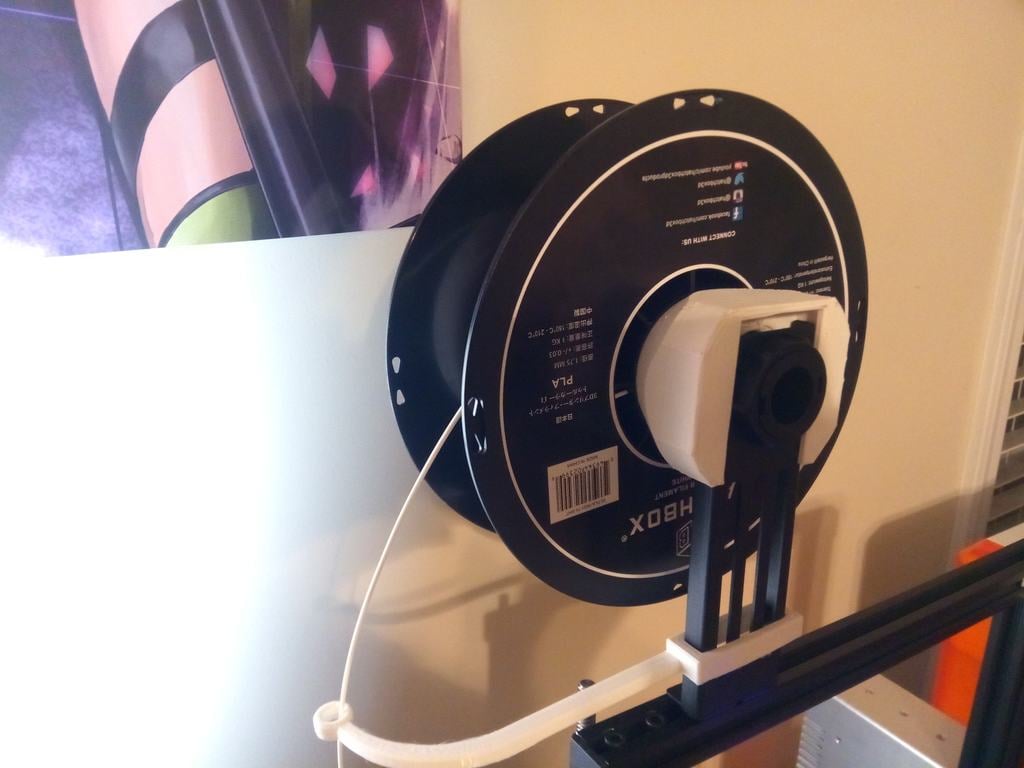
<b>LATEST UPDATE: Pincher Version 2 has been added to the folder for those who would prefer to save a little filament and be able to remove spools even faster than before. The new system incorporates a quarter-turn locking mechanism, allowing you to slide on the Tightening Bolt to your desired depth and then twisting it to lock it in place. The same fine-tuned screw function is still there, so you can grip your spool with your desired level of friction.</b> ------------------------- In the spirit of upgrading my Ender 3, I decided to print a custom spool holder add-on that doesn't use additional parts like bearings or bolts. Better still, not only is it adjustable for spools of larger widths, but also allows you to add spools with larger inside diameters that would otherwise put excess stress on your extruder. The two pieces essentially raises the center of gravity thereby easing it's ability to turn. Both prints together take about 9 hours or less depending on settings. Benefits: - You can now use larger width spools up to 140mm (or two rolls side by side) - Use larger spools with an inside diameter of 50 to 72mm without extra wear on your machine. - No tools or additional hardware required. - Works using OEM parts. - Firmly secures filament roll to printer. - Easy Slide On/Off Design makes filament change a breeze! - Compatible with Ender 3, Ender 3 Pro, and Ender 5 Regular Use Instructions: 1. Remove the black spool holder and bolt that came with your Ender 3. 2. Slide Filament Spool of your choice on to Pincher Spool Holder. 3. Screw Pincher Tightening Bolt onto Pincher Spool Holder until it comes into contact with your Filament Spool. It should be tight enough that your spool doesn't slide or rock but not so tight that it doesn't turn freely. 4. Slide Pincher Spool Holder onto printer in the direction you want it to face. 5. Thread Filament into extruder and start your print! Instructions with Added Support (Version 1 Only): 1. Remove the black spool holder and bolt that came with your Ender 3 2. Slide on Pincher Spool Holder in the direction you want it to face. 3. Insert original black spool holder into the middle of the Pincher Spool Holder until it reaches the end. 4. Adding pressure from the inside, screw on the black bolt until it holds the original spool holder in place. (You might need to wiggle it a little to ensure it's all the way through. 5. Add Filament Spool of your choice. 6. Screw Pincher Tightening Bolt onto Pincher Spool Holder until it comes into contact with your Filament Spool. It should be tight enough that your spool doesn't slide or rock but not so tight that it doesn't turn freely. 7. Thread Filament into extruder and start your print! Printer Settings: PLA Layer Height 0.3 Wall Thickness 0.9 Infill 10% Infill Pattern: Cubic Nozzle Temp: 220C Build Plate: 65C Print Speed: 120 Infill Speed: 140 Wall Speed: 30 Support Speed: 100 Travel Speed: 240 Combing: Within Infill Fan: 40-60 Support: Lines Overhanging Wall Speed : 20 After Print Notes: Clip away any artifacts that may be on the threads. Lightly sand the Pincher Spool Holder to make it easier to use. Expect the Tightening Bolt to be a little tight at first. Screw on and off (going further with every interval) until you loosen the threads. It should be easy enough that you can turn by hand without much force, but tight enough that it does not unscrew easily. Special Comments: If you run into any issues feel free to leave a comment and I'll try my best to address the issue. This is my first Thingiverse upload so please bare that in mind. ^..^
With this file you will be able to print Pincher V2 - The Ender 3 Adjustable Spool Holder Add-On with your 3D printer. Click on the button and save the file on your computer to work, edit or customize your design. You can also find more 3D designs for printers on Pincher V2 - The Ender 3 Adjustable Spool Holder Add-On.