Pinewood Derby Trophy
thingiverse
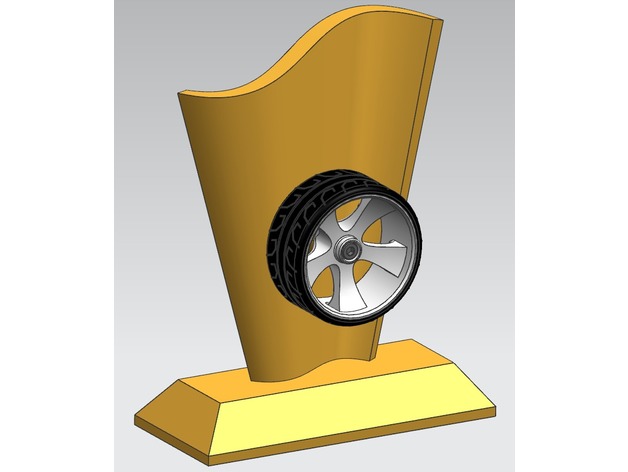
This project started out as a need for some Pinewood Derby trophies for our local church youth function. So why not put this new 3D printer to use and do something creative. This is by no means a completed project, but thought to get started sharing it here. It is 4" wide X 1.75" deep X 4.75" tall. I have included the Sketchup file, which was made from version 7, allowing you to modify or add embossed text as needed. The axle for the wheel is a #6 x 1" wood screw. Edit: 02-MAR-2017 Wheel and tire V2 is an edited version of the original wheel by willkear thanks to his sharing the original file. The V2 setup now is designed so that the tire can be printed separate from the wheel. This allows you to print the tire and Ninjaflex or another flexible TPU material, as well as printing the wheel in other colors. There are some modifications to the wheel to help with printing without support, however you may opt to use a raft for additional bed adhesion. The hub has been resized to take a M3 sockethead capscrew 16mm long with the head recessed into the hub. Print Settings Printer: Anet A8 Rafts: No Supports: No Resolution: .2mm Infill: 7% Notes: .8mm wall, top, and bottom thickness. 2 layers outer walls, and 4 layers top and bottom. 230C Hot End and 55C Bed Material was 1.75mm PLA .4mm nozzle 30mm/s on outer walls and 60mm/s on fill. Post-Printing The object may be left as is depending on how well your prints come out, but I have opted to sand and paint the prototype. Sand with a block with 100-150 grit sandpaper, then 220-320 to smooth out the scratches. Follow this up with a couple of coats of automotive sandable primer. Allow to dry thoroughly. Then wet sand with 400 grit wet or dry paper wet. a sink with slowly running water will keep the paper from loading up and provide a fabulously smooth surface. If you still have low spots you may need additional sanding and priming. Once your happy with the primed and sanded surface, you can hit it with your favorite color. Make the first coats light allowing some drying before shooting a heavy coat. A clear overcoat is nice to seal in the color and protect from smudging as is typical with silver, gold, or other metallic paints. How I Designed This The stand was originally designed is Sketchup. I started with the base rectangular box and added the chamfer all around. Then developed the base profile for the upper portion. Extruded it, and scaled the upper profile to around 2x the lower profile. Then developed the contour from the front view to intersect the bodies to get the proper trim. This detail was then leaned rearward to get the front most wall vertical. The mount for the wheel is a truncated cone place midway up and center, which is then intersected and trimmed. The main body is designed to give the idea of a flag, with spinning wheel fidget object. I borrowed the wheel from willkear's 1967 Shelby Cobra and enlarged by 50%
With this file you will be able to print Pinewood Derby Trophy with your 3D printer. Click on the button and save the file on your computer to work, edit or customize your design. You can also find more 3D designs for printers on Pinewood Derby Trophy.