Piper1 belt driven Z-axis
thingiverse
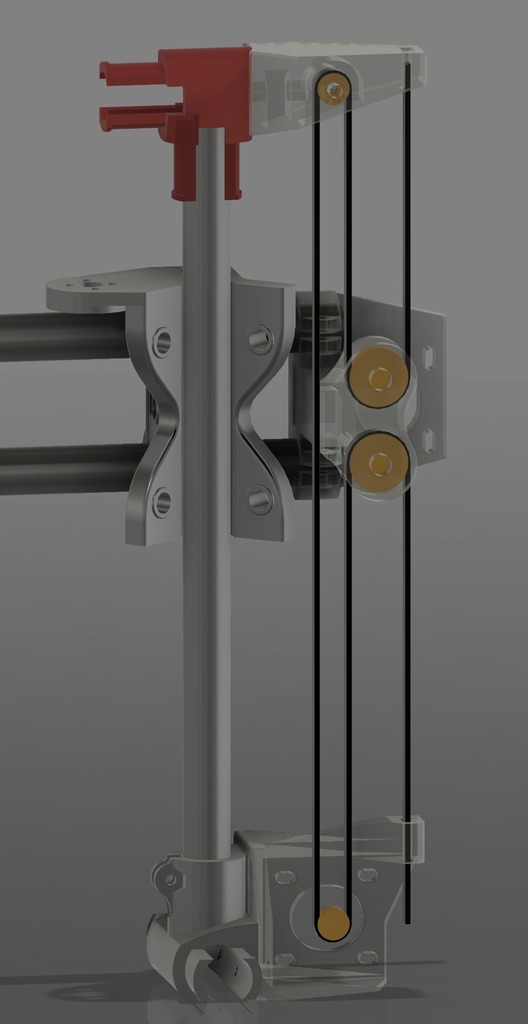
**UPDATE 2019-09-13:** A new version for 20mm pipes has been added. I have no way to test it, and it may have some issues or none at all, so print with caution (and I'll be glad for feedback); New pipe connectors are included for internal pipe diameters of 16mm and 17mm (just in case you need them); All the files were renamed. Belt driven Z-axis upgrade for Piper 1 3D printer. Suitable for those without straight rods or unwilling to spend money on them. Additionally, there's a pipes connector to extend X-axis tubes to properly mount components if you don't have longer pipes available (but you have short pipe segments). The most important question - will the axis drop down when out of power? Yes, it should. But it should move down slowly as two motors hold it and there is a pulley block to reduce load twice on the motors. And if you tighten Z rollers harder, they should hold the axis in place like they do in my case. I've only seen once when the axis dropped fast - during movement up when printer got some critical error and halted. So be careful anyway. List of materials: x2 GT20 motor pulley x2 GT20 idler pulley with bearing x4 608ZZ bearing or similar GT2 timing belts M4 M5 M8 bolts and nuts x2 M8 35-40mm Short manual for upgrade. Check photos for better understanding. Print set on part (+ pipe connectors if needed). Sorry, I used a 0.8mm nozzle, so not sure about tolerances with other nozzle sizes. Assemble parts: Put GT20 idler pulley in top mount (use M5 25mm bolt or longer). Tight nut to remove any backlashes but pulley should move freely; Assemble top mount with M8 35-40mm bolt and nut; Put 608 bearings and tighten them with short M8 bolts (I did not use nuts there, just screwed it into plastic and it holds strong enough). Next the printer: Remove top Z pipe corner mounts; Remove X motor mount Remove Z axis nuts on X rollers and Z rods; Remove Z motor mounts Flip X rollers to free space for belts (or you can cut nut mounts on them to free some space); Put new Z axis top corner mount (check photos to see orientation) Put new X motor mount with belt holder Put second X belt holder, on other side. You need longer pipes for that on X. I took two small pieces of old pipe and used a pipes connector to attach them (check photos). But maybe you will find your own solution. Put new motor mounts (check photos to see orientation). And now you can put the belts. Check photos to see how. Tighten them, don't cut them while not sure that all was assembled right. Use plastic ties to fix the belts. Adjust X belt holders positions to be sure that all belts are parallel. As for Z endstop - I use top mounted endstop for Z max + BL-Touch. Last thing, changes in firmware - use amount of microsteps as for regular GT20 pulley movement and multiply it twice (as we have a pulley block on Z). For regular 1.8° stepper motor it is 80 steps per 1mm for 1/16 microstepping, so it will be 160 steps per millimeter with 1/16. Try to use as much microsteps as possible with your drivers for Z, especially if you use auto level. LV8729 drivers probably will be the best for this - I use them 1/64 microstepping. Do not put high speed for Z on 8bit boards - I use 20mm/s for homing and 40mm/s for movements with 1/64 microsteps. Of course, speed can be higher, but it just doesn't need to be really high. And leave your comments in FB group: https://www.facebook.com/groups/258663638022956/ Cheers!
With this file you will be able to print Piper1 belt driven Z-axis with your 3D printer. Click on the button and save the file on your computer to work, edit or customize your design. You can also find more 3D designs for printers on Piper1 belt driven Z-axis.