PiPhi Raspberry Pi Hifi
thingiverse
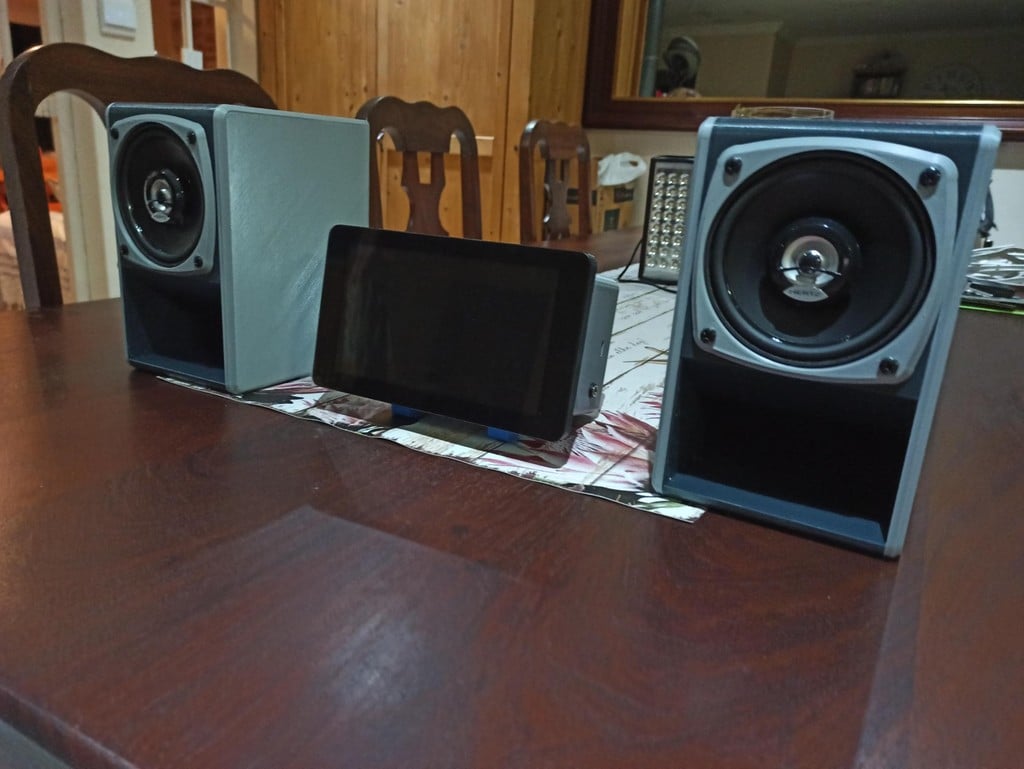
<h1>Summary:</h1> I got a 3d Printer 4 weeks ago and immediately set of with an ambitious project to create my own Hifi after seeing te speaker that guppyk2 created here: https://www.thingiverse.com/thing:4750820 I did not find a body design that I liked or served my purpose, so I set off designing my own. Many long nights toiling over all the new things like 3d software and even the printer and this is the result. It is not perfect, but I like it. Hope you do 2. <h1>Disclosures:</h1> <h2>Screen:</h2> The screen cover I used is a Remix of Luc-e’s design ( https://www.thingiverse.com/thing:1585924 ) – Its not really a remix. It’s almost an exact copy. I just moved the holes a bit as I found they do not perfectly align with my screen and made the screen sit slightly off-center to the cover. <h2>Speaker Enclosures:</h2> The speaker enclosures I used in the pictures is an exact print of https://www.thingiverse.com/thing:4750820. I made no Changes or Mods on those. <h1>Components Used in HiFi:</h1> 1. Raspberry Pi 3B as the main “brain” running Volumio (https://volumio.org/ ) 2. Official Raspberry Pi 7” Screen 3. IQAudio DigiAmp+ Hat as DAC and Amp. (https://www.sparkfun.com/products/17737 ) 4. Generic 12V 10A Power supply as the Amp is powered separately. The Amp also provide power to the PI via the GPIO’s 5. Speaker connectors, Wires, Power connector for PSU, and a Push button ON/OFF <h1>Components Used in Speakers:</h1> 1. Hertz COAX DCX100.3 Speakers. (https://www.amazon.com/HERTZ%C2%AE-Stereo-Coaxial-Speakers-DCX100-3/dp/B008B5B1N6 ) 2. Some Poly fill – I used it to thread it through the Tube of the speaker horn. To me it removed the hollow sound that I did not like. The speakers now do sound amazing to me… But I am no audiophile. 3. Speaker connectors on the back to connect it to the amp. <h1>Printing:</h1> I used a Creality CR-10 V3 for all parts. The below settings is for the Hifi Parts… For speakers, please refer to that link. I printed everything in Graphite PLA and Slate Gray PLA. For the Logo and Feet, I used CRON flex filament. Layer Height 0.2mm, Shell thickness 0.8mm, and Infill 20% For the Main Body and the Back, Support is required (Set to everywhere). On the main body it is required for the bucket that houses the USB etc. for the PI. And on the Back it is for the little clips that holds it in place on the main body. <b>Hope you find the useful and if you print this, please share some pics.</b>
With this file you will be able to print PiPhi Raspberry Pi Hifi with your 3D printer. Click on the button and save the file on your computer to work, edit or customize your design. You can also find more 3D designs for printers on PiPhi Raspberry Pi Hifi.