Pirate's Treasure Kaleidoscope
thingiverse
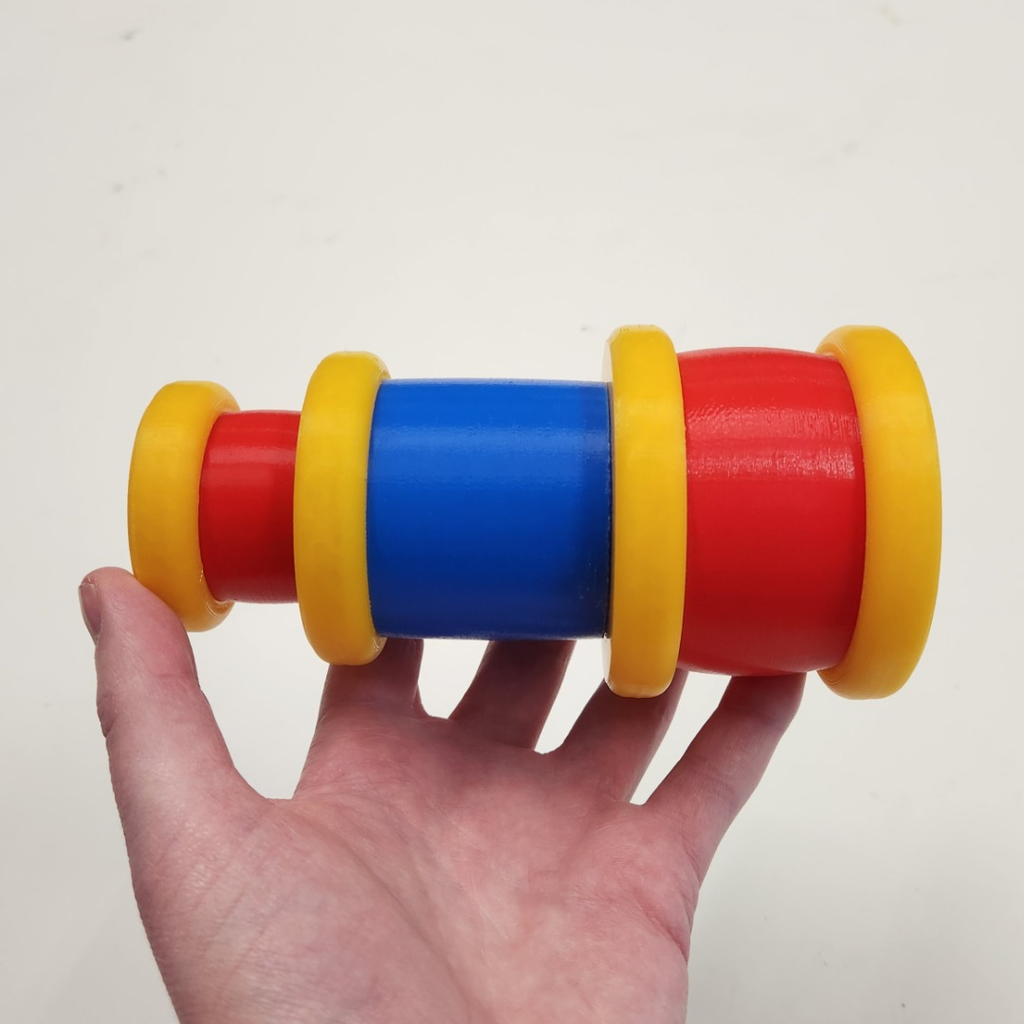
The coolest thing I've ever designed, a Toy Kaleidoscope! Modeled to look like a pirates spyglass, this kaleidoscope will be so much fun to play with! I printed in primary colors to preserve that playfulness. The pieces should slide together right off the print bed. This was designed so that the Barrel assembly (large red end) can rotate around. The rotating makes the beads roll and shift, creating new patterns! You will need to print: 1 - Barrel_Red 1 - Eyepiece_Red 1 - Barrel_Ring_Yellow 1 - Lens_End_Ring_Yellow 1 - Handle_Ring_Yellow 1 - Eyepiece_Ring_Yellow 1 - Handle_Blue 2 - Key_Blue You will also need: 1 - Acrylic circle with DIA: 1" and HEIGHT: 0.125" 2 - Acrylic circles with DIA: 2" and HEIGHT: 0.125" 3 - First Surface Mirrors with LENGTH: 4.365" and WIDTH: 0.9266" and HEIGHT: 0.0575" Sorry for the odd mirror dimensions. I tried to design with tolerances so that the mirror dimensions would be simpler, but the tolerances needed to be greater so that the mirrors wouldn't scratch the acrylic circles. For the assembly instructions, I call the acrylic circles the "lenses", even though they don't actually refract the light. ASSEMBLY INSTRUCTIONS: It can be hard to explain these things with words, so please also refer to the pictures. They are in order of assembly. 1.) 3D print all of the pieces, Cut the mirror pieces to size (CAREFUL!!!), and laser cut all of the lenses. You could probably also cut the acrylic out with a bandsaw, but laser is easier. 2.) Glue the 1" lens into the slot of the Eyepiece_Ring_Yellow. In the picture, I show the lens in the slot with the protective paper still on, but you should peel off that paper before you finally glue it in. 3.) Dry fit the Handle_Ring_Yellow and Handle_Blue onto the Eyepiece_Red to see if it's oriented the right way. Glue the Eyepiece_Red into the Eyepiece_Ring_Yellow, double checking that the correct end is glued in. I think that both ends are close enough that it might not matter, but there is a difference. 4.) Glue the Eyepiece_Ring_Yellow onto the Eyepiece_Red. 5.) Now it's time for the mirrors! I used dark painters tape to form the mirrors into an equilateral triangle, first surface facing inward. Then glue that mirror assembly into the Eyepiece assembly. Make sure not to cover the hole in the Eyepiece_Ring_Yellow so you can see through the mirrors clearly. 6.) With the mirrors glued in securely, you can slide the Handle_Blue piece over them and glue it to the eyepiece assembly. This handle assembly will be one half of our final Kaleidoscope, now for the second half! 7.) This next part of our assembly will not be glued to the first. It will only be attached through the slots in the Handle_Blue. So slide the Barrel_Ring_Yellow onto Handle_Blue. Next, slide the Barrel_Red onto the slots in the Handle_Blue. You can glue the Barrel_Ring_Yellow onto the Barrel_Red, but not onto the Handle_Blue. Secure our new Barrel Assembly to the Handle Assembly by gluding the Key_Blue pieces into the slot holes in the Barrel_Red piece. This part can be hard to explain, hopefully the pictures make things clear. I also added a picture showing how the Key_Blue pieces fit, without the Barrel_Red piece in the way. 8.) With the Barrel assembly attached to the Handle assembly, we can add the first 2" lens into the barrel. There is a tiny little ledge for the lens to sit in, so make sure that it sits flat before you glue it. Make sure the glue is dry before you add your beads! 9.) Add your beads! I chose some that looked similar to gems, gold, and silver. Like pirates treasure! Choose whatever beads you want, but know that my gold and silver beads ended up looking a little too dark. While adding beads, you can glue the other 2" lens into the Lens_End_Ring_Yellow. 10.) With all of the beads in, you can glue the final part! Glue the Lens_End_Ring_Yellow piece onto the Barrel assembly! Now its complete! The barrel can rotate around, causing the beads to shift and produce new patterns! Enjoy!
With this file you will be able to print Pirate's Treasure Kaleidoscope with your 3D printer. Click on the button and save the file on your computer to work, edit or customize your design. You can also find more 3D designs for printers on Pirate's Treasure Kaleidoscope.