Pirate3D Buccaneer Printer Extruder Re-Work
thingiverse
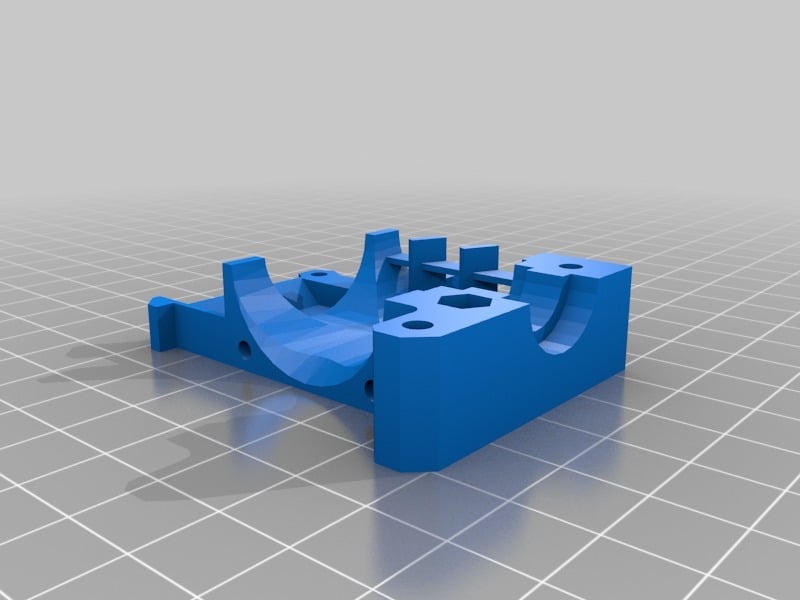
Since Pirate3D closed up shop my Kickstarter Edition Buccaneer 3D Printer (one of the few that actually shipped) has been dead in the water. I have my Original Prusa i3 MK2s so I can still print but decided I wanted to get this printer working again for smaller prints that required only PLA materials. To get this printer working again I will need to replace the existing control board and since the extruder is proprietary I designed this thing to replace the extruder assembly with a E3D-V6 hot end and E3D Titan extruder in a Boden setup. I will be replacing the Control Board with a simple Ramps 1.4 and Mega 2560 setup. This mean all the existing connections for the Y-Max and Z-Max endstop and the X, Y, and Z motors should just unplug from the original board and plug directly onto the Ramps. I will add some 12” long jumper wires for the X-Min Mechanical endstop and the Z-Min Optical Probe as well as some 2.54 connectors to my Titan Extruder Motor wires and the E3D-V6 Thermistor wires so they will connect to the board properly. I didn’t want to lose the existing Optical Probe or have to change the X/Y axis movements and I wanted to add an actual part cooling fan so I designed this file to reuse the existing X-Axis Mechanical Endstop and the Z-Min Optical Probe and will use the same blower fan and printed nozzle file as the Prusa i3 MK2s. **Update 1/29/2018** Got everything wired up over the weekend and was able to get the hot end working and PID autotuned, the hot end fan using the AUX 12V pins next to the X stepper driver without issue. The cooling fan comes on without issue and is controllable and should clear the printed parts with 1-2mm to spare. Everything appears to home properly. I will admit it is quite loud with the DRV8825 drivers but with some tweaking I should be able to adjust it down a little. I'm thinking I may wiring in some TMC2130 once I get everything to where it at least works. When homing the Y I noticed there is a slight difference with where the wires are using this and an E3D hotend. it wouldn't fully engage the Y-Axis endstop. I printed a small angle and just adhered it to the X-Axist stamped frame between the belt to activate it. I did run into and issue though when I tried the first Calibration print. I was trying to use the original Wallart Power supply that came with the Buccaneer as I figured since it was a 4.7 Amp power brick and the fuse for board was a 5 Amp max then it should work fine, but when I starting to print a 20mmx20mmx20mm calibration cube the printer would started a slow stuttering as the hot end heated up and the motors and fans tried to run at the same time. You could watch the Hotend LED's on the board turn on then off for half a second and then back on as it tried to keep up. I believe the amperage is actually at its max as the stepper motors alone at max amperage is around 3 amps (will confirm) and the E3D-V6 will be at 2.5amps at peak. Gonna look into a 12V 10Amp power supply to compensate and then I can test the Auto leveling with the original optical probe and then try to print something. Lastly I have uploaded a new version of the Hotend Body stl as I didn't realize their were screw heads on the bottom of the mounting slide that actually made the assembly sit crooked when mounted. Sitting crooked isn't an issue if there wasn't going to be a par cooling fan but to make it work I added a cut out that should clear the screw heads and sit flush. Again once I'm happy and have everything working I will upload my Marlin config as a starting point for everyone who wishes to try it. Be aware their may need to be adjustments made and I'm not responsible if you mess something up in this process so you will try at your own risk. **Update 2/8/2018** Figured out the stuttering. I honestly just forgot to tune the drivers to the workable levels so they were trying to pull too much power at once. The Z axis motor on my unit is labeled as a Dings Motion stepper motor with a number of 14E2035MG4-050-001. I'm not going to go to in depth into what I found about the number but it is a Nema 14 (the fist two digits) and the 050 part of the number is the amperage for the motor (0.50 amps). I am using the 1/32 stepping and the DRV8825 has a (Vref)*2 to set the amperage to match the motors max amp. I set the Z-axis DRV8825 to .22V so that its not at max and it seems to work with fairly good amount of silence. The X and Y axis are different Nema 14 motors than whats on the Z (due to the integrated lead screw on the Z) with a label on them (hidden by the case) that says they are 0.40 amps. I set these to .17V on the DRV8825 and they also work now perfectly. Everything now moves fine with the original powersupply. I tried again to print a 20x20x20 cube and found an issue with the autoleveling where after it autolevels it thinks the nozzle is at -35mm so it drops to 0 and prints in the air. I am working on this issue now as I beleive its a firmware issue. **2/14/2018** I got the firmware figured out and have uploaded it to the this post.I had to get with the Marlin github guys and worked out the issue. This should get you started (So I will say again, Use At Your Own Risk. Again this is only a reference document. Your stepps/mm might be different, especially for the extruder, depending on what extruder you use and if you use the 1/32 stepping (I'm using a NEMA 17 with the titan Extruder setup as a bowden). Also your bed size may be slightly different so your going to want to adjust. Your biggest adjustment will be with the optical sensor in my opinion. Mine triggers are roughly 6.22mm below the nozzle so that is what this firmware is set to. the repeatability of my optical endstop has a standard deviation of .01+mm so its fairly accurate/repeatable but you may need to adjust this value. What I found was causing my issue in the previous update was after uploading the firmware after making a change to the optical endstops Z position I actually had to run M502 and M500 (in that order) to get my firmware to use the new uploaded version. I am still getting some issue with power stuttering still but I believe that is because I'm using a NEMA 17 for my extruder which uses a bit more power, where the original was using a NEMA 14. I will be seeing if I can take the NEMA 14 out of the existing extruder and replacing the NEMA 17 in my Titan extruder with it. If I can that should (in theory) take care of my final power issue. Worst case I found a slightly more power power supply on amazon if need be. I am have removed the work in progress for this thing but if something comes up I may update one more time but I do have this working on my end.
With this file you will be able to print Pirate3D Buccaneer Printer Extruder Re-Work with your 3D printer. Click on the button and save the file on your computer to work, edit or customize your design. You can also find more 3D designs for printers on Pirate3D Buccaneer Printer Extruder Re-Work.