Plastic Bottle Cordage Maker
prusaprinters
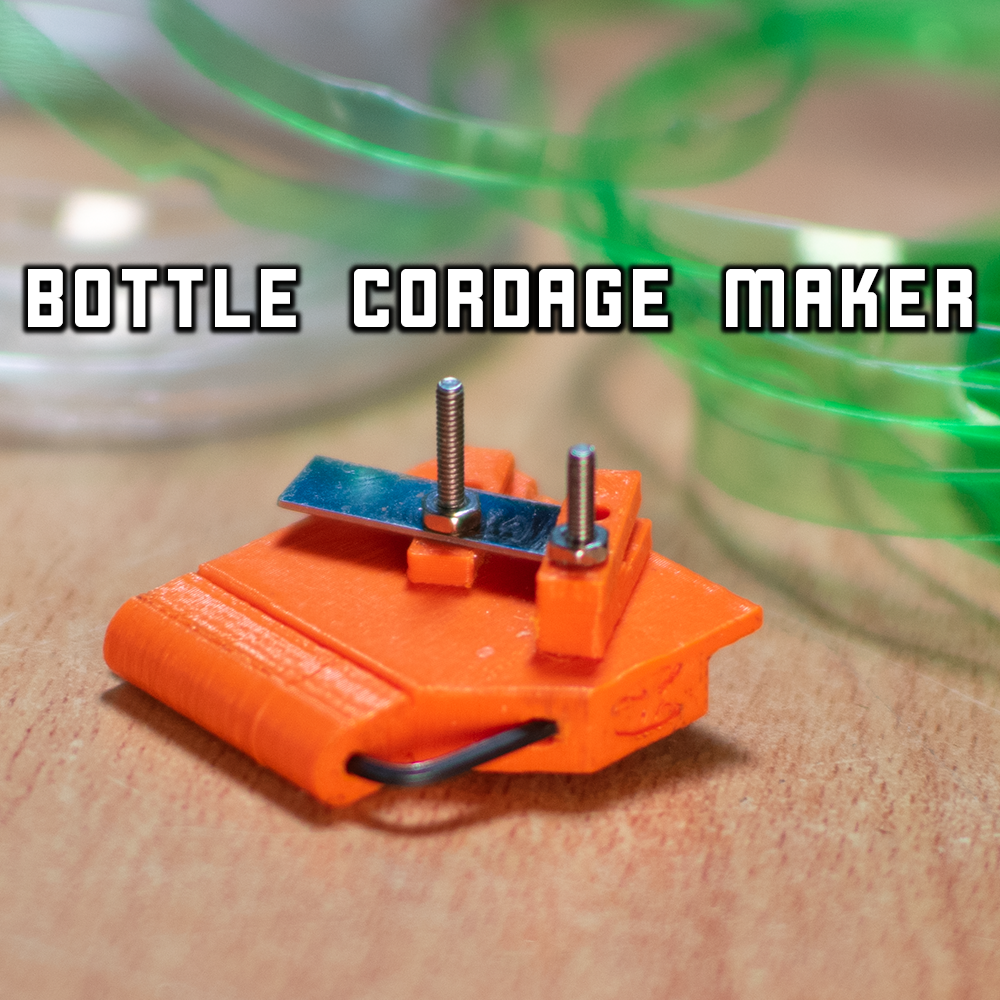
<p>This is a revision of one of my older designs for a bottle cordage maker. V2 is updated to be easier to assemble and use more commonly available parts. The main difference is that version 1 used a small phillips head bit, whereas version 2 is designed around an allen key as the driver. I think this should be much more universally available than the bit from V1. Using a allen key also has a couple of smaller advantages, those being reducing the number of pieces in the model, while also providing the added benefit of acting as a keychain mount.</p><figure class="image"><img src="https://media.prusaprinters.org/media/prints/89527/rich_content/3fc00382-4ab7-4fe9-9122-d8e3633fa4fb/1.png#%7B%22uuid%22%3A%227672f586-5556-4254-aba3-122504a8c69e%22%2C%22w%22%3A1000%2C%22h%22%3A1000%7D"></figure><p>The gadget is made up of a few common parts apart from the printed ones, those being a pencil sharpener blade, an allen key, and 2 20mm m2 bolts with nuts. The device packs down neatly to keep the blade flush and out of the way for transport in a bag or pocket, and includes all the tools to assemble itself within the package. The wrench piece for tightening the nuts is 3D printed and also serves to hold the allen key in place. It is held on with a dovetail tapered on one side to apply slight pressure when fully inserted. </p><figure class="image"><img src="https://media.prusaprinters.org/media/prints/89527/rich_content/16c956eb-f05c-4b8b-abfd-8b1cd9b46252/2.png#%7B%22uuid%22%3A%22193412d8-5dd4-4c73-a8a9-a6466e3f51e4%22%2C%22w%22%3A1000%2C%22h%22%3A1000%7D"></figure><p>There are 5 printed components, and at my regular print settings can be printed in under an hour at 100% infill which is useful for parts this small. My settings, sliced for an ender 3 in cura, are:<br>-0.2mm layer height</p><p>-100% cubic infill</p><p>-skirt</p><p>-0.8mm walls, 2 count</p><p>-ironing on but not needed</p><p> </p><p>The purposes of the cordage or numerous. I personally use mine for outdoors use. Its so small its not hard to always carry on me for the occasion that I have needed it. The cordage produced can be used for all manner of bush craft projects using trash that very likely can be found around wherever you are setup. It is easily strong enough to create lashings for chairs, tables, racks, and other camp gadgets.</p><p>Its use extends beyond outdoors however. The cordage can be used for a wide variety of around the home uses. Some examples of these include tying up plants in the garden, to tie around Christmas gifts instead of ribbon made for the purpose of going to landfill, and many more uses. This video here by roller Scissors shows a few of the uses they came up with for this material: </p><figure class="media"><oembed url="https://www.youtube.com/watch?v=EO2_HOCm2E4"></oembed></figure><p>My personal favourite use however, is making custom cable wraps. I love this because you can make wraps in any size and colour combo to suit the project you are working on, and its really easy to do! First choose the diameter of the wrap you want and find something like a dowel or in this case a piece of bamboo that matches that diameter. Make a slit in the end and thread the cord through then wrap tightly, ending either in another hole or groove or by clamping. Then take a heat gun and heat up and down the length until you see the edges contract in a bit. Once this is done the whole length remove your new cable wrap! I especially like this because of how im able to make cable wraps in specific colours to suit the project im working on, provided I can find a drink bottle in that colour. The wraps are also transparent which is something I haven't seen in commercially available cable wraps. Shown on the right is a cable wrap I made from a sprite bottle. I could get several meters of this from one bottle.</p><figure class="image"><img src="https://media.prusaprinters.org/media/prints/89527/rich_content/4f368993-49a2-415b-b4ec-f32d713a9ea7/3.png#%7B%22uuid%22%3A%223c7a8420-eaf4-4d24-96d5-111de7218d01%22%2C%22w%22%3A1000%2C%22h%22%3A1000%7D"></figure><figure class="image"><img></figure><figure class="image"><img></figure><p>In terms of assembly, I am working on a video covering the new version, but for now my old assembly video still should suffice since the process is virtually the same. Learning to use it is another beast entirely. I do demonstrate it but since making this video ive come across another few tips. Firstly, always start at the bottom of the bottle. Use scissors or a knife to remove the end. Start the cordage by pushing the bottle through the blade until you get a few cms of string. If you mess up like this just use scissors or a knife to cut a ring off so you have a clean circle to start with, it doesn't work well with breaks like these. Once you have a string started push the bottle into your chest and start pulling. Aim for the bottle to be parallel to the top spacer, thats what ive found works the best. Once its started it should just work, keep pulling the string through while pushing towards yourself with the tool. You can shred all the way to the cap of the bottle but I dont generally do this since the cord produced from this end it tightly coiled and not very flat making it hard to use. Again, it's a nack and will take some practice before you manage to do it reliably. Please to be careful when using, you are pulling away from the blade and I have never hurt myself using it but be careful nonetheless, you can optionally wrap the unused edge in a few layers of tape to make it extra safe. </p><figure class="media"><oembed url="https://youtu.be/nFasCILYaHA"></oembed></figure><p><br>In terms of the quick and useful prints project, I think it fits well because apart from fitting the description, this print shows off a printers ability to print mechanically accurate parts that work with no post editing. it also demonstrates a tool that you cant just buy commonly at any shop which is one of the great advantages of 3D printing; the ability to produce small amounts of products that dont need to be mass produced. </p><p> </p><p>as a final note I do intend to release the fusion files open source, but my student trial ran out so I cant export anything till they process my request for renewal :/</p>
With this file you will be able to print Plastic Bottle Cordage Maker with your 3D printer. Click on the button and save the file on your computer to work, edit or customize your design. You can also find more 3D designs for printers on Plastic Bottle Cordage Maker.